• Hi all and welcome to TheWoodHaven2 brought into the 21st Century, kicking and screaming! We all have Alasdair to thank for the vast bulk of the heavy lifting to get us here, no more so than me because he's taken away a huge burden of responsibility from my shoulders and brought us to this new shiny home, with all your previous content (hopefully) still intact! Please peruse and feed back. There is still plenty to do, like changing the colour scheme, adding the banner graphic, tweaking the odd setting here and there so I have added a new thread in the 'Technical Issues, Bugs and Feature Requests' forum for you to add any issues you find, any missing settings or just anything you'd like to see added/removed from the feature set that Xenforo offers. We will get to everything over the coming weeks so please be patient, but add anything at all to the thread I mention above and we promise to get to them over the next few days/weeks/months. In the meantime, please enjoy!

Post a photo of the last thing you made...

Fifty years ago, a long departed girl friend gave me for my birthday a first edition of the late Freddy Forsyth's little novela, 'The Shepherd' now made into a short film with John Travolta as the phantom Mosquito pilot. I had some decent quality thick, bright red, paper so I firstly made a dust jacket for the little book:

View attachment 39009

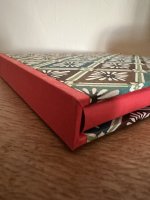
...and then made a slip cover for it:

View attachment 39008

Making a slip cover for a hardback book sounds easy peasy, but it's not, it's bloody 'ard. There are loads of quite good videos on UToob but I eventually decided to follow the instructions from DAS Bookbinding. There aren't many tools needed except for a very sharp craft knife with snap off blades, a cutting mat and steel rules. I used 2.5mm thick acid free backing board from my favourite picture framer in Salisbury and some off cuts of the thick Ferrari red paper for the top, bottom and spine of the slip cover. The diamond pattern paper on the faces is an offcut of Japanese hand printed Washi paper from Shepherds in London, very close to Victoria Station. It's one of SWIMBO's most favourite shops in Londres with all sorts of beautiful, hand printed Japanese and Italian (to name two) papers as well as all the kit and equipment needed for bookbinding.

Freddy Forsyth's little novella is actually a ghost story (based on his time as a pilot in the RAF) and should be read every Christmas Eve along with 'A Christmas Carol', best accompanied by a couple of wee tinctures of the finest malt - Rob
That doesn’t look easy to make at all! I thought the ends were a wood profile at first. Mitred cardboard?
 
That doesn’t look easy to make at all! I thought the ends were a wood profile at first. Mitred cardboard?
Thanks Ian. No, the cardboard isn't mitred but the red paper on the corners is cut at 45deg to wrap around:

IMG_6341.jpeg

....and then tuck inside the slip case. One of the reasons why you absolutely need an über sharp knife; I bought the one linked to and it comes highly recommended, as my left index finger will testify! - Rob
 
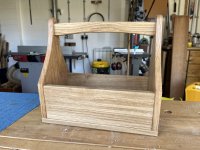
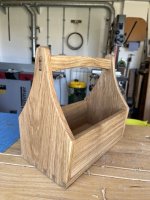
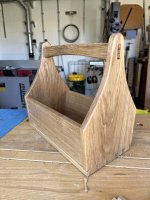
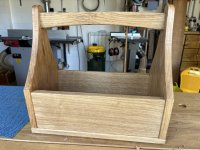
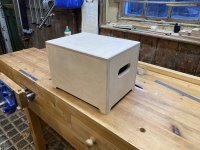
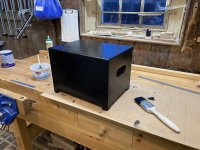
I used up a couple of oak offcuts to make this ...

IMG_7746 Large.jpeg

IMG_7747 Large.jpegIMG_7748 Large.jpegIMG_7749 Large.jpeg

... I think it's called a tote.

It was made up as I went along and consequently the measurement for the handle mortice was wrong. This quickly became a design feature.

I did put the two offcuts through the PT but otherwise it's hand tools only.
 
I used up a couple of oak offcuts to make this ...

View attachment 39269

View attachment 39270View attachment 39271View attachment 39272

... I think it's called a tote.

It was made up as I went along and consequently the measurement for the handle mortice was wrong. This quickly became a design feature.

I did put the two offcuts through the PT but otherwise it's hand tools only.
I really like wooden totes, but I'm yet to make one.

Can I ask how the sides are fixed in?
 
I just used used a long and slender M&T joint Nick.
Did you allow for wood movement in the sides at all?

I've always wondered how best to deal with that with totes.

I guess you could leave some space at the top of the mortise and only glue at the bottom?

Perhaps it's not necessary, but it's something I've pondered.
 
Did you allow for wood movement in the sides at all?

I've always wondered how best to deal with that with totes.

I guess you could leave some space at the top of the mortise and only glue at the bottom?

Perhaps it's not necessary, but it's something I've pondered.
I’ve done it as you describe Nick but would be surprised if it moves.
 
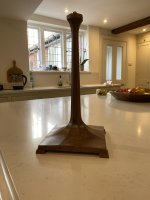
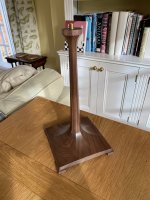
Not the first one I've made or posted pictures of here, but I've made another American Walnut lamp as a present for a relative. It just needs wiring up, but I've got to get it to Guernsey on a plane so I'll do that when I get there. The design is an Edward Barnsley one.

I find it hard to photograph these so here are two shots. The second shows the grain and facet shapes better, and the first shows the overall outline better (the second photo reduces the taper in the stem):

IMG_4474.jpeg

IMG_4471.jpeg
 
That’s excellent Nick. How do you do the facets on the base - spokeshave and cabinet scraper?
Four of the faces are first shaped with a convex round bottomed wooden moulding plane and then spokeshave.

The other four are done with a spokeshave. I will use a scraper to fine tune some of the facets but you can't really scrape across the grain.

Final finish is sanded with a bespoke curved sanding block.
 
For a bit more detail about Nick's lamps, may I recommend this thread from three years ago?

 
As it's an EB design, I don't feel I should do a detailed WIP on this.

There's no rocket science but there are some clever little jigs that can be made.

If anyone wants to have a go, send me a direct message and I can give some pointers outside of the public forum.
 
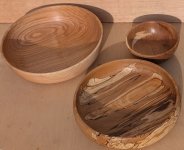
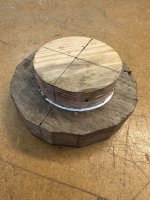
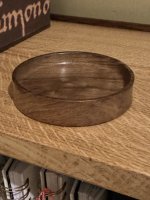
One of a pair of small dishes made from Walnut offcuts after having sorted out timber for my JK cabinet. Made from a blank about 25mm thick using the paper/sacrificial block method:

IMG_6492.jpeg

IMG_6494.jpeg

The dish has a flat interior with slightly concave sides, finished with Odie's Oil and wax. The lightest tap with a chisel was enough to separate the dish from the foot, which will be used again for another project - Rob
 
One of a pair of small dishes made from Walnut offcuts after having sorted out timber for my JK cabinet. Made from a blank about 25mm thick using the paper/sacrificial block method:

View attachment 39461

View attachment 39462

The dish has a flat interior with slightly concave sides, finished with Odie's Oil and wax. The lightest tap with a chisel was enough to separate the dish from the foot, which will be used again for another project - Rob
Interested to hear your thoughts on the Odie's Oil? especially considering its price point.
 
Interested to hear your thoughts on the Odie's Oil? especially considering its price point.
Going off it rapidly! Good stuff but difficult to apply to complicated, fiddly surfaces as it's a thick, gloopy gel....but you only need one coat and it's buffed off with a clean towel inside an hour. It's also expensive but a little does go a long way. The recently finished 'Overflow Bookshelf' was polished with two coats of OO and I've still got loads left....easier to apply if it's diluted with a dash of white spirit, using a separate jam jar.
I'm gradually gathering ingredients to have a go at the genuine Maloof Oil which is equal parts polyurethane varnish (oil based), tung oil and boiled linseed oil, all of which I can buy from the local hardware shop in Wilton - Rob

Edit - @AndyP Lovely stuff to turn, which is why I try and use up all these small bits; they'll eventually go the the District Hospital. The paper/block method means that you can use all the thickness of the blank and finish off in the Cole Jaws as normal, which is what I did on this little dish.
 
Last edited:
Going off it rapidly! Good stuff but difficult to apply to complicated, fiddly surfaces as it's a thick, gloopy gel....but you only need one coat and it's buffed off with a clean towel inside an hour. It's also expensive but a little does go a long way. The recently finished 'Overflow Bookshelf' was polished with two coats of OO and I've still got loads left....easier to apply if it's diluted with a dash of white spirit, using a separate jam jar.
I'm gradually gathering ingredients to have a go at the genuine Maloof Oil which is equal parts polyurethane varnish (oil based), tung oil and boiled linseed oil, all of which I can buy from the local hardware shop in Wilton - Rob

Edit - @AndyP Lovely stuff to turn, which is why I try and use up all these small bits; they'll eventually go the the District Hospital. The paper/block method means that you can use all the thickness of the blank and finish off in the Cole Jaws as normal, which is what I did on this little dish.
Interesting.... I think I'll stick to Osmo and combinations of poly/ cellulose sanding sealers.
 
Interesting.... I think I'll stick to Osmo and combinations of poly/ cellulose sanding sealers.
The problem with Osmo PolyX is that once you've got half a tin left, the damned stuff skins over which then has to be removed with a knife. Irritating it is! - Rob
 
The problem with Osmo PolyX is that once you've got half a tin left, the damned stuff skins over which then has to be removed with a knife. Irritating it is! - Rob
Oh yes. I've had skin up to 15mm thick on my (last) tin of the stuff. It's awfully wasteful, even if you like the finish.
 
With some skin forming finishes, I've managed to make them last longer by cutting a circle of thick polythene (eg from a strong bag) and using it to line all the empty space, pushed down to touch the surface of the remaining oil and coming up the empty sides of the tin.
 
Back
Top