• Hi all and welcome to TheWoodHaven2 brought into the 21st Century, kicking and screaming! We all have Alasdair to thank for the vast bulk of the heavy lifting to get us here, no more so than me because he's taken away a huge burden of responsibility from my shoulders and brought us to this new shiny home, with all your previous content (hopefully) still intact! Please peruse and feed back. There is still plenty to do, like changing the colour scheme, adding the banner graphic, tweaking the odd setting here and there so I have added a new thread in the 'Technical Issues, Bugs and Feature Requests' forum for you to add any issues you find, any missing settings or just anything you'd like to see added/removed from the feature set that Xenforo offers. We will get to everything over the coming weeks so please be patient, but add anything at all to the thread I mention above and we promise to get to them over the next few days/weeks/months. In the meantime, please enjoy!

A Japanese lantern

GaryR

Nordic Pine
Joined
Jan 22, 2024
Messages
761
Reaction score
1,419
Location
Bloomington, Indiana, USA
Name
Gary
My Japanese garden shed WIP thread is up to date so I thought I would show a very much smaller project that got me started with Japanese joinery.

About six years ago I was looking for instruction on how to do more precise joinery and stumbled upon the late Chris Hall's personal forum on Japanese woodworking.

https://craftsmanshipinwood.org/

Unfortunately his forum never attracted much interest and is no longer active. But at that time it changed my woodworking life. Registrants had access to a few project tutorials, one of which was for this andon. If you did the build you got help and advice from Chris. Great fun and I'm proud to say that mine is one of four in existence.

Here is the finished andon. Siamese cat added for scale.

7B16D5E3-2318-481D-AFDF-5A9C8BC9131A_1_201_a.jpeg
A few features that make this lantern unusual: there are, as I recall, something like 114 pieces of wood in the build. I noted that to Chris during my effort and he replied, "Yeah, that is kind of the point."

The only glue used was to attach the washi paper to the four removable frames, and some dabs of glue on through tenons of those frames. The rest is held together entirely with interlocking wood joints.

The wood is mostly American black cherry (Prunus serotina, some red oak for internal lamp electrical pedestal, butternut (Juglans alba for the paper diffuser panels, and bits of ebony for tiny wedges.Here are most of the parts except for the butternut frames.

65622B4E-5BB0-41CC-98B3-A84E68DAE862_1_105_c.jpeg

Conceptually the lantern is built from a joined rigid base and top plate that capture four posts. The kumiko lattice are mortice and tenoned into the base, top and posts. Removable diffuser screens slip into grooves in the posts. The electrical pedestal is captured within the lower base and a handle is captured within the removable insert in the top plate.

I saved a few pictures of the joinery as I went along.

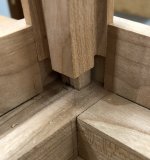
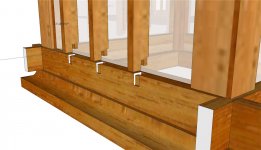
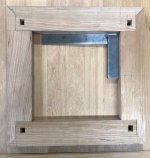
On the square base, the four corner joints are mitred, through morticed and tenoned, and have an additional internal dovetail to resist twisting. The joint is based on one designed as a mud cill/sill foundation for a temple. Far more complex than needed for this structure but it was included as a joinery exercise. A wonderful challenge to get right, especially making both halves of the internal dovetail. I now see it was probably far beyond my skills at the time but that's why I signed up for the job. t

dodai - 12.jpg
dodai in cherry bottom.jpg

The empty mortices are for post tenons. And then it gets complicated. More on that tomorrow.
 
Interesting.

I've not tried making much in the Japanese style myself, apart from lantern screens to fit into stone lanterns in the garden. Not entirely successful as mine struggled with the weather. A Tori gate is on our agenda, but I don't have suitable wood at the moment.
 
Yes very nice, but Gary you really do like to stretch yourself with fiddly bits!
My Japanese style alter/console table is going to have to wait to be finished when it gets shipped over here. That might be a while!
Quick question, I’ve looked and can’t find out how the things to be shipped get in the container, do they bring it to you? Or do they take your stuff away and pack it for you? Anyone done it?
I don’t want my spindle moulder and sash cramps crushing bits of furniture. I think they’re the only bits I can’t replicate over there.
Ian
 
The lantern posts have bottom tenon that fits into the mortice in the base. That little tenon doesn't provide much resistance to racking so the post base is braced with a rigid lapped ring. The laps of the ring are additionally double mitred:

mitered lap joints - 1.jpg

And have half-dovetails let into their inner edges at the corners. Those half dovetails engage their mates let into the outside faces of the post.

corner half dovetails - 1 (1).jpg

Then the post is dropped in and held fast.

679C3F36-BEB8-469D-BEFD-FA654E684C86_1_105_c.jpeg


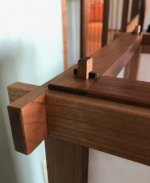
There is a similar lapped, double mitred ring that captures the tops of the posts. It does not have the half dovetails, though. It does carry an inset frame that captures a handle. The inset frame has through mortices for the tenons at the post tops. After assembly the through tenons are fixed with small ebony wedges.


42FC91CA-FFAC-433B-BDDE-062D243C38F0_1_105_c.jpeg
andon ebony wedge - 1.jpeg

Next up will be the kumiko, paper screens, and electricals.
 
Very tidy! I've done a few of these lamps but haven't resorted to Japanese joinery techniques - Rob
 
Woodbloke":5tfq3xjn said:
Very tidy! I've done a few of these lamps but haven't resorted to Japanese joinery techniques - Rob

They are fun projects for sure. This one is more than a little over the top since it was meant as a joinery exercise. It is also pretty large. When I finished it we had to think a bit about where to put it!

The kumiko, 組子. If you consult a Japanese dictionary or machine translation it will tell you that kumiko means "beautiful child." But at as many of you here know the woodworking sense perhaps better translates "thin latticework." It usually refers to the parts themselves rather than the whole effect.

Making these and joining them to the frame was the greatest challenge for me. The strips were 1/4" wide with even smaller, stepped tenons or bridle joints on their ends and tiny mortises for those stepped tenons. I know now that they can be done with hand tools but the tutorial recommended using routers and jigs for greater consistency. I hate using routers but if I was doing this again I would still use one for that reason. Most of the routing work for the mortices I did with a small Dremel router and holder mostly sold to luthiers. Sorry, I don't have pictures of the jigs I used to cut the tenons.

Dremel - 1-1.jpg
kumiko notches - 1.jpg

Here are some drawings from the tutorial. Since Hall's web site is no longer available I don't feel bad about sharing them.The dimension are in decimal inches.

Andon insert lower kumiko ends-small.jpg
Andon kumiko lower end tenon-small.jpg
Andon kumiko mortise on tie ring-small.jpg
Andon kumiko bridle joint.jpg

Off you go. Let me know how well it works out for you!

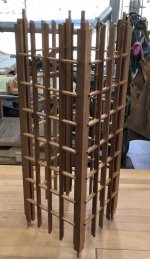
After many kumiko ending up in my artisanal kindling pile and doing the lap joints between the verticals and horizontals and finishing the parts I ended up with these test fits.

IMG_3353.jpeg
F98E84AB-4967-4CB5-8FF6-D805DC6D3994_1_105_c.jpeg
 
Those who have been here a while, Gary, know what I think of the Japanese aesthetic, and of mid-century/ Krenov/ Swedish design. I rarely comment on such projects, and try not to comment negatively. Suffice to say that it's nice to see the joinery.
 
Mike G":50zdt51k said:
Suffice to say that it's nice to see the joinery.
I have a rather good book on ancient Chinese furniture, with many detailed photos and drawings of their work from the 17-18th cent etc, most of it done in a particular form of Rosewood (or similar). The highly complex form of joinery in the Far East evolved (so the book mentions) because at that time, there wasn't a glue available to the craftsmen that would resist the extremes of humidity durning the summer months in that part of the world. Ornate European furniture exported to Japan and China made with hide glue simply fell apart (much as the famed Mosquito bomber of WW2 did, which is why there are virtually none flying today) so they had to devise ways of joining timber that didn't rely on glue. Suffice to say that Japan at the height of summer, when the humidity is overbearing, is definitely not a pleasant place to visit - Rob
 
Woodbloke":8pjns3pq said:
....... made with hide glue simply fell apart (much as the famed Mosquito bomber of WW2 did, which is why there are virtually none flying today).......

I had always thought they were made with urea formaldehyde glue, and that the reason few of them remain is that they were used as target tugs after the war and the arrival of jets. I've got nothing to back up either of these claims, though, and could well be entirely wrong.

edit Turns out I was right on the glue: https://www.sciencedirect.com/science/article/abs/pii/S1874569502800069
 
Mike G":1p6d5mwy said:
Woodbloke":1p6d5mwy said:
....... made with hide glue simply fell apart (much as the famed Mosquito bomber of WW2 did, which is why there are virtually none flying today).......

I had always thought they were made with urea formaldehyde glue, and that the reason few of them remain is that they were used as target tugs after the war and the arrival of jets. I've got nothing to back up either of these claims, though, and could well be entirely wrong.

edit Turns out I was right on the glue: https://www.sciencedirect.com/science/article/abs/pii/S1874569502800069

So did I Mike but it was apparently milk based caisin glue which isn't water resistant - Rob
 
I have zero expertise here and no skin in the plane game. But...

Quite a few WW1 era aircraft survive. They have them at Brooklands and elsewhere and are fairly plentiful. They were made largely of wood and doped canvas. If the glues were problematic, I am surprised that so many have survived. Must be other factors at play surely for the DH Mosquito to have disappeared almost totally.
 
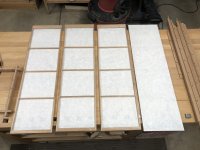
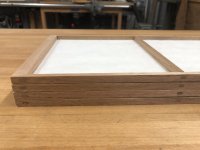
The diffuser frames are simple. Just a frame with intermediate bars. All M&T joinery. One refinement is that the horizontal stiffeners are positioned so that the shadow they cast when the light is on falls on the back of horizontal kumiko making them invisible.

I glued the washi paper (made from mulberry) to the frames with rice glue. Which is just a bit of boiled rice mashed to a paste and thinned with water. After the glue dries the paper is a bit wrinkled at first but after light mist of water it shrinks and tightens up smooth. An advantage of washi paper is that it gets brighter as it ages, rather turn yellow.

IMG_3352.jpeg
IMG_1733.JPG
IMG_3319.jpeg

The the frames are dropped into grooves cut in the posts. This was a test fit. In practice the kumiko grids would be fitted first and the panels dropped in at the last step.

6D348CB4-BF61-4676-B972-42C7A1B5BD3E_1_105_c.jpeg

The pedestal for the electricals is made from two pieces of red oak joined with a double mitred lap. After shaping the parts they also get a bridle joint that is captured by the arms of the base. The assembly could be glued but it isn't really necessary.

3AE607CC-0E3F-4E16-9189-3DF52C99ADDA_1_105_c.jpeg
90A372F2-2687-450F-A99F-E4246E7ACB32_1_201_a.jpeg

After fitting a socket and installing a small LED candelabra lamp.

9729E4F9-D407-4BDF-8A6A-129FBF2F5F99_1_105_c.jpeg

And done.

203034ED-9EDB-4F41-A6D8-0E96EF56B15B_1_105_c.jpeg
 
Nice quality work. Quite delicate.

In England we used to have telephone boxes on street corners that remind me of your lamp. They were always painted red. Those in London often had colourful cards inside as decorations. :?

We need a thread on Japanese tools.
 
AJB Temple":150gmuw2 said:
.....
We need a thread on Japanese tools.

Adrian, do you mean a 'thread' or a 'sub-forum'? If the first then you can start one easily enough.

Did you see my last offer to help you over in the Photos Again thread ?
 
Hello Roger. Yes I did see your offer thank you and thought I had replied to it. My reply may well have got lost in the ether, as sometimes happens. But I have not been back to that topic since then as I felt it was done for me. The time has passed.

Yes, I meant a new topic not a whole forum. I was trying to encourage Gary to start a thread running through his Japanese tools as he obviously has both a selection and some considerable expertise. Although I have a few myself, bought in Japan, and even though I went on a Japanese carpentry course near Kyoto 10 years ago, all of my actual woodwork is still western style so I don't know enough to be a topic starter on this subject. :oops:
 
AJB Temple":3w29lyys said:
Nice quality work. Quite delicate.

In England we used to have telephone boxes on street corners that remind me of your lamp. They were always painted red. Those in London often had colourful cards inside as decorations. :?

We need a thread on Japanese tools.

Not entirely correct Adrian, Kingston upon Hull or Ull for short had it’s boxes painted cream, but I’m sure they smelt the same.
 
AJB Temple":zqc7tweb said:
Hello Roger. Yes I did see your offer thank you and thought I had replied to it. My reply may well have got lost in the ether, as sometimes happens. But I have not been back to that topic since then as I felt it was done for me. The time has passed.
.....

In that case you will have missed my last offer which was to take away the need for you to upload the photos completely. Please pop back and have a look.
 
AJB Temple":1a40e4ly said:
I was trying to encourage Gary to start a thread running through his Japanese tools as he obviously has both a selection and some considerable expertise. Although I have a few myself, bought in Japan, and even though I went on a Japanese carpentry course near Kyoto 10 years ago, all of my actual woodwork is still western style so I don't know enough to be a topic starter on this subject. :oops:

Adrian, I'll show you mine if you show me yours. :D

Actually, the best resource I know for Japanese hand tools is Stanley Covington's web site. He lives in Japan, he uses the tools, he knows many blacksmiths, and he sells tools. Most of my chisels and saws and planes came from Stan. And most of what I know about how to use them came from Stan. He is also happy to answer questions.

https://covingtonandsons.com/2019/05/04 ... ools-blog/
 
Hello Gary

Fair enough! Thanks for the link, I shall have a good look when I get home.

Adrian
 
Back
Top