• Hi all and welcome to TheWoodHaven2 brought into the 21st Century, kicking and screaming! We all have Alasdair to thank for the vast bulk of the heavy lifting to get us here, no more so than me because he's taken away a huge burden of responsibility from my shoulders and brought us to this new shiny home, with all your previous content (hopefully) still intact! Please peruse and feed back. There is still plenty to do, like changing the colour scheme, adding the banner graphic, tweaking the odd setting here and there so I have added a new thread in the 'Technical Issues, Bugs and Feature Requests' forum for you to add any issues you find, any missing settings or just anything you'd like to see added/removed from the feature set that Xenforo offers. We will get to everything over the coming weeks so please be patient, but add anything at all to the thread I mention above and we promise to get to them over the next few days/weeks/months. In the meantime, please enjoy!

CNC Router! (Drawing Ukulele Components)

Andyp":ebqtcvj7 said:
Once you have it hoisted what will the clearance underneath be? How tall are you? Will moving stuff around the workshop be a problem?
I’ve not a better solution other than a workshop extension.

Je suis un petit cul :D I'm not sure how well that translates. :D
 
9fingers":3b722bzo said:
I have a small (5' x3') road trailer stowed in my garage roof hauled up by winch and rope but once in position, the weight is taken by short chains and the tension taken off the rope.
Something similar as a safety measure might be appropriate here too?

Bob

I was also coming to a similar thought, Bob. Certainly if I was only using rope. Even with steel rope, belt and braces is never a bad thing.
 
Just occurred to me that if you had an inverted box structure on the ceiling that you winched the cnc on it's table up into to form a sealed box, it would keep it virtually dust free.

Toggle clamps around the box would both keep it shut and take the weight off the ropes as well as dealing with any chance of rodent issues.

Bob
 
9fingers":27io4on1 said:
Just occurred to me that if you had an inverted box structure on the ceiling that you winched the cnc on it's table up into to form a sealed box, it would keep it virtually dust free.

Toggle clamps around the box would both keep it shut and take the weight off the ropes as well as dealing with any chance of rodent issues.

Bob

I like the idea, but I think there isn't the amount of space to achieve that, and it's adding weight to the tie beams. I've got to move lighting panels and electrical trunking, as it is. I'll look into it.
 
Youre over estimating weight problems. Again, 50kgs (assume 60 including the actual pulleys and ropes) across two beams. 30 kgs per beam. If you were fit and able, would you be prepared to chin yourself up on each beam? Thats about a 100 kgs per beam.

I would not use galvanised wire, galvanising is a very thin top coat over iron. A few lifts and lowers over steel pulleys could easily crack the galvanising, leading to early onset rust in shed conditions.
Very thin stainless cable, and ALL of your maintenance goes away for the rest of your life. :D 8-)
 
sunnybob":hvqz63e3 said:
Youre over estimating weight problems. Again, 50kgs (assume 60 including the actual pulleys and ropes) across two beams. 30 kgs per beam. If you were fit and able, would you be prepared to chin yourself up on each beam? Thats about a 100 kgs per beam.

I would not use galvanised wire, galvanising is a very thin top coat over iron. A few lifts and lowers over steel pulleys could easily crack the galvanising, leading to early onset rust in shed conditions.
Very thin stainless cable, and ALL of your maintenance goes away for the rest of your life. :D 8-)


Thanks, Bob. That's reassuring. Stainless it is.
 
No photos to show, just to post that with the help of the Australian guys,

https://www.cnc3d.com.au/

I can now control the machine from my laptop by bluetooth which means I haven't got the usb cable traipsing across the workshop.

In addition, they say that the bluetooth connection is more stable because it's not susceptible to EMI interference.

Currently machining a collet and cutter holder.
 
Malc2098":26mz33hv said:
In addition, they say that the bluetooth connection is more stable because it's not susceptible to EMI interference.

That statement stretches their credibility somewhat. A wireless link almost never offers greater EMI resistant than a directly connected cable.
As you know from your Wifi experience in the workshop, EMI from your lights caused lots of issues.

Certainly reducing/removing cables draped across the shop is highly desirable so that is a positive.

Bob
 
9fingers":2p68dc5i said:
Malc2098":2p68dc5i said:
In addition, they say that the bluetooth connection is more stable because it's not susceptible to EMI interference.

That statement stretches their credibility somewhat. A wireless link almost never offers greater EMI resistance than a directly connected cable.
As you know from your Wifi experience in the workshop, EMI from your lights caused lots of issues.

Certainly reducing/removing cables draped across the shop is highly desirable so that is a positive.

Bob


I don't know enough to challenge them, Bob. All I know is they make, sell and export their machines and controllers and work through connections problems in their workshops, and with their help I've managed to eliminate them problems that were preventing me from making the machine work.
 
Andyp":3o59t31z said:
How long did that take Malc?

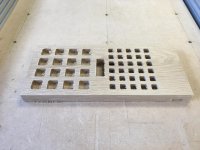
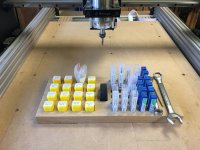
I used it as an exercise. I did the drawing and tool path calculations last night and about an hour.

I did the pockets in batches, so as to allow the spindle to cool down between batches.

I also experimented with feed rates (how fast the spindle moves laterally in mm per min) and pass depths ( the depth of cut per pass). I'm advised no more than half the diameter of the cutter deep. So with a 6mm up cutter, the depth of cut started at 1.5 and I added .5mm at a time till the last batch was 3mm at 1100 mm pm @ 19000 rpm.

That resulted in each of the smaller pockets on the right taking about 45 seconds. So the cutter pockets if done all at that same speed would have taken between 20 and 25 minutes. But, like I said, I do it in batches to let the spindle cool down.
 
Andyp":38hhnnys said:
How long did that take Malc?

Six months to build the machine. Five more to get it working. Four hours on the computer writing the instructions. 30 seconds making it. :eusa-whistle:

Sorry, Malc...couldn't resist. I'm seriously impressed with what you've done.
 
RogerS":nic3d75p said:
Andyp":nic3d75p said:
How long did that take Malc?

Six months to build the machine. Five more to get it working. Four hours on the computer writing the instructions. 30 seconds making it. :eusa-whistle:

Sorry, Malc...couldn't resist. I'm seriously impressed with what you've done.


:lol:

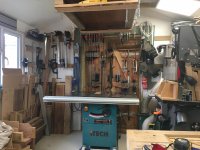
Thanks, Roger. Next challenge is to hoist in to the ceiling so I can access my table saw.

But all the time, I'm learning the complexities of the drawing Cad/Cam software.
 
Hi Malc,

Here is my collet storage, I like having a lid to stop the dust collecting on it.[emoji848]
a586c2177d3874769b19844e6448353f.jpg
 
DaveL":jpe7tomd said:
Hi Malc,

Here is my collet storage, I like having a lid to stop the dust collecting on it.[emoji848]
a586c2177d3874769b19844e6448353f.jpg


Nice! Can I see cog wheels in the background?
 
Malc2098":pydkhfje said:
Nice! Can I see cog wheels in the background?

Er yes, I have bought the plans for a wooden clock and have started cutting some of the parts. The cogs are quite easy, the work holding is the tricky bit, the little ones will be a challenge. The case is a big pocket watch which is going to need some careful planning when I get to it.
 
DaveL":1ugclu87 said:
Malc2098":1ugclu87 said:
Nice! Can I see cog wheels in the background?

Er yes, I have bought the plans for a wooden clock and have started cutting some of the parts. The cogs are quite easy, the work holding is the tricky bit, the little ones will be a challenge. The case is a big pocket watch which is going to need some careful planning when I get to it.

Wow! Sounds exciting. I've used masking tape and CA glue for mine so far for work holding. I am told the trick is to really burnish the tape down to each surface before gluing. Mine don't appear to have moved at all.
 
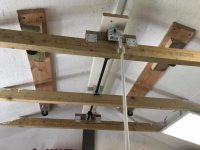
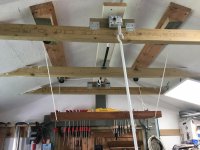
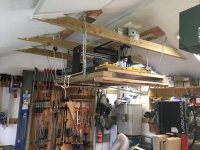
Ceiling hoist fitted. It's one of those that can lift the rook box off your car. 100kg is it's SWL with the poly rope.

F2546BBC-8FA4-4262-924D-9F30A098975B.jpeg

The pulleys are bolted through the larch rails which in turn are screwed with 120mm construction screws into three of the rafters through the OSB ceiling. The hoist spindle is sitting two of the joists as most of its load will be sideways and hopefully equal and opposite.

08993D7A-B100-4AE5-A95D-2C72733B1CB8.jpeg

The lump of sapele is proving proof of principle. Even though the manufacturers state that rope can take 100kgs, I have bought the necessary Stainless rope and fittings and have now got to fit the cnc to a base with a framework that will support it while being hoisted.
 
No doubt it works and is safe but I'd want belt and braces before working underneath the suspended CNC. The reality looks scary to me.

Maybe a couple of safety chains with hooks and eyes that clip on once its up.

Not me under it so do carry on :)
 
Robert":31a9w1m6 said:
No doubt it works and is safe but I'd want belt and braces before working underneath the suspended CNC. The reality looks scary to me.

Maybe a couple of safety chains with hooks and eyes that clip on once its up.

Not me under it so do carry on :)

You're right, Robert, that hadn't escaped me, either.

First time it goes up, I will make sure I'm not alone in the workshop.

Then I will measure the lengths for the chains, bring it down, fix the hooks and eyes, then chain it up before going underneath.
 
An old 60's veneered flush door and some timber and it's got a stable base.

Stronger rope for the hoist, chain and turnbuckles for stowing, and it's up, and I've got my floorspace and benchspace back! :D

5FA5D2E0-EE28-4986-8EC9-C416D4C9D7E5.jpeg67ABC536-255B-47A3-B78E-75E3BDDFDC62.jpeg
 
Glad it’s a success Malc. How does it work though? Is it on a a ratchet somewhere? What stops it slipping back down after you have pulled it up and before you have the chains in place?
 
Andyp":mm47lley said:
Glad it’s a success Malc. How does it work though? Is it on a a ratchet somewhere? What stops it slipping back down after you have pulled it up and before you have the chains in place?


Thanks, Andy. The gearbox has a mark on it which suggests to me it's a ratio of 7:1 (or maybe 1:7) so I think there is sufficient resistance within that to stop it whizzing back. Anyway, this is what it is.

https://www.thule.com/en-gb/cargo-carrier/car-top-carrier-accessories/thule-multilift-_-572004

They reckon it's good for 100kgs. As suggested by Bob9F earlier in this thread, I've screwed 100mm long 6mm threaded eyes into 6 roof rafters, 3 either side, and I've connected them by chains and turnbuckles to 6 eyes screwed into the wooden framework under the machine. Once all six are connected, I loosen the the hoist just enough to slacken it off tension,
 
I missed this post :oops: :oops: :oops:

What a good solution. Nice work.
Really like that idea, could also work for a train layout although the study ceiling is not high enough :lol: :lol:
 
Cheers, Gents.

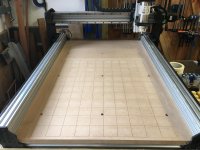
Next job make a proper spoil board, flatten it (tramming), then mark a grid on it and make holes for threaded inserts for work fixings.
 
The spindle has been trammed, I think that's how you say it, but in any case 90 degrees vertical to both the X and Y axes.

That then let me level the spoilboard with a 25mm surfacing bit, and because the spindle was perfectly vertical there's no lines between the cutter's overlaps on the board. It's perfectly level and flat.

Now that's been done, I've engraved the spoilboard with a 50mm grid.

8D7EAC4E-6A66-4BEE-84C6-95ABA390CEAE.jpeg
 
I'm getting the hang of my Cad/Cam software and nearly got the hang of video capture (but not quite ;) ) on my Windows 10 laptop.

This is a simulation of the CNC cutting various internal components of ukuleles I am making. I'm using Vectric VCarve Desktop software for the cad/cam drawing and toolpath creation. The top row, when joined together in 3s, will be for horn reinforcement inside the cutaway mitre joint. The middle row when joined together will make the tail block and the bottom row, the heel block. The holes are for locating dowels.

If only it was this quick in real time! :D

[youtubessl]kYvK7TyN0KY[/youtubessl]
https://youtu.be/kYvK7TyN0KY
 
I have a CNC router project build coming along very very slowly, not even started to build the framework yet Malc. I have one ready built too so no rush needed on the build. I have looked through your post and think you managed to get to grips with the assemble and working very quickly. I was going to use GRBL control software originally but ended up buying MACH3 as I needed it for my ready built CNC. Building a CNC machine and learning all the software and hardware settings is like moving to a foreign country and having to learn a new language and traditions. I'm still in the process of ordering parts for my CNC build and may post on here when I get started on the build. Very nice post Malc.
 
meccarroll":3gbm40ht said:
I have a CNC router project build coming along very very slowly, not even started to build the framework yet Malc. I have one ready built too so no rush needed on the build. I have looked through your post and think you managed to get to grips with the assemble and working very quickly. I was going to use GRBL control software originally but ended up buying MACH3 as I needed it for my ready built CNC. Building a CNC machine and learning all the software and hardware settings is like moving to a foreign country and having to learn a new language and traditions. I'm still in the process of ordering parts for my CNC build and may post on here when I get started on the build. Very nice post Malc.


Thanks, McC.

I've got the sort of brain that can learn the stuff, eventually, but something always has to fall out to make space for it. :D

Do post your build on here. Let's encourage more to develop their woodworking using this sort of machinery. I'm chuffed with the help it's given me with my instrument builds.
 
Back
Top