• Hi all and welcome to TheWoodHaven2 brought into the 21st Century, kicking and screaming! We all have Alasdair to thank for the vast bulk of the heavy lifting to get us here, no more so than me because he's taken away a huge burden of responsibility from my shoulders and brought us to this new shiny home, with all your previous content (hopefully) still intact! Please peruse and feed back. There is still plenty to do, like changing the colour scheme, adding the banner graphic, tweaking the odd setting here and there so I have added a new thread in the 'Technical Issues, Bugs and Feature Requests' forum for you to add any issues you find, any missing settings or just anything you'd like to see added/removed from the feature set that Xenforo offers. We will get to everything over the coming weeks so please be patient, but add anything at all to the thread I mention above and we promise to get to them over the next few days/weeks/months. In the meantime, please enjoy!

Dave's Shed project (progress)

ScotlandtheDave

New Shoots
Joined
Mar 2, 2016
Messages
211
Reaction score
0
Location
Clackmannanshire, Central Scotland
Hi all,

I’ve been lurking for many months while deliberating my new shed design and have changed tack many times, in part thanks to the excellent contributions on here. The time approaches to stop nerding it up and start building, so I’ve broken cover to say hello, bore you to tears and hopefully gather some feedback on my proposed shed design. I will be very grateful for some assistance on a few of the remaining decisions. I hope to learn a lot over the next few months!

Firstly I should state my requirements which may help explain some of my design decisions:
Current state
My 8*6 shed is far too small to be used practically. I currently house 3 pedal bikes, garden tools, and expanding set of power tools, bike tools and paraphernalia and some other junk, plus a full length workbench and vice on one 6ft side. In summary it’s rammed. I have one of the keter storage boxes outside the end of the shed too holding mower etc. It has no electric lighting and it’s cluttered. The current shed doesn’t maximise the space, partly because of the odd shape of space it occupies.

Proposed state
Build a much larger shed occupying the space better with Reverse pent roof planned due to consideration of the neighbours. Proposed size <15sq.m and max height will have to be <2.5m – I’m not interested in pursuing planning permission. Based in Scotland too so I believe my proposal is within planning limits.

Two compartments with separate doors– one large for storing and securing bikes, bench, tools and organised storage for bike bits etc. all in a space where I can work without emptying the place. Maybe even use it for some woodworking projects!
The other compartment will house all garden tools, garden furniture when we buy some and a big weber barbecue during inclement weather.
No windows planned – no need. Security risk from the bike perspective for the main space and no real need for light in the storage area. I’m planning to run electricity in and will engage a qualified spark for this (no part P though thankfully as in Scotland)
Running in mains from the house <10m away to provide light and some double sockets for power tools. May fit a waterproof external socket for running mower and pressure washer too.
Wide doors – modern mountain bikes approach 800mm for bars, so looking at 1m wide doors to get in and out with no problem
I’m 6’2 so would love a 1.85m doorway as I’ve smashed my head enough in the current shed

So that’s what I have in mind so far. Being a nerd with a seemingly endless capacity to overthink things and absolutely hating scenarios where I meet an obvious problem at a late stage I decided to model the proposed shed using google sketchup. It took a fair bit of time to learn the tool and some of its tips and tricks, but I’ll be happy to make most of my major design mistakes in the virtual world :) I can pop the file in one drive for anyone interested - I expect after this post it will be a necessity!

Design decisions taken so far:
The space is an odd shape, like an almost right angled triangle with the nose cut off. I have two neighbouring back gardens to consider. The shed itself will face almost exactly due north, so the neighbours are on the east-south-east side and the south side if you were looking out the door. Both gardens are bounded by a 1.83m fence. Originally I wanted to build to fit the space exactly and quickly realised that with no right angles on any side it would have been impossible to build (it was impossible to model!) so stripped the design back to a wall running parallel to the southern neighbour boundary approx. 400mm from the fence and two walls running perpendicular to this. This means the front face of the shed on the north side is angled at 56.5 degrees. The issue is if I build a rectangle in that space I won’t be able to make a footprint very much bigger than what I have currently, which to me seems rather pointless. The space in front of the shed is largely wasted as it’s just grass and a couple of thrown down slabs, which I could build on and use for storing more junk :)

In terms of neighbour considerations the southern boundary shouldn’t mind the shed approaching 2.5 m as their garden looks onto the current shed and they have 2 young kids, so there is a playhouse in that space anyway – I won’t be blocking light or views. They are easy going too so I don’t foresee a problem. The ESE boundary might be trickier as the proposed shed will block some light from their garden at the very end of the day as the sun is setting. If I put a normal pent roof in this will mean the high point is overlooking their garden (over the 1.8 m fence by approx. 700mm max) and may obscure late day sun slightly. This is why I had the brainwave of reversing the pent to put the high side towards the back of that boundary to appease any potential issues. I don’t know if I’m over thinking this though – I reality it might block a tiny bit of light for the last hour or so of a few of the days per year. I also haven’t approached either neighbour about my plans yet so don’t know if either would be worried. I know I don’t legally have to consider this but I’ve not had a problem with any neighbours so far and don’t want to start!

This gives rise to my remaining challenges to solve:
1. principally spanning 4m safely without skimping on roof joists but not at the expense of headroom,
2. achieving some pitch without breaching the 2.5mmax height and
3. fitting a 1.85m door onto a reverse pent shed with sufficient space to clear eaves and gutters J

I found Trada tables online and it suggests C16 in the region of 6*2, but I don’t know if this is overkill for a shed? I definitely don’t want the roof coming in, but I’m hoping the combination of some sensible trusses plus 18mm OSB? For the roof would help me achieve the span without having to significantly lower the front wall / door height.

Other things I’ve opted for are:
1. I’m opting for this as the shed base. http://www.shedbase.com/probase/ I don’t want to lay a muckle big lump of concrete in the garden and this stuff looks like it will cope with my needs. Costed out at <£300 for the area I need including a bulk bag of pea shingle to fill some voids.
2. EPDM for the roof as I hate roofing felt and being a new build I can hopefully fit this and forget. I also think this will let me use a 1:12 pitch without too much trouble.
3. Cladding wise I love waney edge larch and a local sawmill has assured me they can do a good price on it (to be confirmed) If cost is prohibitive I might only clad 2 edges in it.
4. 75*75 bearers sitting on the probase
5. 19mm treated t+g flooring, possible with a vapour barrier underneath
6. 75*50 wall studs at 400mm centres (not 610 as in the sketchup drawing
7. 11mm OSB lined inside, vapour barrier and cladding on outside
8. No insulation planned for walls or roof
9. 1000mm doors

Budget wise I don’t really know how much most of it will cost, because I don’t yet know what I need.
I’ve costed the base at c. £280 and the EPDM roof would probably be the same again, so I’m expecting little change £2k at least, possibly more if the cladding is pricey. The alternative is to buy off the shelf but to fit the space it would be a full custom job and I am really up for the challenge of building something myself and being proud of the job.

I have looked at a number of the projects on here and they are all very impressive buildings – some of the construction is excellent. This shed will not be in the same league, so I hope you’ll understand my desire to use things like the plastic base. It will be a fairly sizable building, but only used for light duties.

Anyway, as usual I have said far too much, so I thank you for reading if you are still awake and look forward to hearing your feedback.

Thanks!

David
 
Welcome to the forum Dave. Have you been able to find the builds by wizard9999 (Terry) & Mike G? Loads of info there.

When you start the build don't forget the camera, we like photos.

I am sure the more knowledgeable will be along soon to help with your queries.

Edit I'll move this thread to General Woodworking
 
Too many words! I need a pictures :lol:

Drop us a drawing Dave, and you'll get plenty of comments. And welcome to the forum, BTW.

No insulation in walls and roof!!! Well, sorry, but that's the worst decision any shed builder could make (other than sitting the sole plate straight on the ground). Insulation is cheap, easy, and painless. It would be nuts to build a decent workshop and not include it. Without insulation, in Scotland, you'll be using this shed for about 4 months of the year.
 
Hi,

Thanks for the replies so far. I have browsed all of the shed threads with interest Andy and the quality of work is awesome. A bit daunting even :)

Mike G - i'll get you a drawing up and put a link to the latest sketchup file online somewhere - you're right a picture will paint 5000 words in my case :) I take your point completely on the insulation, especially as installing it afterwards would be significantly more difficult. I don't spend much time in the building itself atm as I'm often working on bikes etc, but that's perhaps because the space isn't big enough to work in at the moment and the lack of artificial light is a nightmare. The design would facilitate insulation easily as I'm double-skinning, so will give it some serious thought.

I'll get some drawings up ASAP - thanks all.
 
Dave, there may be a bit of forum software that stops you posting images until you have 3 posts, if i remember correctly. It's to ward off spam-bots. Post another comment somewhere, then you'll be free to drop images in (just host them on Imgur, Photobucket etc).
 
Dave - Looking forward to your build, you will find lots of very useful guidance here as I am sure you have seen from other posts, the photos speak a 1000 words and convey what you are doing clearly. Best of luck as you embark! :D

Dan
 
Hi all,

right, a couple of pics of the proposed development area :)

20160304_175400103_iOS.jpg


20160304_175453682_iOS.jpg


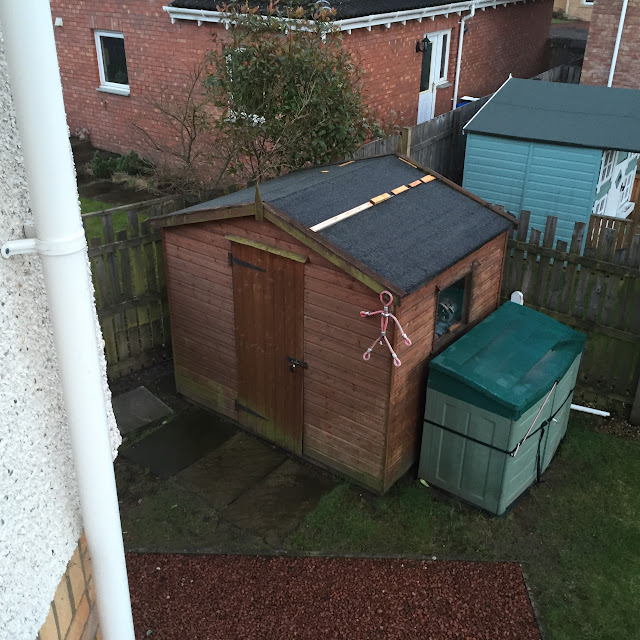
This shows the shed from both angles and the spacing / neighbour boundaries. these pics are taken from the house which is to the North east of the shed (the door pretty much looks north)

Please excuse the horrible condition of the existing shed, the felt needs replaced and it needs a coat of stain, which i may or may not do before selling.

I'll get the sketchup model into a state where it will make sense and post it later tonight too!

Cheers

Mod Edit: Dave you now have made your third post[ and the moderation thing goes away and your posts will appear immediately. Sorry for the delay with approving this one. Bob
 
Hi all,

Sketchup model showing dimensions. This is the top down view, so hopefully you can tie in how the model looks to the photos. I've gone to mm precision with this, so not 100% sure after all this time why the numbers aren't perfectly rounded :)

shed3.png


full hi res link too as thats hard to see. https://picasaweb.google.com/lh/photo/2VGi6Y-Y0m1g9xqP4GocV_UzAiFFdPYyCLRLSr59LNE?feat=directlink

Here's a link to the full model if you are on google Sketchup 2016. As said its definitely a WIP...
http://1drv.ms/1QUdILN
 
That's a very odd shape - have you checked out useful internal capacities by plotting to scale what you would like to store and carry out in there?

Rod
 
I'd echo what Rod said. Your notional floor area is illusory, because that tight corner at bottom left is not very useable. I really can't see the problem in building a rectilinear building in that location.
 
Thanks for your responses Rod and Mike - you've really challenged my thinking, which is exactly why I joined and posted. Initially I was going to respond and say i was making use of the space because it was the only space available to use! Thats not an ideal rationale, but as i said in the OP i went with this design to expand into whats available.

However after a period of reflection you got me thinking. There's no definitive reason why i can't put a rectangular building in there and simply expand further right into garden, building a longer, thinner shed or build over the end of the gravel strip shown in the pictures. This would solve a lot of problems, namely removing the issues with spanning a 4m void and the issue of overlooking the neighbours garden. it would simplify construction somewhat too.

I understand its useful to build in sizes compatible with modern sheet wood sizings, so given its a 4m length at the moment what would you suggest?

Thanks again gents, back to the drawing board!
 
It's only marginally helpful to design to material sizes. Better to design the best building you can, then cut a single sheet of material on each wall. You'll be cutting anyway, because even the best forget to allow for the thickness of the sheets at the corners, and tolerances between the sheets, and so on. The only important dimension when planning around sheet sizes is height: don't have a wall height of 2.5 metres, when sheets are 2.4m tall! (I've seen it done: it's hilarious........when it isn't your own building).
 
Hi, thanks for the advice. I am happy to note I did allow for the OSB tolerances after seeing one of your previous posts so my model allowed for 3mm between sheets and 14mm at the corners.

The plastic shed base comes in 500mm squares so makes sense to try and accommodate around this. I've had a think and reckon 4.88 *2.44 (16*8) would fit ok, but need to get back to the drawing board tonight. Rods suggestion of plotting out storage space and the bench is a good idea too.
 
ScotlandtheDave":26uijap2 said:
Hi, thanks for the advice. I am happy to note I did allow for the OSB tolerances after seeing one of your previous posts so my model allowed for 3mm between sheets and 14mm at the corners.

The plastic shed base comes in 500mm squares so makes sense to try and accommodate around this. I've had a think and reckon 4.88 *2.44 (16*8) would fit ok, but need to get back to the drawing board tonight. Rods suggestion of plotting out storage space and the bench is a good idea too.

Won't that necessitate a change in orientation of the roof, meaning it is side on to the neighbour who you seemed a little more concerned about? Or will you just look to span the 4.88m dimension?

Terry.
 
Hi terry, id be looking to extend the shed width as it stands currently, so instead of making it deeper it would be longer. This would extend along the southern boundary fence, meaning the neighbour to the left of the pictures above would see less of the shed. As always a picture should help and I'll try and knock something up tonight!
 
Hi,

Hopefully this makes things a bit less confusing. It really was a lightbulb moment yesterday when the suggestions were made, to the point where my wife, who had been roped into helping with measuring duties said "why didn't you always plan it this way?" :oops:

Anyway, yet another graphic. So, here's the real world shot:
20160304_175453682_iOS.jpg


and heres the 4.88*2.44 unit from roughly the same perspective:
shed3.png


The pic shows which neighbour is which and you can see from the overlay the new shed wont overlook nearly as much of their garden as the old one. As its tucked away in the corner i'm content that the height wont be a problem at that distance, as there are deciduous trees at the side there that will shade light anyway. This design of roof also makes the span only 2.44m, instead of 4m, so should mean i can use smaller timbers to retain head height and i can also get full height doors in too because the high edge is at the front again.

Happy days! I think i should take a few days away to stop annoying you all and redevelop for a rectangular profile, but if anyone sees any gotchas in the rest of the proposal (points 1-9 in paragraph 97 up there :D ) i'd appreciate your wisdom and advice as always.

Thanks again, been a great help so far.

David
 
Good decision Dave.

One of the first things I always get clients to do is to imagine stuff not being there. Just imagine the location for the building being blank. You've been bamboozled by the unimportant bits of hard landscaping, paths etc, but once you've seen past that you've got yourself a decent looking shed. You image is too small to see the writing, so I can't see what your notes say.....but I can see that you will have a shed to be proud of in due course.

When it comes to designing the structure, I have some important tips for the base, even though you are using a product new to me in place of a foundation. Don't rush on until we've looked at that in detail! ;) :)
 
Hi Mike,

Yes a valuable lesson learned indeed - thank you! The notes are only there to show the shed roof heights (2.4 closest to the front of the drawing, sloping to 2.1 at the rear) and indicating which neighbour is which. I was concerned about blocking light to the garden on the left, but i think the one behind should be ok with it.

I'm intrigued about the base now and look forward to your opinion on it. I have done a bit of research on the product and i believe it will suit my needs and budget, but i haven't seen much real world feedback, especially on the forums here. I know concrete with bricks and mortar are recommended here, but thats really beyond my skill set :)
 
Well, with a 2.4m span and decent drainage in the area of your shed, I think that a reasonable shed base can be made using the stuff you are proposing. However, I wouldn't use their base details, and I have a simple and cheap alternative which should add years to the life of the shed.
 
I wouldn't use their base details
interesting, do you mean the "just lay it on turf" methodology? I was planning to dig out slightly and lay pea shingle to aid drainage and levelling and use some in the grids themselves under the bearers. a bulk bag is £40 delivered oop north.

however..

I have a simple and cheap alternative

the suspense is killing me! :lol:

I did look at slabs and blocks, but the prospect of trying to get 50 odd blocks dug to the right level wasn't appealing. I'm all ears though!
 
No, I would use their product as suggested, although I would suggest digging away the top soil and laying some compressible porous material such as hoggin in its place. (I can never remember the difference between Type 1, Type 2 and Type 3 :oops: ). No, my suggested change would be what goes on above their product. Instead of laying the sole plate of the building direct onto the plastic grid, I would suggest buying those cheap pre-cast concrete lintels readily available at any builder's merchant, and laying those on the grid underneath the sole plate locations, and wherever you need load-bearing (so maybe at the mid-line of floor joists). Seal up the gaps so that vermin can't find a way in, or fill the inside with pea-shingle to the top of the lintels. Getting your sole plate up above ground level is critical to the longevity of any building. You've then only got to bring the bottom your cladding down below the top edge of the concrete lintel and you've given your building every chance of lasting decades.
 
Hogging is a mixture of clay, gravel and sand and good for footways, driveways if you want a countryside/rural/historic look. Can be impermeable because of clay content and not the best choice in this situation.
Type 1 is graded stone and fines mix and is classed as the strongest. Used on heavily trafficked highways.
Type 2 "less" graded but more fines and slightly weaker but cheaper used on minor highways and footways.
Type 3 is generally a similar sized material but free draining (very porous)

Scalpings - generally ungraded crushed rock, a waste product and the cheapest subbase.

Rod
 
Thanks again Mike, much food for thought there. I had planned to use 75*75 tantalised bearers and mount the floorboards directly to this to keep the overall height down, but the concrete lintels will last a lot longer. I'll need to work out overall heights if I add floor joists on the lintels, but I assume if I space them evenly (c. 400mm centres) place lintels along all edges and through the midpoints I could use something relatively low profile i.e. it wont need 4*2 joists. I need to work out overall heights but don't want this to dictate using something that wont be suitable.

Thanks also for the explanation Rod - I had to Google what Hoggin was!

I sense more sketchup coming to design the ground profile and look at working this in to keep within 2.5m
Thanks again for your contributions, it is all very much appreciated.

Dave
 
Rod":2tgwh5o7 said:
Hogging is a mixture of clay, gravel and sand and good for footways, driveways if you want a countryside/rural/historic look. Can be impermeable because of clay content and not the best choice in this situation.
Type 1 is graded stone and fines mix and is classed as the strongest. Used on heavily trafficked highways.
Type 2 "less" graded but more fines and slightly weaker but cheaper used on minor highways and footways.
Type 3 is generally a similar sized material but free draining (very porous)

Scalpings - generally ungraded crushed rock, a waste product and the cheapest subbase.

Rod

Which would you use to mend potholes, Rod?
 
ScotlandtheDave":11zihyun said:
...mount the floorboards directly to this to keep the overall height down, .....
Dave

I could be wrong (I'm sure Mike will correct me if I'm wrong) but you could sink your concrete lintels into the subbase until they are maybe a couple of inches above ground level. That way you reduce your height while maintaining the rot-free benefit of concrete.
 
For domestic use Type 2 as it's cheaper.
Scalpings could be OK if reasonably graded IE a nicely balanced mix of medium sized stones and fines.
Too many large stones - won't compact
Too many fines - won't drain and will be weaker

Rod
 
you could sink your concrete lintels into the subbase

That's another good option. Previously I've modelled the shed base with 20mm above ground (the grids are 40mm high) with the bearers directly on the grids, but I suppose there is no reason why I couldn't drop the grid say 60mm into the ground, meaning 65mm lintels would be sticking out of the ground by 45mm.

Again I'm obsessing over millimetre precision, but I don't have a clue what the overall height will be yet :)
 
You've got to be careful with that, Dave. That is effectively creating a low point in your garden exactly where you don't want water to gather. If you end up having to put a surface water drain in because of this, you'll wish you'd just lost a couple of inches off your headroom instead.

I personally wouldn't be sinking the lintels into the ground. The whole thing is too near the ground for my liking anyway. However, you could notch your joists over the lintels, or hang them from your sole plate on hangers, to get them further down. Whatever your hopes, your floor joists are going to be a minimum of 4x2, BTW.
 
Thank you again Mike for the advice and particularly the diagram. My inexperience is shining through so far :oops:

A bit ashamed to admit my first thoughts when i saw this diagram were "its only a shed, this is overbuilding, do i need all this added cost and complexity?" I know that's stupid for lots of reasons. First and foremost you're giving your valuable time and knowledge freely for no reason other than to help me build a great building and for that i am extremely grateful - If I'd embarked on my planned design it would have been a nightmare. Secondly, I invited comment by posting the thread specifically to see what my design was like :) Finally and perhaps most importantly, you and the other contributors are infinitely more likely to know what works so i have no basis to disagree!

Its just challenging my thinking again, coupled with kicking myself that I've tried to skimp on material sizes to meet some requirements in my head, instead of the other way round. Confirmation bias i think its called.

Anyway, I've bored you all to tears with my pointless rambling again so time to dry my eyes, pull on the big-boy pants and get the bleedin' thing built!

So, before i go off and redesign, from the ground up I can see:

100*150 lintels,
4*2 (95*47) floor joists
looks to me that its 4*2 for sole plate / wall studs too? I've assumed 400mm centres for the floor, is 610 centres suitable for walls or better at 400?
Is it 19mm floorboards with a 3mm gap to OSB above, or 22mm floorboards with no gap?
10mm OSB sheeting inside (i thought OSB came in 11mm?)

I made the following assumptions on the old build:
double vertical studs at the hinge side of doors - no idea why really, just saw it done on another build
I also doubled studs at the corners to allow fixing the OSB adequately.
Is a single 4*2 on the top of the walls enough to seat joists on. I was planning just to put joists straight onto walls.
1:12 roof pitch on the old design to achieve slope over 4m and stay within 2.5m height restriction. I have a smaller span now so is that pitch too low? I am planning on using EPDM to cover the roof which i think can cope with that pitch.
I had previously hoped to "get away with" (now a banned phrase :lol: ) 4*2 on a 4m span, i'm assuming 6*2 is realistic for 2.4m according to TRADA tables. Also I was planning 18mm OSB on the roof sheeting to sit the EPDM on.

Sorry again for another bore-fest. All this handwringing shall be forgotten when the build kicks off. Finally once again sincere thanks to all the posters so far and nothing written above is intended as a critcism of anyone on here except me :)
 
ScotlandtheDave":f93qo6nd said:
A bit ashamed to admit my first thoughts when i saw this diagram were "its only a shed, this is overbuilding, do i need all this added cost and complexity?"
Dave

What Mike is doing is helping you build a 'shed for life', it will last and last and last. If you plan to move in a couple of years or will just be throwing junk into it then it probably is over engineering and I doubt it is worth the investment. But, if you want to be using it in a decade plus and plan to use decent tools in it then based on my experience would be to follow Mike's advice.

ScotlandtheDave":f93qo6nd said:
1:12 roof pitch on the old design to achieve slope over 4m and stay within 2.5m height restriction. I have a smaller span now so is that pitch too low? I am planning on using EPDM to cover the roof which i think can cope with that pitch.
My roof is c.4m span and the pitch is about 1:7 if I recall correctly. Earlier today I was watching the water streaming off into the gutter, so I'm sure that will be absolutely fine. I seem to recall people quoting 1:40 being OK for EPDM.

Terry.
 
2% is stated by EPDM manufacturers.

4x2 will be fine if the vertical stanchions line up with the roof trusses IE the horizontal load is carried by the vertical studding. Over windows -might need doubling up to act as lintels.

18mm fine for roof and 11mm for walls.

Rod
 
what Mike is doing is helping you build a 'shed for life'

Indeed, I couldn't agree more Terry, exactly why I was annoyed at myself for thinking it at the time. It's doubly annoying because I know it's good advice and in my op I said I hate making mistakes, so even more dumb to ignore good advice with a character trait like that in me :lol:

I probably didn't need to vocalise what I wrote above to be honest, more for my benefit I guess than for the reader, public chastisement for idiocy.

Needless to say I will gladly absorb the forum wisdom and continue to appreciate the fact that total strangers are willing to help. hopefully one day I can contribute something back.

Thanks for the note on epdm, it was your build that inspired the idea as you made a cracking job of it.
 
ScotlandtheDave":2fkhfsnb said:
......
So, before i go off and redesign, from the ground up I can see:

100*150 lintels,
4*2 (95*47) floor joists
looks to me that its 4*2 for sole plate / wall studs too? I've assumed 400mm centres for the floor, correct is 610 centres suitable for walls yes or better at 400?
Is it 19mm floorboards with a 3mm gap to OSB above no, or 22mm floorboards with no gap?22mm yes: t&g (ply is best, chipboard is fine), and yes, there should be a small gap to the wall cladding
10mm OSB sheeting inside (i thought OSB came in 11mm?)11 is fine, but my supplier sells 10mm

I made the following assumptions on the old build:
double vertical studs at the hinge side of doors both sides, the inner ones being cripple studs to support the lintel - no idea why really, just saw it done on another build
I also doubled studs at the corners to allow fixing the OSB adequately.
Is a single 4*2 on the top of the walls enough to seat joists on. I was planning just to put joists straight onto walls. yes, so long as the rafters/ joists sit directly over the studs
1:12 roof pitch on the old design to achieve slope over 4m and stay within 2.5m height restriction. I have a smaller span now so is that pitch too low? I am planning on using EPDM to cover the roof which i think can cope with that pitch.1:50 is all you need, 1:40 would be great
I had previously hoped to "get away with" (now a banned phrase :lol: ) 4*2 on a 4m span, i'm assuming 6*2 is realistic for 2.4m according to TRADA tables. Also I was planning 18mm OSB on the roof sheeting to sit the EPDM on. 6x2 (just!)......you could do 4x2 if you had a centre purlin, but you'd bang your head on it every time you used the shed! Besides, you need the 6 inch depth for your insulation.

ScotlandtheDave":2fkhfsnb said:
Sorry again for another bore-fest. All this handwringing shall be forgotten when the build kicks off. Finally once again sincere thanks to all the posters so far and nothing written above is intended as a critcism of anyone on here except me :)

Not at all. Now is the time to do it, not once you've started. I always tell my clients "make your mistakes on paper. It's much cheaper that way."
 
Hi all,

Sorry for the radio silence since the last update. I'm in the process of redesigning and things are progressing, albeit a wee bit slowly. One thing that has caught me out is the difference in standards for wood sizes. I didn't realise that regularised wood can be so different between nominal and finished thickness - every day is a school day. I'm also starting to price materials to get an idea of overall costs. Ideally I'd like to use some of the easter weekend to move the existing shed and begin groundworks.

More updates as they happen!
 
Hi all,

Project shed has officially broken ground! It was a beautiful weekend in the shire so i took the opportunity to start preparations by emptying and shifting the old shed out of the way. Here's a few shots showing the positioning of the current unit, minus all the junk that had accumulated behind there, such as the rarely used compost bin:
y3mGjjr3THDU9uzqeLufU6dmudwGdb_I2vHWVJOzMt9zrbhksjor2Fe5dAdmDkDGHMuhGP21JMn_dNXuZ6DlVbr7pkYs7Jyl_7x1aumbwwl2Hg_3IJZQvy2Y_R0HGoQJMCoBkaAXk7_bnFRFURWTypbDM5GUrdb5_qHcKzBzXrqShc

y3mgoBUeTcQEbQCZDpkKOOG3xb6hr5g1UVgDfRHLMMBy4N6akqx9yErRHvQ95X21ZgZtgcRh1Q4bawT-cA32oKIBaPJ0V2XYO3lnfqlV92SkFNanIzkskS4CjIw73-ClxC-DCid3bC2iwy8aIRwVDgfGMrg-Pf0PEzT1K1cHChZRnk


I temporarily laid some slabs on the turf to keep them out of the way and provide a bit of stability. Now that i'm no longer building on this bit i will lay slabs here eventually.
y3m1Q56N_1Va1ZLm300Y-YpcomDXMo6uQIvto5moXXN0IRITMEWdY2QDcmZ884CMW59xIxz_jQpUufGpKfhm0KfiTdh_xWg5Xv6S99Mth1hdbHlBJKR5ytjvPms-slcIFz9UI9Se4KEulh2Rh4DGKZS7xX_ZfFOZgRhY4K0K1CnLOk


Let me tell you at this point i was flabbergasted at just how much i had crammed in the place! I was going to post a pic but no point making it obvious what is in there :)

Bit of a brainwave when it came to moving the shed single-handed, using egyptian methods. Luckily i bought a car jack for getting under low profile cars, it also works at getting under sheds too. I've heard of a car-jacking, but never a shed-jacking...
y3mU4zjQA2asPfkKu7ZCKyuxtruRu_LsaplqpJ4nG_PQ28NqcIFGv2QY2azD90UrbTjVbKb0TcIPd03aYvzDDYTbotIc-AMLNXn8QG5GhZhlFcxwhSn5B2DT4hd9icEKtaz0Lk8Hot56Ztk0wjCmJpprjKemWC4vj43t8-O4LPMzv4


Its worth noting this shed was erected in late 2006, so been down for 10 years. The bearers it was sitting on were a bit rotten at the ends, so getting the new shed off the ground using concrete lintels is a good call Mike G :)

The brainwaves just kept flowing with the composter sides used as runners. it actually worked really well and made shifting the shed a breeze.
y3m0o45mFjiaP_8YhR3WxgcN8R7MfZVWnkma_YstEHorFp9PtAOrFq2_MyjbsDI3ayI8BgbY-UMHeBDB1jY18xp3onD7JkMBm5V8RHg0VWxgI-nzyL1MFHHtHW0y1ufZqf9tKktqobkIAj96jV3iymqYbklWiKTRW0t6rVgyokFgfw


A wee pic to show 2 things: 1. how beautiful a day it was and 2. just how well it worked, shifted it 10.5m!
y3mKspkoXuS8JNTXeSD0cmct2TBaptQ7-H8lIGk37ZMXpReuUpIDIrY4S4FkdNJm0KubT7gq8e2HFedJ3vK_2CCv7GgBF2s364UzKfQPHUIgjZ309oZkiZPnhf7qdPIIIi3NlQdWNBEhDlyuPsgo7TbtkNyWQ02KIBj-nkDpukmCi0


A wee bit heath robinson, but it got the job done
y3moWEsDtdzsJ6xOYfHCudFCIC41X3FJpJ-bUtdPpvv68CYvhLJ6v_vwL8BCsAsBEbzpSoTJ9ToVlutVRPC4Yi620xbuWrGu-_pqgDjI2WxmJ1xYzSfPtN5msnWVuemogcHo1Hlxrn2BpLc7vbftb_7h7B19oaBnW_PUiD5UG3vvak


I also lifted and shifted the original slabbed base as it was only bedded on a bit of sand and not really useful to keep. Pic specifically for Dave R the Sketchup guru :)
y3m7fNdlSFcsqybfsn93RjRyziQ2V_tLywvckT35TBjRFH_L6rghfcrYntoeSo5ipSrN7RAUMP0JyIdkojA3DHos5GcquQzAc7Giz5cAUbEtuOhRIKQdOLF6tKYK5VPcn7qPdc_zIOBnn2SaXQjCoGgqQEhBGvfhURBidjLxR5jQ_o


Time for a gratuitous dog pic, the the shed contents strewn across the garden. Archie made a rubbish site foreman..
y3mOdTvQbiYNZFbSN1dWDMhIrt2WM8fN-V4m03BbNvLjTL1IHNWNTgD94e8TUHsmrCDO4csqgyFgJWhv5eiUFCeN43pa9ErEwp27zT8oBdXg1oFODay-Wn_qrRePI_fhah8OHUyqvPETE3cajC02PbeZxpX7WmgBDMm66gRHDSO8A4


Once the shed was empty and shifted i thought i'd have a better look at the base after it was delivered last week. This would also be useful it setting out as the grids are exactly 5x2.5m, so no real need to measure, just lay out the grids and make sure the clearances are ok at the side and rear.
Here's 1 row at 2.5m long:
y3mljlQhzVDUSK8aAsi0l4Eo0_JRlkS7J25dDb74Q-V7wGdU-SdskIBwt9j9a2po-EVTsXZolONnsi-2Vh2gNZ-Rr9Vi82W20Hyi9u6tTo_EjDZDrzammAoQxNeoahizdll7KX_61E3T7N9LLZvoAziTqqQ3Daw75Gjco2NfQ1bLow

and a close up for those interested:
y3m1W49f7GtOAcGNPwyM6ihr8koEcj7QepB1OxbaoGGnXi3qMMmJ3XlA6IyjVqUAtO-7aEtfCGYtoUTvADoyxcRmgE3rwQ1_VKy5JFXm0qXpdBnFanthR8GUmZAhg4QzRxHANHaA9dStdEmZISTGwjr1dI2pfoPKku2_O6jI1tRfwU


They do seem good quality, so we'll see how user friendly they are and most importantly how good they are!
Pic with the full 5x2.5m base down. the eagle eyed viewer will spot the gap isn't consistent - it will be in the final config :) The holes get filled with pea shingle to aid stability but since they aren't directly bearing any weight i opted for 38 grids. I'll also have to adjust the path to accommodate the shed crossing it, but its worth it to make the build easier. Another "watershed" moment thanks to the contributors here :)
y3mXXU0uAwyi_5sCewXWVkrbAnzDFWt0eO6nsOqWq26vzn5M8gDP4SBkEGYeNYmxQw5_4OFTKc794Dk1iwQKSdc68hbgJ_dqRWWuUBrJ2QQf1qbx9mnczc1MJBa7IWoUq6a_qjvgcVBbxgWXkGPQ0yudfr1pK2L8kyN6HDROT0Pd4A


I've nominally elected for 500mm gap from the fence at the back and 600mm sloping to 1m at the left side. I think this should be enough as it will let me tie the hard landscaping in ok at the front without skimping on the gap between the shed and the fence at the back
y3mp6kQSbLMbILxgug3ywczCSmam_SwWnlSGXvFb6MUTcdVNB6yQXu7-y9E1ZGgTCmLslvyspjkBcqEVhIeuwuDji4FoeDFtBgIjUBOlH6QkRtCEE7d__P53sa5A9cmVZJYdwEK8X0QhossFBM-IJqatI9Bsg5hSIrn9pB88r00R7Y


Finally a shot of muttley looking on whilst i sneak a well earned rest in my makeshift recliner :)
y3m0OMUFcydpcZIEiZizD-A7gFn25o5S2zXnaip_ThZ-q6Qz9nJzkCKBNobZ5A_2mMaxmXRwGhZSq9PW5gtQD8dCrNw4dBVv2kcuvMuNu0G3VoEmXxbS1QkvAcjgOYk-mnn7Z3hYlq2NCz_VQAQfNF5dqmoMWhJxtZf-UNpZCVKGFM


I have a question re the sub base if anyone is still awake..

I was going to build a miniature form around the 5x2.5 grids, making a very slightly larger rectangle so i can dig out out, level and fill to the required depth with type 1 before compacting. Once i have it solid and level i can lay a weed membrane and finally the grids, then the lintels. I'd like to do the ground prep over the easter weekend so when i get back from hols mid-April i can crack on with the wooden structure itself. the question is how much type1 should i need? At 60mm depth on those dimensions i think that would use 2 bulk (800kg) bags of type1, so i'd rather buy more bags than less. Will 60mm depth be enough?

Hopefully you've enjoyed instalment 1!

Cheers

David
 
Nice start, Dave!

5x2.5 = 12.5sq.m

12.5 x 0.06= 3/4 cubic metre.

From here: http://www.diydoctor.org.uk/tips/tipsconversions.htm there are 1.92 tonnes per cubic metre of Type 1, so:

.75 x 1.92 = 1.44 tonnes. So, on the face of it, two bags (1.6 tonnes notional) should be enough.

However.....

I would be digging away all the top-soil. That is, everything with any loam in it, or organic matter. I'd be surprised if this amounted to less than a spade depth (say 250mm). That doesn't all need to be type 1 back in its place, as hardcore would do perfectly well.
 
Back
Top