• Hi all and welcome to TheWoodHaven2 brought into the 21st Century, kicking and screaming! We all have Alasdair to thank for the vast bulk of the heavy lifting to get us here, no more so than me because he's taken away a huge burden of responsibility from my shoulders and brought us to this new shiny home, with all your previous content (hopefully) still intact! Please peruse and feed back. There is still plenty to do, like changing the colour scheme, adding the banner graphic, tweaking the odd setting here and there so I have added a new thread in the 'Technical Issues, Bugs and Feature Requests' forum for you to add any issues you find, any missing settings or just anything you'd like to see added/removed from the feature set that Xenforo offers. We will get to everything over the coming weeks so please be patient, but add anything at all to the thread I mention above and we promise to get to them over the next few days/weeks/months. In the meantime, please enjoy!

Fixing a stripped thread

Steve Maskery

Old Oak
Joined
Jul 27, 2014
Messages
2,374
Reaction score
1,329
Location
87290 Laplagne, France
I used to have a Record CL3 lathe. It was good. It grew legs. If you have it, I'd like it back, please.

My mate Stuart had two lathes, but only had room for one. He kept his Eliot(?) and sold me his SIP. It's a picee of junk, in oh so many ways. Designed by a 14-year old on Work Experience.

The banjo has two holes for a Bristol lever. The Bristol levers themselves were the cheapest nastiest things you could ever imagine trying to use to tighten up anything at all, so a few years ago I replace then with some rather splendid ones. Proper job.

I don't do a lot of turning, but recently I had A Job, and in the long, frustrating and generally not-at-all-enjoyable process of it, I found that the tool rest was not being held peoperly. I'd stripped the thread in the Gorgonzola-like banjo.
For now, I can use the other hole, but sometimes it is the stripped hole that is more convenient.

I was discussing this with my mate Dave and he suggested that I investigate JB Weld. It is available over here, at a price, of course.

Is it as straightforward as slathering thestuff inside the hole, inserting a very-well-greased Bristol lever into it whilst still wet, then removing at some critical moment when the Stuff has set up but not yet made the whole thing one solid, unuseable mass, then waiting for maturity and the world is (as) right (as it will ever be) again?

Has anyone actually done this? Any advice or better ideas?

I'll never see my own lathe again, and whilst I could just go out and buy another, I turn so rarely, it's not really a sensible use of woodworking funds.

All input gratefully received.
 
A Helicoil would be my preferred method of repair for something like that as it will be stronger than the original thread.
 
OK, so I've googled.
There are plenty of Helicoil repair kits available here in France, but they are all, as far as I can see, without exception, metric. This is not a metric thread. I can't remember what it is, but I could probably find out what I bought, About 5/16 or 3/8 something or other.

I realise that I could drill the hole out and make it metric, but then I'd have to change the Bristol levers again and so it goes on.
 
How about drilling it out slightly then welding a nut of the same thread as the lever, that is if there is enough thread on the lever.
 
Or weld the hole Steve and tap it to suit the lever. Taps are almost certainly available, I might even have one in my box of odd sizes. You need of course to determine the size and pitch first.

I use JB Weld regularly and it's good stuff but I'm not sure it will hold as a thread when tightening down hard. It can't surely be so expensive in Froggyland? You will find other uses for it if it doesn't work so maybe worth a gamble as it keeps well.
 
A pic. of the offending cheese metal banjo might help offering a sound mechanical answer.

For instance:- could you recess and epoxy a suitable nut in the rear of the stripped hole?

nut.jpg
 
We use JB weld in many circumstances - including as a packing medium for re-tapping holes - at our heritage railway. In that respect, it will hold a bolt, and hold it strongly in the face of quite a lot of vibration when we subsequently run the vehicle.
I am not so sure it would stand up to repeated tightening/loosening, and on a lathe, I would be apprehensive about it 'letting go' with injurious results.
Sorry Steve. But, helicoils have been around for decades and are simple to insert.
 
Is it this one that I've pulled off another one of your threads Steve?

1735432093511.jpeg

If Helicoil isn't an option (they can be expensive just for one job, especially outside of metric sizes), I'd be tempted to affix a reasonably thick steel plate to the side of the banjo and thread a hole in that for your 3/8" Bristol Lever.
 
That's the one. Well, actully, that is the remaining good one, but there is an identical hole on the opposite side and that is the one that is stripped.

I'm pretty sure I could have got one easily enough in Mansfield, but I've no idea where there is an engineers' merchant in these parts. I'll keep looking.

Thanks for all the info, folks.
 
Steve see if you can find a ferronnier (blacksmith/ironworker) locally.
my local one was very happy to do something different to the sheet metal work and staircase building he was more used to and was happy for a bit of cash on the side.
 
Does it have to be on the opposite side?
Could it be 90 degrees from the other two, on one of the other faces? Then all you'd need to do is drill and tap to suit.

Be wary of welding if the banjo is cast iron, esp that close to the edge.
Duncan
 
Another vote for a helicoil (or v-coil, which is another brand that tends to be cheaper).

I'd imagine getting metric levers would be quite straightforward in France after you'd fitted a metric coil? Most imperial coil kits are likely to be American thread sizes (e.g. UNC) which might just about work with a BSW thread but wouldn't be ideal. UNC usually has the same pitch as BSW (UNF differs to BSF) but a slightly different thread form. Mismatches on the coarse thread pitches (e.g. BSW screw in UNC hole) often work okay but not guaranteed. Metric will just work of course as you'd be changing both halves.
 
Last edited:
How often do you come to the UK? I've got most sizes of (metric) coil kits so I'd be happy to rethread it for you. I'd guess post back & forth would be prohibitively expensive but if you were over here for other reasons then I'm sure we could sort something out.
 
Thank you all, most generous of you.
I've ordered a little kit, we'll see how well it works.
Although everthing else of mine is metric, I'm reluctant to swap out the thread to M10 simply because these are most very excellent Bristol levers. I'm not much of a metal man (that's what friends are for :) ) but looking at stuff on YT, I think even I can do this.
I'll keep you posted.
 
I have used JB weld a few times, for example trying to reattach parts of a chimenea: door bolt and cowl. It worked for a while but eventually failed. To be fair it was outside and subject to temperature fluctuation. Not sure I would trust it on a rest where I am using sharp tools.

Edit: pos crossed with Steve's
 
Last edited:
+1 for Helicoil (or equivalent). As a yoof, I was told that a properly done Helicoil is stronger than the original thread., and like many others on 'ere I've had very good results, for example in motorcycle cylinder heads.

My SIP bandsaw is wholly metric, so I'm surprised your lathe is imperial. If it really is imp. you can get Helicoil sets, as they're used a lot by vintage machine and American car enthusiasts. Anyway, I just did a Google search here for "Helicoil UNC" and found quite a few UK-priced vendors. Kit prices obviously vary, but they're out there.

And finally, you don't necessarily need an imperial thread kit. The process is that you centre carefully and drill out the damaged thread, to match the tapping-drill size for the outer thread of the Helicoil. The Helicoil simply needs to fit the newly-drilled-&-tapped hole - metric would be fine if you wanted to go that route. Some sizes, for example 1/4" and 6mm, are pretty close, and you might find 8mm or 10mm will do it nicely. You're not relying on the original threaded hole, except for centering purposes. Of course, there is an argument that imperial threads are inherently stronger because of the thread form...

Realise I'm repeating some of the discussion above. Apologies.
 
Last edited:
I've used helicoils a few times to remedy my ham fisted over tightening tendency. They work very well. I'm told that some engine rebuilders will fit them as a matter of course to threads in an alloy engine blocks as they're stronger than the original thread.
 
I'm told that some engine rebuilders will fit them as a matter of course to threads in an alloy engine blocks as they're stronger than the original thread.

That's definitely true in aluminium - it's simply a case of the thread size being larger (and hence stronger) in the aluminium part and the thread that will wear with repeated insertions/removals is all steel and hence more robust.

I'm not as convinced that they're stronger in steel (although I doubt they're much weaker).
 
I have used JB weld a few times, for example trying to reattach parts of a chimenea:
Adrian, you do know heat - as in chiminea - wrecks JB? Assuming your chminea gets to about 600 degrees - normal for a wood fire, which can go as hot as 1000 degrees with a bit of encouragement. Same holds for many epoxies and cyanoacrylates.
 
Is there a chemist in the house?

You can apply a blowlamp to epoxy to break it down, and it works fairly well, but...

... it seems to off-gas something volatile, which, if trapped, causes "small" detonations.

This (definitely) surprised me.

It's a reason for not using heat on epoxied-up cast iron threads, too: you might release the stud or whatever, but by stripping the rest of the thread as it launches the stud in the direction of your overhead fluorescent tubes.
 
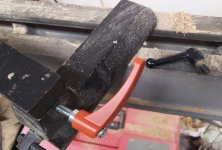
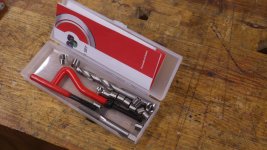
Well the repair kit arrived this morning. The case was broken but the contents were all intact.
the kit (Medium).JPG

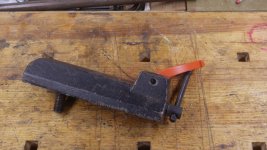
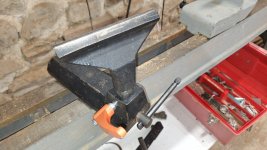
This is the offending hole
the offending hole (Medium).JPG

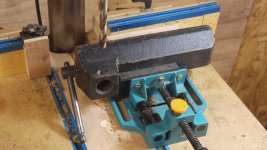
So the first task was to drill it out with the supplied drill. Easy-peasy.drilling (Medium).JPG

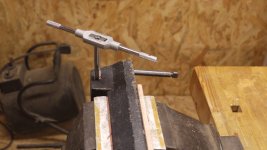
The tap with the supplied tap. I must get a better tap wrench, mine's a bit weedy.
tapping (Medium).JPG

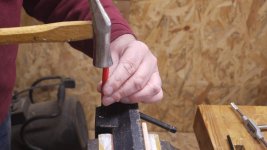
Unfortunately the photo of inserting the helicoil is miles out of focus (unless you want a good view of the back wall), so, moving on, I knocked out the tang
removing tang (Medium).JPG

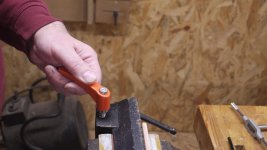
"This is easy", I thought. I should have known better. The instructions said to insert the helicoil half a turn below the top surface, so that's what I did. Unfortunately, that meant that it stuck out of the far side and I couldn't get my tool rest post in. And because I'd knocked off the tang, I couldn't move the helicoil. And I've only got one eye at the moment and can't see what I'm doing anyway.

But eventually I got it out and installed new one properly.
test fit (Medium).JPG

I thought I'd do the other side while I'm at it, as It seemed likely that the same thing could happen to that thread, too. So I installed a helicoil, not too far this time. Quite a lot of the insert was sticking out and when I tried to insert my Bristol lever, it wouldn't go in. I couldn't figure out why, and, as I say, I can't see very well.

To cut a long story short, the thread had become distorted due to lack of support and I had to replace that, too. But all's well that ends well
installed (Medium).jpg

I'm just not sure now what to do about the excess thread sticking out. I think I'm just inclined to leave it alone.
S
 

Attachments

  • P1070808 (Medium).JPG
    P1070808 (Medium).JPG
    100.2 KB · Views: 4
I must get a better tap wrench, mine's a bit weedy

There's a lot to be said for using the smallest tap wrench you can get away with: it's much more likely you'll feel any strain in the tap if it starts to bind and you can reverse it before it snaps. Big (and non-weedy) tap wrenches can break taps very quickly!

what to do about the excess thread sticking out

You can shorten coils by just cutting them with some heavy duty side-cutters. They're hard, but they'll snap with a good enough squeeze. It's much easier to shorten them before inserting the coil though (although if they're sticking out a bit, you can grab the end with a pair of pliers and pull and it'll come out, so you can replace with a shorter one).
 
I'd leave it - it's not doing any obvious harm there.

Couple of tips I've picked up from YouTube:

Whenever practical, I now tap this way:
  1. Pillar drill throughout, and don't move the workpiece if avoidable.
  2. Drill a pilot hole (centre drill) then the correct tap size.
  3. Put a slight bevel on the pilot hole (this REALLY helps the tap to centre and start cutting)
  4. Put the tap in the drill chuck and (definitely if small), take the belts off and spin the pulley by hand whilst plunging the tap into the workpiece, so it bites.
  5. Release the tap from the chuck (without taking it from the hole) and fit a tap wrench. Swap chuck for a sprung pin to hold the end of the tap in-line.
  6. Tap until done.
Trefolex is my lubricant of choice for both drilling and tapping in most metals.
 
Well the repair kit arrived this morning. The case was broken but the contents were all intact.
View attachment 31198

This is the offending hole
View attachment 31199

So the first task was to drill it out with the supplied drill. Easy-peasy.View attachment 31192

The tap with the supplied tap. I must get a better tap wrench, mine's a bit weedy.
View attachment 31196

Unfortunately the photo of inserting the helicoil is miles out of focus (unless you want a good view of the back wall), so, moving on, I knocked out the tang
View attachment 31195

"This is easy", I thought. I should have known better. The instructions said to insert the helicoil half a turn below the top surface, so that's what I did. Unfortunately, that meant that it stuck out of the far side and I couldn't get my tool rest post in. And because I'd knocked off the tang, I couldn't move the helicoil. And I've only got one eye at the moment and can't see what I'm doing anyway.

But eventually I got it out and installed new one properly.
View attachment 31197

I thought I'd do the other side while I'm at it, as It seemed likely that the same thing could happen to that thread, too. So I installed a helicoil, not too far this time. Quite a lot of the insert was sticking out and when I tried to insert my Bristol lever, it wouldn't go in. I couldn't figure out why, and, as I say, I can't see very well.

To cut a long story short, the thread had become distorted due to lack of support and I had to replace that, too. But all's well that ends well
View attachment 31193

I'm just not sure now what to do about the excess thread sticking out. I think I'm just inclined to leave it alone.
S
Grind it off flush with a Dremel...
 
I'd leave it - it's not doing any obvious harm there.

Couple of tips I've picked up from YouTube:

Whenever practical, I now tap this way:
  1. Pillar drill throughout, and don't move the workpiece if avoidable.
  2. Drill a pilot hole (centre drill) then the correct tap size.
  3. Put a slight bevel on the pilot hole (this REALLY helps the tap to centre and start cutting)
  4. Put the tap in the drill chuck and (definitely if small), take the belts off and spin the pulley by hand whilst plunging the tap into the workpiece, so it bites.
  5. Release the tap from the chuck (without taking it from the hole) and fit a tap wrench. Swap chuck for a sprung pin to hold the end of the tap in-line.
  6. Tap until done.
Trefolex is my lubricant of choice for both drilling and tapping in most metals.
^^ Good technique. The other way is, with the tap in the chuck, turn the drill on, then off, and plunge the tap in as it slows to a stop. Then release and continue by hand. Quick and simple, but probably not the best way with a tiny tap, say under M5. It’s how I started all my tapping before I got the milling machine.

Now I power tap everything, using machine taps that don’t need backing off, like an ape.
 
Thank you all.
I'd leave it - it's not doing any obvious harm there.

Couple of tips I've picked up from YouTube:

Whenever practical, I now tap this way:
  1. Pillar drill throughout, and don't move the workpiece if avoidable.
  2. Drill a pilot hole (centre drill) then the correct tap size.
  3. Put a slight bevel on the pilot hole (this REALLY helps the tap to centre and start cutting)
  4. Put the tap in the drill chuck and (definitely if small), take the belts off and spin the pulley by hand whilst plunging the tap into the workpiece, so it bites.
  5. Release the tap from the chuck (without taking it from the hole) and fit a tap wrench. Swap chuck for a sprung pin to hold the end of the tap in-line.
  6. Tap until done.
I think I've watched the same video. My kit is not the same quality as his. I didn't think to countersink, it would have helped. I don't have a spring pin.
Trefolex is my lubricant of choice for both drilling and tapping in most metals.
I think mine is called C12 or something like that. Good stuff, the one can will last me the rest of my life and then some.
Well done Steve.
PS, do you have a pirate patch?
No, but one might help. I've either damaged my cornea or damaged my contact lens. I hope it the latter. I did take a photo of it and could see some crud, but cleaning it didn't remove the mark. It hurts immediately I put it in. The trouble is that without it I read about 6/360 or something ridiculous like that (c.f. 6/6 with my lens, 6/5 on a good day). It's been out for over a week now, so if it was a corneal abrasion it should have healed by now.

I get my contact lenses feom the CL clinic at Queen's in Nottingham, but they can't post it out to France, so it is going to my friend's house and she will post it on. But then she is in Spain for a week. And so it goes on. So I think it is likely to be another couple of weeks before it gets here. It's very frustrating. I have one perfect image and one as de-focused as you can imagine, superimposed.

On the upside, I have an appointment at the clinic in Limoges at the end of this month, so once I'm in the French system, I'm hoping things will be easier. The clinic has an excellent reputation.

Nottingham has been very good to me over the last 45 years, but I was due to see my consultant in June and I'm still waiting. I may as well not have a consultant at all.
 
I sympathize.

In December I had an annual consultant appointment, scheduled for this month, put back to an undefined date in 2026. It's not a crisis, and they do have a responsive and good helpline, but it's a bit of a wake-up call as to how much pressure there actually is on them.

Stay warm in that mediaeval barn of yours!
 
Steve, I'm sure any of us on here would be happy to accept your lens delivery and post on to you if it helps to get it faster.

Having worn hard contact lenses most of my life before getting laser correction in 2008 I sympathise. I had regular, painful episodes caused by dry office conditions, dust and just plain overuse.
 
I sympathize.

In December I had an annual consultant appointment, scheduled for this month, put back to an undefined date in 2026. It's not a crisis, and they do have a responsive and good helpline, but it's a bit of a wake-up call as to how much pressure there actually is on them.

Stay warm in that mediaeval barn of yours!
Unfortunately it's the same everywhere at the minute as they're all under considerable pressure.

My wife has Parkinsons and was due to see her consultant January 2024, an important regular visit to assess and tweak the drugs that keep it under control. The appointment was cancelled twice and when chasing all we got was "you're on the list to make a new appointment". I had to have a polite chat with them to get her seen 10 months late. She was also assessed and approved for NHS hearing aids in May and quoted a maximum of 12 weeks wait, it's now 8 months and counting.
 
That's very kind of you, Lons. But Irene's SiL (Stuart's son, a dead ringer for him) lives just round the corner. so if it does not arrive today, he will check in periodically and post it on. But thank you very much for the offer, much appreciated.

As regards waiting times, it seems like we are all in the same bateau.
 
Well the repair kit arrived this morning. The case was broken but the contents were all intact.
View attachment 31198

This is the offending hole
View attachment 31199

So the first task was to drill it out with the supplied drill. Easy-peasy.View attachment 31192

The tap with the supplied tap. I must get a better tap wrench, mine's a bit weedy.
View attachment 31196

Unfortunately the photo of inserting the helicoil is miles out of focus (unless you want a good view of the back wall), so, moving on, I knocked out the tang
View attachment 31195

"This is easy", I thought. I should have known better. The instructions said to insert the helicoil half a turn below the top surface, so that's what I did. Unfortunately, that meant that it stuck out of the far side and I couldn't get my tool rest post in. And because I'd knocked off the tang, I couldn't move the helicoil. And I've only got one eye at the moment and can't see what I'm doing anyway.

But eventually I got it out and installed new one properly.
View attachment 31197

I thought I'd do the other side while I'm at it, as It seemed likely that the same thing could happen to that thread, too. So I installed a helicoil, not too far this time. Quite a lot of the insert was sticking out and when I tried to insert my Bristol lever, it wouldn't go in. I couldn't figure out why, and, as I say, I can't see very well.

To cut a long story short, the thread had become distorted due to lack of support and I had to replace that, too. But all's well that ends well
View attachment 31193

I'm just not sure now what to do about the excess thread sticking out. I think I'm just inclined to leave it alone.
S
Glad it worked out well Steve. Last week I found a good assortment of metric and imperial kits at the auto parts store. Now I know how to fix similar problems if necessary. Never too old to learn!
 
Back
Top