• Hi all and welcome to TheWoodHaven2 brought into the 21st Century, kicking and screaming! We all have Alasdair to thank for the vast bulk of the heavy lifting to get us here, no more so than me because he's taken away a huge burden of responsibility from my shoulders and brought us to this new shiny home, with all your previous content (hopefully) still intact! Please peruse and feed back. There is still plenty to do, like changing the colour scheme, adding the banner graphic, tweaking the odd setting here and there so I have added a new thread in the 'Technical Issues, Bugs and Feature Requests' forum for you to add any issues you find, any missing settings or just anything you'd like to see added/removed from the feature set that Xenforo offers. We will get to everything over the coming weeks so please be patient, but add anything at all to the thread I mention above and we promise to get to them over the next few days/weeks/months. In the meantime, please enjoy!

Light restoration of an Ulmia Reform Hobel

AndyT

Old Oak
Joined
Nov 23, 2020
Messages
2,456
Reaction score
74
Location
Bristol
Name
Andy
When I visited my very generous friend Peter the other day, he insisted on giving me some really good tools.
One of them was this plane:

IMG_9438.JPG


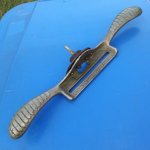
If you are anything like me, you'll notice several things about it. One is that it's a German design, with the distinctive "horn" for the left hand, to guide and pull the plane. It's a design that looks odd if you're not used to it, but if you can pick up a horned plane and try it out, it immediately makes sense and feels completely sensible and practical.

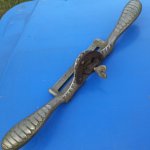
Another obvious point is that it's looking a bit sorry. Some previous owner (not Peter) has been at it with coarse sandpaper and removed all the old finish, rather crudely. There's no significant damage, but it needs a little TLC. That actually makes it a better present - I can have fun getting it to a nicer state of health. This afternoon, I started.

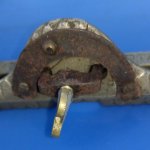
First though, a quick historical note. This pattern - the "Reform" plane - dates back to 1894. Its special feature is that it has an adjustable mouth, which is unusual on a wooden plane. Here's the underside. You can see that the mouth is set pretty fine at the moment; this is a smoother for taking fine shavings only, and the adjuster will cope with any wear during use.

IMG_9440.JPG

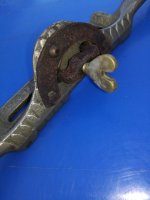
The mouth is secured by a screw on the top:

IMG_9439.JPG


They rapidly became popular and were copied by other makers. There's a full history on Wolfgang Jordan's website, which is the source of almost all my knowledge of continental planes. My plane resembles one in the 1930 catalogue but is not necessarily that old; it's hard to tell. You can still buy them - eg from Dictum for nearly £200.


Although the rough sanding is the most obvious issue, the front horn was missing a bit at the top and was a bit wobbly. It had also picked up a streak of black paint.

IMG_9442.JPG

It was easy to remove the adjuster and knock the body away from the horn. Although the glue had failed, the sliding dovetail joint was a very good fit.

Inside the adjuster there was a clear assembly number, as you'd expect from a fitted part.

IMG_9449.JPG

and here is the horn coming away:

IMG_9451.JPG

IMG_9452.JPG

On the surfaces, I mostly used a cabinet scraper. I wanted to get a smooth surface while taking away the very minimum amount of material.

The sides of the body have a nice decorative bead detail, but the sanding had flattened it out and spoiled it. It won't affect the performance, but I put that right like this:

IMG_9455.JPG


IMG_9456.JPG

On the rest of the body, I mainly used 3M open mesh abrasive - the sort that resembles pan scourers - in medium and fine grades.

One other non-functional detail that bugged me was that the previous sanding had scratched at the brass surround for the adjusting screw, leaving patches of bare brass:

IMG_9457.JPG

Fixing that was really easy - a fine paintbrush, a bottle of cold patinating fluid and a few seconds wait - but my 10 image limit is up and it's time to go and eat, so on that cliffhanger I'll leave the story for now. Back soon, so don't worry!
 
I'd never seen a wooden plane with an adjustable mouth: that's really interesting to see.

Following with interest...
 
That's an intriguing little scratch stock/ beading tool, Andy. Does it not have a fence? If not, then how was it designed to be used?

I've never even touched one of those horned German/ Scandinavian planes, so I have no idea how they feel in the hands.......but they just look so weird.
 
I've picked up a load of them over here in Germany. I believe the correct name is putzhobel.
 
I really like the steel button for retracting the blade depth with a little hammer. The jack plane looks the same as the smoother but slightly longer with a wider mouth. My most used though is the shoulder rebate plane, it's ace. I had to round the back off as it was a really sharp corner on the back that ripped my palm to bits.
 
@MJ80 - I'm glad you like horned planes. I think it's fascinating how different nations worked out their own suite of woodworking tools and methods, all getting to the same destination, via different, but successful routes.

I'd never seen a wooden plane with an adjustable mouth: that's really interesting to see.

Following with interest...
It's my first too. Maybe it was a wooden plane maker's reaction to competition from the Stanley block planes with sliding mouths?
That's an intriguing little scratch stock/ beading tool, Andy. Does it not have a fence? If not, then how was it designed to be used?
It's a Stanley 66 beader. Aimed at the man who can't be bothered to make his own scratchstock, and not really any better than a home-made one. The cutter leans back a bit too much, at a fixed angle, like the no 80 bench scraper. I bought a set of new cutters with it, which Bristol Design were stocking back then, which have been more use. I don't know who made them but there are similar, pricier alternatives by Veritas or Ray Iles

Mine only had the curved fence when I bought it, so I improvised one from a bit of boxwood, but the distance from the sole of the plane to the bead is about 2mm too much for its reach, so I just followed the existing line and used my fingers to make a fence.
 
A bit more progress. Here's the before and after on that nasty bare brass:

IMG_9457.JPG

IMG_9461.JPG


It's ridiculously easy to do. I used a bottle of 'Cold Patination Fluid' from Priory Polishes, which says it contains Selenious Acid, which justifies it having a skull and crossbones on the bottle. Anyway, you just paint a drop on with a fine paint brush, wait a few seconds until it's gone dark, then wipe over with a damp rag.

My next step was to put some finish onto the body. I know that some high-end English planes (such as plough planes) were sold 'French Polished' ie with shellac, and looking at the few remnants of finish on this plane, I think it had the same. I have another Reform Plane which certainly looks as if it was finished with shellac. And I have plenty of it, so shellac it is.

Two of the big advantages of shellac are that it's easy to use and dries in just a few minutes. It was very nice to see the body - which is pear wood - getting a bit of its proper lustre back.

IMG_9465.JPG

and it was soon done.

IMG_9467.JPG

I decided to get a first coat on before gluing the horn back, so as to make it easier to wipe off any surplus glue.

When the shellac felt dry enough, I warmed up a little liquid hide glue. Recent bottles of the liquid glue seem to be thicker and gloopier than they used to be, or else my unheated workshop is a bit on the cool side. I put some in a plastic pot over some hot water and it was soon nice and runny.

IMG_9468.JPG

There was a tiny amount of squeeze out,

IMG_9469.JPG

but a damp cotton bud followed by a dry rag removed it all nicely.

When the glue was set enough for handling, I turned my attention to the sole. It's made from lignum vitae, which gives that ideal combination of natural slickness and hard wearing. I knew from seeing other planes that this one could be improved.

IMG_9471.JPG

I could see, by holding it up to the light and using a straightedge, that there were patches of wear. You'll have to take my word for that, as it was too fiddly to photograph.

I recently found a handy offcut of marble in a skip, which I thought would come in useful for this sort of thing. I taped on some 120 grit paper and carefully sanded the sole.

IMG_9475.JPG

It was soon flat and straight, or (for the engineers among us) flatter and straighter.

IMG_9479.JPG

Thinking I was getting quite close to trying the plane on some wood, I lightly fettled the iron and cap iron. These aren't original, but are definitely suitable. Wolfgang Jordan confirms that Two Cherries irons were used on these planes. However, this iron started at 48mm and has been ground down to 45mm to match the plane...

IMG_9476.JPG
 
... as you can see here:

IMG_9477.JPG

At this point, I discovered a little snag.

I can't get the cutting edge to show below the sole.

IMG_9480.JPG

IMG_9481.JPG

Fortunately, I reckon that if I shave a few millimetres off the back edge of the movable mouth, all will be well.

I wonder what the best technique would be, on a challenging wood like lignum vitae? Wish me luck, or give me a suggestion!
 
Well, anyone who's seen my workshop will guess that whatever the question, the answer is often a plane.;)

But first, a marking knife cut all round:

IMG_9482.JPG

then a bit of chamfering with a chisel to try and avoid splintering on the edges

IMG_9483.JPG

and then one of my favourite planes, a venerable old Stanley 60½ - with, of course, a sliding plate on its adjustable mouth.

IMG_9484.JPG

Lignum vitae is tough, but it's just wood in the end, and can be planed.

I noticed that Ulmia had stained the rest of the sandwich of wood on the sliding part, so I did too, the easy way with one of those brown felt pens.

IMG_9487.JPG


And that's about it, really. All done!


But I expect you will want to see if it works...

It does! On mahogany:

IMG_9489.JPG

on pine

IMG_9490.JPG

and on a bit of old, very dry oak:

IMG_9491.JPG

It's a really lovely plane, now working to my satisfaction, and looking a bit more like it should.

Thanks again to Peter, and to everyone for their interest. If you see a plane like this languishing unloved somewhere, rejected as an ugly duckling, please give it a good home and treat it nicely! :)
 
Great little write up Andy. I was surprised to learn that people used lignum vitae for plane soles, probably because I'm used to it being incredibly rare and I doubt anyone would even think of using it for such these days. 'twasn't always thus. As an aside, I heard a while back that John Harrison (of "Longitude" fame) used lignum vitae for clock gears for a while, and in my world it has always been used for the heavy bails reserved for the windiest days when ordniary bails would blow off the stumps.
 
LV is very naturally oily and self lubricating I believe. Another good reason for Mr Harrison to use it for clock gears.
 
Great minds think alike Andy! I too have one of those Ulmia Reform planes with the adjustable mouth. I picked mine up in mint condition from Pennyfarthing Tools for the princely sum of £12; the shop used to be in a back street of Salisbury but sadly it moved some years ago. I was so impressed with the adjustable mouth mechanism that I copied it and used it on 'Big Woody', my veneer shooting try plane:

IMG_2713.jpegIMG_2712.jpeg

You can see that I didn't like the original fairly naff metal knob, so I made a new one; the shiny bit on both planes is a silver coin epoxied onto a 6mm hex bolt that sits within a bit of knurled brass - Rob
 
1000037660.jpg1000037661.jpgHere is my family of German planes, I've mostly picked them up on small ads and been gifted them from people's basements. There is a scrub, 2 jacks, a Putz Hobel with the adjustable blade and mouth, toothed plane, shoulder and the big jointer which is my favourite. The blades in them are fantastic.
 
Is this how online trends start? The 'influencers' with good taste round up the bargains while the prices rise in readiness for everyone else ;)
 
AndyT have you worked out the wiggles between the two woods on the sides?

Pete
Not really. I think it's a pattern of corrugations that run diagonally but I can't see how they get to look sharp on the ends but wavy on the sides. A photo of a dismantled one would be very welcome!
 
I'm found a clip of how it fits together. They are machined with a 'frase' tool. This term can cover anything with a spinning cutting tool across wood and metal work. From about 1:15.
I'm sure I have seen a video of a factory tour, but I can't find it at the moment.
 
Not really. I think it's a pattern of corrugations that run diagonally but I can't see how they get to look sharp on the ends but wavy on the sides. A photo of a dismantled one would be very welcome!
If you look down the end of the plane at a slight angle the corrugations will appear to carry on, its the V notches cut at a slight angle so its an angled section through the V notches.

Pete
 
Thanks both. I think I've got it now and can see how the ECE square wave and the Ulmia sawtooth wave both work. IMG_20240425_102758.jpg
 
Have you made one yet Al?
Yes, although just with aluminium (rather than aluminium and brass) and it didn't turn out as well as his did. I made it quite soon after the video came out (about 8 years ago) and I was relatively new to metalwork at that point, so making custom dovetailing end mills was probably being a bit too ambitious for my abilities.
 
The older Ulmia planes (before the firm was sold or taken over or something) are spoken fondly of by many German woodworkers. I picked up a dovetailing plane for €10 at a flea market. It's essentially in perfect condition although I dislike the thinnish metal fence. One day I'll try to knock out a wooden replacement for it. Then I might even get around to using the thing!
 
I'm found a clip of how it fits together. They are machined with a 'frase' tool. This term can cover anything with a spinning cutting tool across wood and metal work. From about 1:15.
I'm sure I have seen a video of a factory tour, but I can't find it at the moment.
He refers to the grooves for mounting the soles being the result of a "Spezialfräsung". In this context this simply means a specialised routing procedure.

As background info: fräsen is the verb "to rout". An Oberfräser is a classic hand router in the manner of e.g. Festool.
 
Back
Top