
-
Hi all and welcome to TheWoodHaven2 brought into the 21st Century, kicking and screaming! We all have Alasdair to thank for the vast bulk of the heavy lifting to get us here, no more so than me because he's taken away a huge burden of responsibility from my shoulders and brought us to this new shiny home, with all your previous content (hopefully) still intact! Please peruse and feed back. There is still plenty to do, like changing the colour scheme, adding the banner graphic, tweaking the odd setting here and there so I have added a new thread in the 'Technical Issues, Bugs and Feature Requests' forum for you to add any issues you find, any missing settings or just anything you'd like to see added/removed from the feature set that Xenforo offers. We will get to everything over the coming weeks so please be patient, but add anything at all to the thread I mention above and we promise to get to them over the next few days/weeks/months. In the meantime, please enjoy!
You are using an out of date browser. It may not display this or other websites correctly.
You should upgrade or use an alternative browser.
You should upgrade or use an alternative browser.
"machine made" drawer box
- Thread starter 9fingers
- Start date

Nice work mate. What’s going in the tall one, broom, vac and ironing board?

Mike G
Petrified Pine
9fingers":3t6z3c12 said:Not been any response so far so either my methods have horrified/dumbfounded everyone or I did not describe it well enough to give readers scope to comment.....
Whilst interesting, this sort of construction isn't something most of us can do because it is all table-saw based, and there are very few of those kicking around the forum.
I'm curious as to why you are using oak for utilitarian construction such as the unseen corners of drawer boxes. I know you got it FOC, but haven't you got some upcoming projects where you might use oak on show?

- Joined
- Jul 21, 2014
- Messages
- 10,414
- Reaction score
- 164
Mike G":1bnpb0ng said:9fingers":1bnpb0ng said:Not been any response so far so either my methods have horrified/dumbfounded everyone or I did not describe it well enough to give readers scope to comment.....
Whilst interesting, this sort of construction isn't something most of us can do because it is all table-saw based, and there are very few of those kicking around the forum.
I'm slightly surprised at that assertion Mike. I know it true in your case. I might just start a poll on workshop equipment
The frame under the stairs has oak veneered pine ( my Quercus Pinus from another thread) on all the visible parts but plain pine from the stash on the hidden parts. I made a sort of rule for this project to use oak on exposed and moving parts hence the drawer box. The final panelling will be made from home veneered ply and laminated oak made as described in another earlier thread. That is maturing under the bed and hopefully not moving.Mike G":1bnpb0ng said:I'm curious as to why you are using oak for utilitarian construction such as the unseen corners of drawer boxes. I know you got it FOC, but haven't you got some upcoming projects where you might use oak on show?
I'd not set out to make this a particularly frugal project but more to try and reduce stocks of timber such as pine that is taking space in the garage and is not my preferred timber to use. So far all I have had to buy is 4 sheets of 9mm Wickes best beech faced hardwood ply at £109 and the FE ball slides 6 x 700mm at around £30 on the 'bay.
I will need some oak for the end door but that is downstream and once lockdown is eased I'll be more able to get out and about to find a decently priced source.
Bob

Phil
Old Oak
That looks very good Bob.

- Joined
- Jul 21, 2014
- Messages
- 10,414
- Reaction score
- 164
TrimTheKing":t6o8rcc9 said:Nice work mate. What’s going in the tall one, broom, vac and ironing board?
Nope - a much more interesting application. Think of items that are normally stored at 90 degrees to your suggestions. :lol:
Bob
9fingers":k9vpnez7 said:TrimTheKing":k9vpnez7 said:Nice work mate. What’s going in the tall one, broom, vac and ironing board?
Nope - a much more interesting application. Think of items that are normally stored at 90 degrees to your suggestions. :lol:
Bob
Fold down table? Aeroplane wings?
- Joined
- Jul 21, 2014
- Messages
- 10,414
- Reaction score
- 164
TrimTheKing":169zciim said:9fingers":169zciim said:TrimTheKing":169zciim said:Nice work mate. What’s going in the tall one, broom, vac and ironing board?
Nope - a much more interesting application. Think of items that are normally stored at 90 degrees to your suggestions. :lol:
Bob
Fold down table? Aeroplane wings?
Nope - this is the dining room if that helps - and we already have a table :lol:
Bob
Spare chairs or table extensions...
- Joined
- Jul 21, 2014
- Messages
- 10,414
- Reaction score
- 164
TrimTheKing":qg4nws0x said:Spare chairs or table extensions...
Nope. It is mainly for a consumable product.
Bob
- Joined
- Jul 21, 2014
- Messages
- 10,414
- Reaction score
- 164
spb":3oz9v2kt said:Given that you said it'll take a lot of weight, I'm going with wine rack.
Give the man a cigar! Yes the right hand cupboard will house a static wine rack and glasses.
The middle slide out heavy weight drawer will have dinner service and cutlery plus other dining table related paraphernalia.
Bob
Phil
Old Oak
9fingers":1z70xxar said:Mike G":1z70xxar said:Whilst interesting, this sort of construction isn't something most of us can do because it is all table-saw based, and there are very few of those kicking around the forum.
I'm slightly surprised at that assertion Mike. I know it true in your case. I might just start a poll on workshop equipment
Agree with you. :lol:
Can you start a poll on equipment being used not just sitting in the workshop.
I have the greatest respect for Mike and his hand tool abilities, not in my lifetime would I get there.
However, without the machines I might just as well sit and play games on my laptop. :lol: :lol:
Mike G
Petrified Pine
Phil":3j4g6sh8 said:......However, without the machines I might just as well sit and play games on my laptop. :lol: :lol:
Oh, I've got machines. It's just that I reckon bandsaws will outnumber tablesaws at least 5 to 1 here.
Raymedullary
Sapling
- Joined
- Jan 20, 2020
- Messages
- 330
- Reaction score
- 93
I have both a tablesaw and a bandsaw. I would not be happy without a tablesaw... the easy,instant and safe accuracy that they provide is hard to beat.
And my workshop is by no means big, in fact its rather compact.
And my workshop is by no means big, in fact its rather compact.
9fingers":2qt4s608 said:TrimTheKing":2qt4s608 said:Spare chairs or table extensions...
Nope. It is mainly for a consumable product.
Bob
Ahhhhhhhhh Vino!!


I’d like to think that the collective brains around here could come with an idea for triangular section.
- Joined
- Jul 21, 2014
- Messages
- 10,414
- Reaction score
- 164
Andyp":1l04nw54 said:I’d like to think that the collective brains around here could come with an idea for triangular section.
I did wonder about blanking it off as planned and adding a simple shelf on the base and to use it as a secret compartment that would only be accessible by total removal of the centre drawer unit.
Whoops! you lot would now know about it. :lol:
Open to suggestions. The opening is about 320 x 320 by 800 deep
Bob
Phil
Old Oak
Mike G":f2vyfqnq said:Phil":f2vyfqnq said:......However, without the machines I might just as well sit and play games on my laptop. :lol: :lol:
Oh, I've got machines. It's just that I reckon bandsaws will outnumber tablesaws at least 5 to 1 here.
Ok, but thats now a different tune ........... :lol: :lol: :lol:
- Joined
- Jul 21, 2014
- Messages
- 10,414
- Reaction score
- 164
Earlier in this thread I was in the process of making a rod for the next part of my understairs storage project.
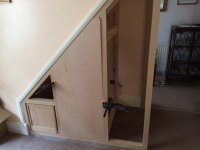
A small leap forward though design and starting to build - no photos taken, I have got the skeleton under construction for the roll-out section. It's my first project using the domino and has exposed the accuracy flaw in my domino but I've managed to work round that. I've been gluing up in small steps (about 10!) to help ease the stress of the "big bang" final glue up which is still going to be bad enough.
Part assembled skeleton frame in 22mm square oak.
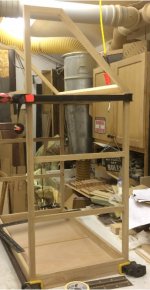
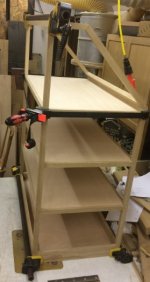
This second shot shows all the shelves in place. Mainly intended for crockery but the top shelf with have some drawers for cutlery etc.
I'll try and remember to take more pics as it develops.
Bob
A small leap forward though design and starting to build - no photos taken, I have got the skeleton under construction for the roll-out section. It's my first project using the domino and has exposed the accuracy flaw in my domino but I've managed to work round that. I've been gluing up in small steps (about 10!) to help ease the stress of the "big bang" final glue up which is still going to be bad enough.
Part assembled skeleton frame in 22mm square oak.
This second shot shows all the shelves in place. Mainly intended for crockery but the top shelf with have some drawers for cutlery etc.
I'll try and remember to take more pics as it develops.
Bob
- Joined
- Jul 21, 2014
- Messages
- 10,414
- Reaction score
- 164
The skeletal frame has now fitted with the four drawers and anti tip runners/retainers
written up here http://www.thewoodhaven2.co.uk/viewtopi ... 445#p91445
The drawers are made from 12mm thick stock. Sides and backs are in oak and the fronts in ABW.
Time to get out the finger jig that I made a few years back and written up way back in this forum.
Modestly I have to say it is a pleasure to use and can be set up without having to make any measurement. Just a couple of test cuts and away you go.
The dado set was set up for about 12mm to give square end to the pins.
Here is the jig
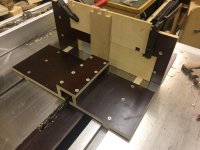
And close up
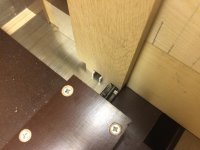
I set the jig up with a clearance of a paper thickness to allow for glue and ease of assembly.
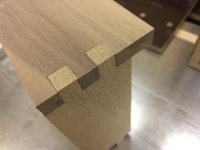
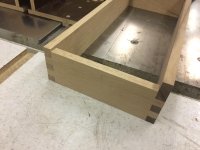
I did a quick dryfit of the smallest drawer.
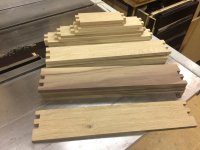
A short production run for 4 drawers worth of parts plus a spare front out of oak to try finger cutouts later.
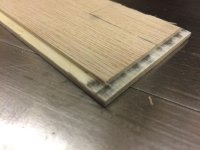
I used 5mm ply as the base but I did not want to set a 5mm groove so near the base of the drawer - maximum internal depth is immportant so the bases were rebated into a 1.8" (3.2mm) groove, 3mm up from the bottom edge of each drawer.
No photo of the groove but I set up the tablesaw and dado to cut the rebates. The ply was not dead flat so I used a feather board to press it down onto the blade. In the photo, you might just be able to see the blade. Once set up it is just a matter of pushing all the edges through.
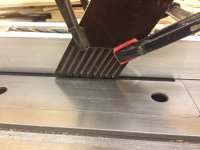
This is one of the bases (or maybe a test piece?)
The walnut had a few pale streaks and rather than try and stain them out I arranged the fronts to SWMBO's satisfaction to make them a feature.
Here is the dryfit of the 4 drawers into the housing
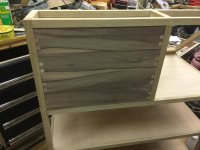
More to come folks
written up here http://www.thewoodhaven2.co.uk/viewtopi ... 445#p91445
The drawers are made from 12mm thick stock. Sides and backs are in oak and the fronts in ABW.
Time to get out the finger jig that I made a few years back and written up way back in this forum.
Modestly I have to say it is a pleasure to use and can be set up without having to make any measurement. Just a couple of test cuts and away you go.
The dado set was set up for about 12mm to give square end to the pins.
Here is the jig
And close up
I set the jig up with a clearance of a paper thickness to allow for glue and ease of assembly.
I did a quick dryfit of the smallest drawer.
A short production run for 4 drawers worth of parts plus a spare front out of oak to try finger cutouts later.
I used 5mm ply as the base but I did not want to set a 5mm groove so near the base of the drawer - maximum internal depth is immportant so the bases were rebated into a 1.8" (3.2mm) groove, 3mm up from the bottom edge of each drawer.
No photo of the groove but I set up the tablesaw and dado to cut the rebates. The ply was not dead flat so I used a feather board to press it down onto the blade. In the photo, you might just be able to see the blade. Once set up it is just a matter of pushing all the edges through.
This is one of the bases (or maybe a test piece?)
The walnut had a few pale streaks and rather than try and stain them out I arranged the fronts to SWMBO's satisfaction to make them a feature.
Here is the dryfit of the 4 drawers into the housing
More to come folks

Woodbloke
Sequoia
9fingers":3cclm8cl said:I set the jig up with a clearance of a paper thickness to allow for glue and ease of assembly.
The thickness of a bit of paper will give you a joint that's going to go together easily, but it's also going to be too sloppy. I like to make joints that need to be knocked together with an 'ammer (or maul) or pulled up with a cramp of some sort. With that dado rig on your tablesaur Bob, it should be dead easy to set it up for an exact 'one on one' push together fit - Rob
- Joined
- Jul 21, 2014
- Messages
- 10,414
- Reaction score
- 164
Indiviual preferences I guess. Even with 1/2 paper thickness per glue joint once the glue was on all parts and some swelling had started, a small persuader was needed and there are no naked eye visible glue lines.
The first test cut was possibly a honeymoon fit more to your liking but I then offset the guide pins with a handy bit of newsprint paper (uncalibrated) to give a mummy and daddy working fit!
Bob
The first test cut was possibly a honeymoon fit more to your liking but I then offset the guide pins with a handy bit of newsprint paper (uncalibrated) to give a mummy and daddy working fit!
Bob
Woodbloke
Sequoia
The only reason I thought about this was that when I made that Krenov bookshelf a while back from that hideous kiln cooked American Ash, I used a slip of printer paper on the 'female' part of the drawer runner when the sections were glued together, thinking the clearance provided would enable a smooth working, sliding fit. It ended up as a loose, workable fit so on the current little skeletal' project just completed, I left the paper out and the sliding fit is much snugger - Rpb
- Joined
- Jul 21, 2014
- Messages
- 10,414
- Reaction score
- 164
When I fitted my drawer slides for these drawers, I used offcuts of the drawer component stock as spacers and no paper. They have fitted nicely with the slightest swipe of 320 grit. Cant do the piston test as the drawer pulls are cutouts in the fronts so spoil the seal. I'll candle wax the slides once I have finished creating dust from the project.
Bob
Bob
- Joined
- Jul 21, 2014
- Messages
- 10,414
- Reaction score
- 164
In case anyone is interested the box joint jig wot I made is here
viewtopic.php?f=26&t=2099
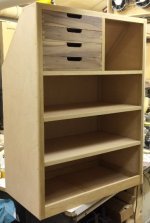
This whole section I'm working on at the moment is a large drawer that will pull out from under the stairs for access. You have seen the skeltal frame work and shelves before. Now it is clad in 9mm ply all but the access face (side). This is the front view of the drawer box.
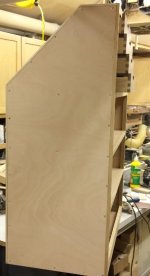
I'd better refer to the small drawers above as "sub-drawers" I suppose - no sniggering at the back :lol:
No pics of the sub drawer assembly as I'm usually busy concentrating on the glue ups, setting square and clean up etc and forget to take pics!
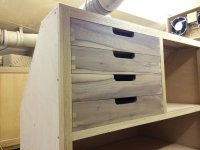
Looking at the side of the main drawer, we seen access to the sub drawers. No room for conventional drawer pulls and in any case SWMBO's fingers don't work well so these cutouts are easiest for her and don't stick out.
And closer on the sub drawers
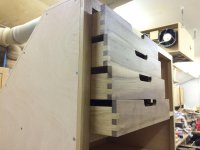
and showing off the box joints. The colour contrast is better between the end grain ABW and the oak face than on the more visible fronts betwenn end grain oak and face grain ABW. Never mind eh? The thought was there.
Thats about up to date. Other domestic stuff to do today, shopping etc. The next step will be to get it fitted into the framework in the dining room. Everything has been made to the rod I made earlier so should be perfick! :lol:
Thanks for looking.
Bob
viewtopic.php?f=26&t=2099
This whole section I'm working on at the moment is a large drawer that will pull out from under the stairs for access. You have seen the skeltal frame work and shelves before. Now it is clad in 9mm ply all but the access face (side). This is the front view of the drawer box.
I'd better refer to the small drawers above as "sub-drawers" I suppose - no sniggering at the back :lol:
No pics of the sub drawer assembly as I'm usually busy concentrating on the glue ups, setting square and clean up etc and forget to take pics!
Looking at the side of the main drawer, we seen access to the sub drawers. No room for conventional drawer pulls and in any case SWMBO's fingers don't work well so these cutouts are easiest for her and don't stick out.
And closer on the sub drawers
and showing off the box joints. The colour contrast is better between the end grain ABW and the oak face than on the more visible fronts betwenn end grain oak and face grain ABW. Never mind eh? The thought was there.
Thats about up to date. Other domestic stuff to do today, shopping etc. The next step will be to get it fitted into the framework in the dining room. Everything has been made to the rod I made earlier so should be perfick! :lol:
Thanks for looking.
Bob
- Joined
- Jul 21, 2014
- Messages
- 10,414
- Reaction score
- 164
Installation day!
I alreay knew from my rod that the opening was slightly out of square. Rather than make the drawer out of square to match I opted for a shim fitted behind the bottom left runner.
All went pretty smoothly. I've used lots of the basic full extension drawer slides and they are pretty easy to install.
Here are some installed views.
Fully closed.
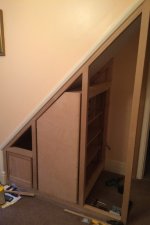
Fully closed from the side
This view will eventually be blocked off by the back of the wine cupboard.
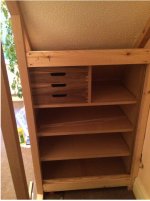
Partly open for access to the drawers and commonly used items.
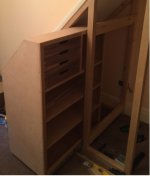
Cutlery drawer
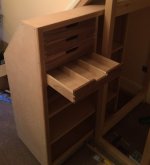
Fully open
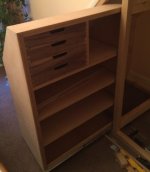
Thanks for looking
Bob
I alreay knew from my rod that the opening was slightly out of square. Rather than make the drawer out of square to match I opted for a shim fitted behind the bottom left runner.
All went pretty smoothly. I've used lots of the basic full extension drawer slides and they are pretty easy to install.
Here are some installed views.
Fully closed.
Fully closed from the side
This view will eventually be blocked off by the back of the wine cupboard.
Partly open for access to the drawers and commonly used items.
Cutlery drawer
Fully open
Thanks for looking
Bob

Dr.Al
Old Oak
Malc2098":1aeulo5t said:Nice.
What he said :text-goodpost:
- Joined
- Jul 21, 2014
- Messages
- 10,414
- Reaction score
- 164
Thanks Chaps!
Bob
Bob

Steve Maskery
Old Oak
This is excellent, Bob.
I had a triangular space underneath my staircase, too, but not as neat as what you started with. I turned mine into double-decker cupboards. They are neat enough, but inside they are each just one big glory-hole. Yours is a much better solution.
I had a triangular space underneath my staircase, too, but not as neat as what you started with. I turned mine into double-decker cupboards. They are neat enough, but inside they are each just one big glory-hole. Yours is a much better solution.
Where does everyone store their Toblerones?Andyp":8mvw2vf1 said:I’d like to think that the collective brains around here could come with an idea for triangular section.
- Joined
- Jul 21, 2014
- Messages
- 10,414
- Reaction score
- 164
Just4fun":1dhrdgv3 said:Where does everyone store their Toblerones?Andyp":1dhrdgv3 said:I’d like to think that the collective brains around here could come with an idea for triangular section.
Great idea but I have to avoid sweet things :lol:
There is a volume of 40 odd litres available.
I could fit a hinged panel for access maybe with some form of magnetic lock or a bowden cable release operated from the wine cupboard?
Bob