
-
Hi all and welcome to TheWoodHaven2 brought into the 21st Century, kicking and screaming! We all have Alasdair to thank for the vast bulk of the heavy lifting to get us here, no more so than me because he's taken away a huge burden of responsibility from my shoulders and brought us to this new shiny home, with all your previous content (hopefully) still intact! Please peruse and feed back. There is still plenty to do, like changing the colour scheme, adding the banner graphic, tweaking the odd setting here and there so I have added a new thread in the 'Technical Issues, Bugs and Feature Requests' forum for you to add any issues you find, any missing settings or just anything you'd like to see added/removed from the feature set that Xenforo offers. We will get to everything over the coming weeks so please be patient, but add anything at all to the thread I mention above and we promise to get to them over the next few days/weeks/months. In the meantime, please enjoy!
You are using an out of date browser. It may not display this or other websites correctly.
You should upgrade or use an alternative browser.
You should upgrade or use an alternative browser.
Mitred Through Dovetail
- Thread starter NickM
- Start date

Woodbloke
Sequoia
Mike G":2x8p84mo said:Do you know, it's never occured to me to use Araldite on wood. I can't imagine why it wouldn't work, though, and the open time would be just about forever. Good idea, Rob!
It does work Mike; brilliantly! I bought my tubes of 'proper' Araldite from fleabay at a very reasonable price (think about half normal). If you've got a large project to glue it's then of course prohibitively expensive, but for small stuff like boxes etc it's excellent.
No good for your dining room table and chairs :lol: - Rob
NickM
Old Oak
The next scary bit was cutting the lid off, but it was fine.
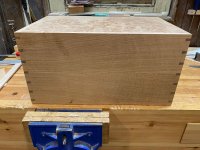
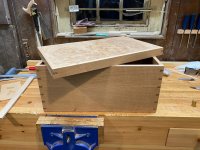
I've also done the inlay. I'll take some photos of that once I've tidied things up a bit more.
Hinges are next.
I've also done the inlay. I'll take some photos of that once I've tidied things up a bit more.
Hinges are next.
Cabinetman
Sequoia
- Joined
- Oct 11, 2020
- Messages
- 5,528
- Reaction score
- 1,231
- Location
- Lincolnshire Wolds + Massachusetts
- Name
- Ian
That’s looking really nice Nick, how did you cut the lid? On the table saw? That’s the way I’ve always done it before. Ian
NickM
Old Oak
Cabinetman":1g3qa42x said:That’s looking really nice Nick, how did you cut the lid? On the table saw? That’s the way I’ve always done it before. Ian
Yes, table saw. It feels safe enough as long as the saw kerfs are wedged when the third and fourth cuts are done. It’s also the only way I’ve done it before. I’ve contemplated other methods, but none seem to have a big advantage over the table saw.
NickM
Old Oak
Mike G":15x6vn99 said:Great stuff, Nick. It is of course cheating to have a table saw, so can you go back to the beginning and do it again properly. :lol: :lol:
:lol:
If it helps, I did hand plane the box and lid to get a decent (rocking-free) joint.
Woodbloke
Sequoia
As a suggestion for the next one, which needs as Mike says, to be a 'proper job' :eusa-whistle: what's normally done is to have a small, single dovetail within the lid and allow a little more (3mm) in the pin where the saw kerf will be.
A tip to get the lid and box to 'mate' is to stick some sandpaper to a sheet of something dead flat and rub the component parts on top, testing as you go to achieve a perfick fit. Planing it is long winded and prone to all sorts of errors. This is also the method that Andrew Crawford uses and he knows a thing or twelve about making boxes - Rob
A tip to get the lid and box to 'mate' is to stick some sandpaper to a sheet of something dead flat and rub the component parts on top, testing as you go to achieve a perfick fit. Planing it is long winded and prone to all sorts of errors. This is also the method that Andrew Crawford uses and he knows a thing or twelve about making boxes - Rob
NickM
Old Oak
Woodbloke":12oxvsme said:As a suggestion for the next one, which needs as Mike says, to be a 'proper job' :eusa-whistle: what's normally done is to have a small, single dovetail within the lid and allow a little more (3mm) in the pin where the saw kerf will be.
Thanks Rob. That’s how I’ve done them in the past but I’m loosely following a Matt Estlea design for this one. It does look neat when the lid is closed.
Woodbloke
Sequoia
The Zebrano Toolbox? - RobNickM":33jc1hxk said:... I’m loosely following a Matt Estlea design for this one. It does look neat when the lid is closed.
NickM
Old Oak
Woodbloke":1ec3sl45 said:The Zebrano Toolbox? - RobNickM":1ec3sl45 said:... I’m loosely following a Matt Estlea design for this one. It does look neat when the lid is closed.
That's the kind of thing. I was actually watching his multipart series making an oak version (free online woodworking school series on YouTube).
NickM
Old Oak
The box/chest is basically finished (perhaps bar a second coat of oil and some wax).
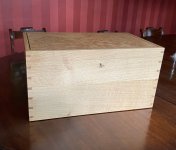
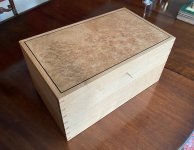
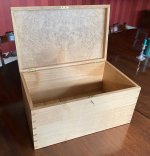
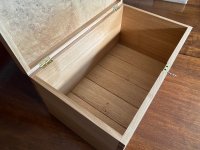
I think I'll make a lift out tray for it, but I'm wondering how to fix the support pieces to the internal sides of the box. I'd like to glue them, but the insides of the box were oiled and waxed earlier in the process. Are screws the only option?
I think I'll make a lift out tray for it, but I'm wondering how to fix the support pieces to the internal sides of the box. I'd like to glue them, but the insides of the box were oiled and waxed earlier in the process. Are screws the only option?

Mike G
Petrified Pine
Well, you'd either need to scratch through the wax layer with some sand paper or similar to glue it, or go for screws. Some small brass screws properly countersunk would look just fine. Make sure you've got a short enough drill and screwdriver, though.
There's no need to screw anything in. You could consider making a lining of solid wood machined to, say, 3 - 5 mm thick, and of a width from the top surface of the box's base to the point where you want the bottom of the tray to rest, and a length something longer than sum of the internal length of each of the four sides. Then cut the lining into four pieces, mitre both ends of each piece so that the sharp 45º ends of each lining piece match the internal length of each side. Insert all four pieces and they become, if done well, pretty much self locking. Rest your tray on top of the installed lining. Slainte.NickM":2u75bvb2 said:I'm wondering how to fix the support pieces to the internal sides of the box. I'd like to glue them, but the insides of the box were oiled and waxed earlier in the process. Are screws the only option?
NickM
Old Oak
Richard":3j3xhv2c said:There's no need to screw anything in. You could consider making a lining of solid wood machined to, say, 3 - 5 mm thick, and of a width from the top surface of the box's base to the point where you want the bottom of the tray to rest, and a length something longer than sum of the internal length of each of the four sides. Then cut the lining into four pieces, mitre both ends of each piece so that the sharp 45º ends of each lining piece match the internal length of each side. Insert all four pieces and they become, if done well, pretty much self locking. Rest your tray on top of the installed lining. Slainte.NickM":3j3xhv2c said:I'm wondering how to fix the support pieces to the internal sides of the box. I'd like to glue them, but the insides of the box were oiled and waxed earlier in the process. Are screws the only option?
Thanks for the suggestion. I did wonder if that might be an option.
Woodbloke
Sequoia
That's the way I would do it as well...but if those internal mitres are really tight into the corners (and they need to be) you'll only get one shot at inserting them as they're next to impossible to remove. A slightly more refined way of doing it is to scribe and mitre the corners, where only the top say, 6mm is actually mitred. A bit more of a faff to do, but slightly easier to fit - RobNickM":iirkwrb7 said:Richard":iirkwrb7 said:There's no need to screw anything in. You could consider making a lining of solid wood machined to, say, 3 - 5 mm thick, and of a width from the top surface of the box's base to the point where you want the bottom of the tray to rest, and a length something longer than sum of the internal length of each of the four sides. Then cut the lining into four pieces, mitre both ends of each piece so that the sharp 45º ends of each lining piece match the internal length of each side. Insert all four pieces and they become, if done well, pretty much self locking. Rest your tray on top of the installed lining. Slainte.NickM":iirkwrb7 said:I'm wondering how to fix the support pieces to the internal sides of the box. I'd like to glue them, but the insides of the box were oiled and waxed earlier in the process. Are screws the only option?
Thanks for the suggestion. I did wonder if that might be an option.

One more option for you. Less wood, less work and it wouldn't cover up as much of your excellent work. On the other hand, it might look like an unplanned afterthought.
Make four "posts" of suitable height. They could be quite slender, and would look better if planed down so they were right-angle triangular in cross section. Glue one in each corner, standing upright, to hold a tray on its corners.
This would be long grain against cross-grain, but if you used a solvent based glue such as Uhu, it would have a little bit of give in it if movement was ever an issue. And it would stand a chance of sticking to your finished surfaces. (You could test this first on an offcut.)
Alternatively, make two or three or more trays, so they sit on each other and fill the box like trays of chocolates. All could be lifted out and sorted through, which might be easier than rummaging at the bottom of a deep box.
Make four "posts" of suitable height. They could be quite slender, and would look better if planed down so they were right-angle triangular in cross section. Glue one in each corner, standing upright, to hold a tray on its corners.
This would be long grain against cross-grain, but if you used a solvent based glue such as Uhu, it would have a little bit of give in it if movement was ever an issue. And it would stand a chance of sticking to your finished surfaces. (You could test this first on an offcut.)
Alternatively, make two or three or more trays, so they sit on each other and fill the box like trays of chocolates. All could be lifted out and sorted through, which might be easier than rummaging at the bottom of a deep box.
NickM
Old Oak
Woodbloke":1ids7wgz said:That's the way I would do it as well...but if those internal mitres are really tight into the corners (and they need to be) you'll only get one shot at inserting them as they're next to impossible to remove. A slightly more refined way of doing it is to scribe and mitre the corners, where only the top say, 6mm is actually mitred. A bit more of a faff to do, but slightly easier to fit - Rob
That's certainly a consideration!
NickM
Old Oak
AndyT":1tet50nb said:One more option for you. Less wood, less work and it wouldn't cover up as much of your excellent work. On the other hand, it might look like an unplanned afterthought.
Make four "posts" of suitable height. They could be quite slender, and would look better if planed down so they were right-angle triangular in cross section. Glue one in each corner, standing upright, to hold a tray on its corners.
This would be long grain against cross-grain, but if you used a solvent based glue such as Uhu, it would have a little bit of give in it if movement was ever an issue. And it would stand a chance of sticking to your finished surfaces. (You could test this first on an offcut.)
Alternatively, make two or three or more trays, so they sit on each other and fill the box like trays of chocolates. All could be lifted out and sorted through, which might be easier than rummaging at the bottom of a deep box.
I agree that having a mitred lining all the way around the box is rather a lot of wood.
Another option I have in the back of my mind is some sliding trays which capture, and are captured by, the side supports. I think the Warrington Tool Chest you brought to our attention had something like that. That may be a bit of a faff though, and I'm not sure my chest is large enough to warrant it (it would all be a bit fiddly to operate).
This box has just been made on a whim rather than for a particular purpose which doesn't help me come up with a design!
This is what I did for a similar problem (it was to support a drop in top rather than a tray, but same principle).
Ply sides inside the box proper.
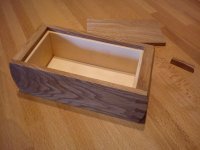
Thin strips of oak to top.
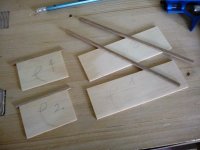
Insert, mark, cut.
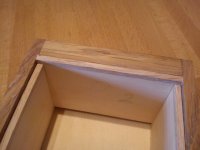
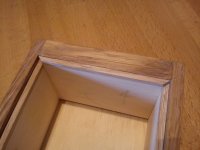
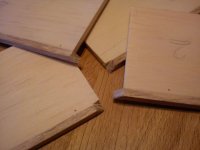
And voila.
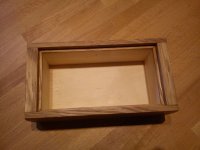
Essentially the same as some one above (Rob?) suggested – only the top of the supports is mitred. The sides essentially keep themselves in place. If you were worried a small area of finish in the centre of each side could be stripped and a dot of glue used. If you do that over only a small area there should be no worries about differential movement. Really those sides aren’t going anywhere.
Of course I knew I was going to line it. Hence the ply. But you could veneer it to make a nicer inside surface. Actually, perhaps my lining counts as a veneer. A skill I didn’t know I had.
Ply sides inside the box proper.
Thin strips of oak to top.
Insert, mark, cut.
And voila.
Essentially the same as some one above (Rob?) suggested – only the top of the supports is mitred. The sides essentially keep themselves in place. If you were worried a small area of finish in the centre of each side could be stripped and a dot of glue used. If you do that over only a small area there should be no worries about differential movement. Really those sides aren’t going anywhere.
Of course I knew I was going to line it. Hence the ply. But you could veneer it to make a nicer inside surface. Actually, perhaps my lining counts as a veneer. A skill I didn’t know I had.
Woodbloke
Sequoia
Tiresias":3lq8ocjf said:Essentially the same as some one above (Rob?) suggested – only the top of the supports is mitred.
Yep, that's a 'scribed and mitred' lining but I do each side using just one bit of material rather than two as each bit can be polished before it's dropped into the box and glued in place. This has to be done in the right order, in other words, the bits with the 'recessed' mitres have to be cut first, polished and stuck in place and then the other two bits with the 'sticky out' mitres can be cut and carefully fitted in place. Once you get your head round the process it's not too difficult - Rob
NickM":2z4suwjn said:Another option I have in the back of my mind is some sliding trays which capture, and are captured by, the side supports. I think the Warrington Tool Chest you brought to our attention had something like that. That may be a bit of a faff though, and I'm not sure my chest is large enough to warrant it (it would all be a bit fiddly to operate).
It would be great to see people experimenting with Ernest's clever system of unglued interlocking support rails, but on this scale I agree it wouldn't really be worthwhile.
NickM
Old Oak
Tiresias":18a21t0n said:This is what I did for a similar problem (it was to support a drop in top rather than a tray, but same principle).
Ply sides inside the box proper.
View attachment 5
Thin strips of oak to top.
View attachment 4
Insert, mark, cut.
View attachment 3
View attachment 2
View attachment 1
And voila.
Essentially the same as some one above (Rob?) suggested – only the top of the supports is mitred. The sides essentially keep themselves in place. If you were worried a small area of finish in the centre of each side could be stripped and a dot of glue used. If you do that over only a small area there should be no worries about differential movement. Really those sides aren’t going anywhere.
Of course I knew I was going to line it. Hence the ply. But you could veneer it to make a nicer inside surface. Actually, perhaps my lining counts as a veneer. A skill I didn’t know I had.
Thanks for sharing that. Very helpful.
NickM
Old Oak
I made another of these boxes which I think I will give to my cousin as a wedding present. It's American black walnut with a maple tray.
All of the walnut, including the bandsaw veneer I made for the top all came from the same board which is nice.
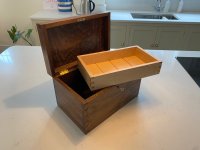
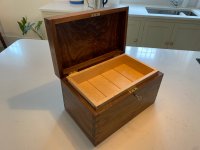
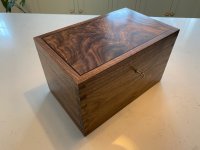
All of the walnut, including the bandsaw veneer I made for the top all came from the same board which is nice.
Woodbloke
Sequoia
Nice job; I think I might have included a liner of some sort. Following my brother's visit last weekend, I have another few boxes of different sorts to add to the 'tuit' list  - Rob
- Rob
- Rob