• Hi all and welcome to TheWoodHaven2 brought into the 21st Century, kicking and screaming! We all have Alasdair to thank for the vast bulk of the heavy lifting to get us here, no more so than me because he's taken away a huge burden of responsibility from my shoulders and brought us to this new shiny home, with all your previous content (hopefully) still intact! Please peruse and feed back. There is still plenty to do, like changing the colour scheme, adding the banner graphic, tweaking the odd setting here and there so I have added a new thread in the 'Technical Issues, Bugs and Feature Requests' forum for you to add any issues you find, any missing settings or just anything you'd like to see added/removed from the feature set that Xenforo offers. We will get to everything over the coming weeks so please be patient, but add anything at all to the thread I mention above and we promise to get to them over the next few days/weeks/months. In the meantime, please enjoy!

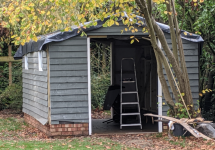
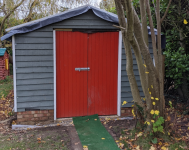
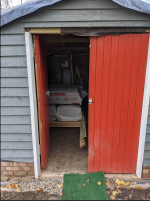
Nick's workshop

Great progress Nick.

I have turned the images for you.

Photos taken on Apple devices have an annoying habit of not rotating properly when viewed on non apple platforms.
For best results take all your photos in landscape view with the volume control button at the bottom of the camera.
 
Thanks all - and thanks for rotating the photos.

First question: what do I do with the DPM that is now sticking out around the edges? Cut it back to the concrete? Thanks!

(With a bit of luck the builder will lend me a labourer this afternoon so I can get the walls put back up)
 
Cut the DPM off at the bottom edge, where it starts to tuck under the concrete.
 
Thanks Mike- seems easy enough. Presumably I should dig a shallow trench to below the dpm around the slab and fill with pea shingle or serving, so I don't have water or wet soil sitting against the slab?
 
I finally found some time to put this up today, with the help of a labourer. Photos to follow- it was dark when we finished at about 5pm. There were 8 different wall panels which were seriously heavy and they did take a lot of effort to move, but the ridge beam, rafters; osb roof sheets and door linings went in pretty easily. There is quite a long snag list of things to sort out before I am happy with the basic structure and I'll show some of these in photos in the coming days, and I still need to get the doors on and the permanent roof material, but to get it up so have a dry place to store things for now is pleasing for a day's work.

But my mind is now turning to insulating it - I never bothered insulating the building in its previous location. Looking at the roof design in Mike's "How to build a shed" template: how important is it to have a ventilated space between the insulation and the osb that sits above it?

I note from some of the builds that another method is to put breather membrane rather than osb across the tops of the rafters; then batten and install the roof material. I think I'd prefer to do that here - just remove the OSB I put on top of the rafters today and move it to the under-side; install 100mm or 170mm glass wool insulation between the rafters; cover over with breather membrane; then 25mm battens; then the box profile sheets. Is that OK?

Also - is there any reason I cannot use softwood plywood instead of osb to line the walls inside? I prefer working with plywood than OSB, and 12mm ply is no more expensive than 11mm OSB at the moment (although I note that materials prices have all increased considerably since I built it in 2018!). I remember Mike saying that the OSB forms a vapour barrier due to the glue content, is the same true of plywood? If not: I used a big sheet of 1200ga DPM today to cover the roof as that is all they had in screwfix, so presumably I could use that on the inside, behind the plywood as a vapour barrier?
 
That airgap under the OSB is absolutely critical. The roof will fail without it.......but in the long period prior to failure it will harbour damp and mould.
 
Thanks Mike. In my case I am using box profile cladding as the roof, so would run horizontal battens across the tops of the rafters and fix the metal sheets to that. So from bottom to top, I'd have:

OSB
Rafter (with insulation between)
Breather membrane
Batten
Metal roof sheets

Does that work?
 
Photos from last weekend's efforts attached.

I had another 4-5 hours at it today and got the doors on, started to insulate and line it and fixed a few issues that I'd left last weekend. There are double doors on the front and a large door at the back. That back door serves absolutely no purpose with the shed in its new location, I am kicking myself for not realising this until I was fitting it. I will fix it closed - it leads to nowhere. Had I realised I'd have done something different. Oh well.

[EDIT: image removed as it was up side down, pls see below instead]
 
Screenshot 2020-11-14 at 23.26.31.png

I've rotated the image both ways before uploading above, but it always shows up side down. So here is a screenshot of the photo instead.
 
As you can see, the cladding suffered some damage while they were being stored, but nothing that isn't fixable. The corners have been left open because I want to replace some of the bolts.
 
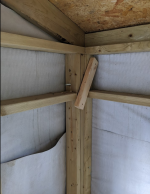
As I mentioned, I put the basic structure up in a day with the help of a labourer. We had a lot to do and quite a few issues arose as we went on. Rightly or wrongly, I dedided that we should focus our time on doing the heavy work - if we came across a problem that we couldn't quickly resolve, I'd make do as best I could and thn go back and repair it later. The main problem we could not reconcile (or even understand) was that the front and back walls simply would not go in plumb - the bottoms kicked out by about 20mm in all four corners. Th tops were fine - on this one I put in a new bolt because I have longer bolts now than I did last time and they are just easier to use, but it lined up OK:

Screenshot 2020-11-16 at 13.08.01.png

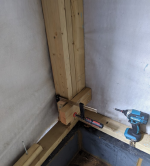
But the bottoms kicked out. So later I went back and used a clamp (and a sledgehammer from the other side) to "encourage" them in to line:

Screenshot 2020-11-16 at 13.17.35.png

The reason they were doing this was that the cladding on the front wall, which covers the corner of the side wall, had curled inwards a bit at the bottom. It took me 2 hours to work that out. The fix took about 5 mins.

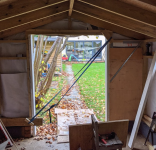
The other problem was one of sheer stupidity. In my rush to get the walls up, I checked each one was level and square only once, when it first went up. Clearly they subsequently moved as other walls were added. I really should have gone back around before bolting it all up to make sure everything was square when I had the labourer here, but I didn't. The problem became apparent when I tried to put the doors on - the whole front wall had racked over by about 30mm, so quite a lot. It would have taken seconds to fix this at the time, but I didn't, and so had to set up a ratchet strap to pull it back in to square before adding the lining on the inside wall to hold it in place. It worked well - this is just after I'd finished sorting out the right hand side (which did something nasty to the left hand side, easily fixed). I will ply over this to hide the metal strap which is likely overkill anyway, and add stability by attaching to the rafters as well.

Screenshot 2020-11-16 at 13.26.12.png

The biggest problem I had was of my own making though. I'd tried to widen the bolt hole on a back wall to take a bigger bolt, but managed to get my drill bit trapped and embedded in the wall and after a stupid attempt to hammer it through I only had about 40mm of the bit to fit back into the chuck, and that was impossible due to its location. I spent 2 hours trying to get it out but couldn't do it. Ultimately I gave up, and instead cut a small hole in the back of the corner post into which the back of the drill it could sit.
 
Frustrating when things nudge themselves out of square and plumb........

Anyway, well done for A/ spotting the problem, and B/ sorting it.
 
Wow, that looks hugely frustrating Roger! Well done for getting it fixed. At least I've only got myself to blame in my case - I'd always rather that than having someone else to blame as I know I'll believe me when I say it's my fault. Builders rarely seem to agree with me that it's their fault, and that just adds to my frustration.

An interesting thread though. The "corrective post tensioning" thing is actually similar to something I do when putting up floating shelves in the kids rooms. I am convinced that they are going to climb on them at some stage, so I want them to be as rigid as possible. So rather than just screw the fork-style brackets to the wall, I always put wall anchors where the prongs sit; push the threaded bar through each prong; and secure into the wall anchor; put a washer over the front end of the prong and tighten a nut as hard as I can. It seems to firm them up quite a bit. Similar logic (I think!), just turned 90 degrees.
 
That's called post-tensioning, Nick, and is one of the standard techniques of structural engineering. A concrete slab which might be, say, 300mm thick with normal reinforcement might be only 200 thick if post-tensioned. And vertically, a wall which ends without a junction, pier or a return is often strengthened by embedding essentially a long threaded rod into the foundations and tightening a nut down somewhere near the top of the wall.
 
Some more photos from this weekend. I got the doors on after squaring the building up again - they need a good clean!

Screenshot 2020-11-17 at 18.48.51.png

I don't know what has happened to the breather membrane on that front wall- it was not like that when the building was taken down in January. I'll have to investigate. I have no overhang at all on the front or back of the building (defintely a mistake, aesthetically as well as practically) so it does really matter that there is a proper waterproof layer. I suspect I'll have to remove some of the cladding and re-fix it. Argh.

And then today, some nice new stuff arrived:

Screenshot 2020-11-17 at 19.09.45.png

I have a pile of those sort-of rigid insulation batts for the walls and 10 sheets of 11mm plywood to line the walls; and a big pile of roof batten, for battening the roof (obviously). The delivery driver was super helpful and helped me carry all of this stuff into the garage, in return for my gift of a sheet carrier handle. And as insulating and lining the walls is all indoor work, I can (theoretically) do it in the evenings after work/kids bed time. Let's see if I manage it this week. You can also see that I've started to dig a trench around the slab and fill with pea shingle, to prevent water/soil/leaves/whatever sitting against the slab above the DPC. Lots more to do on that and lots of tidying up to do generally, but that trench, plus some guttering for the water running off the roof, should do the job.
 
The other job that I am going to need to tackle soon is the floor. This is a frustration: I wanted a much smoother finish on the concrete and was going to paint that and use it as my finished floor. But the builder left it very rough. I should have been there to supervise but work got in the way and I left him to it - as far as I can tell they did little more than drag a timber across it. And then the bricklayer's labourer cut the blocks on it and generally made a right mess. Then I left it for a month gathering leaves and other garden waste before putting the walls up. Result: it's dusty and filthy, and rough and I cannot live with that. So I am going to put down Ardex K 301 (a self levelling compound suitable to use as a finished floor) which is a product i have used before and really liked. An expense and a task I could have done without. In particular as it is a large area to do with no help, and lockdown means getting help is difficult. But before I even get that far I first need to clean the floor. Now that I've got the sheet material etc for the wall lining, my thoughts on order of play are:

1) insulate and line walls (I might as well do the roof while I am at it)
2) paint the walls
3) cover the walls with plastic sheets and then power wash the concrete floor, brushing the water out of the door
4) leave to dry out a bit, then remove plastic sheets and vacuum the floor
5) put down the SLC.
6) paint when dry with floor paint.

It is annoying that I've got this job to do - part of the reason for getting the builder (who I generally trust) to do the slab was that I thought I'd end up with a decent finish, but it is what it is.

Thoughts on the above plan? the main concern I have is the amount of water I will be putting inside the building when I power wash it. The inside skin is made of thermalite blocks which are surely going to soak up a lot of that, and the concrete itself is likely to hold moisture for a while too.
 
Is there not a machine you could hire for half a day to clean up the surface before applying the SLC?

I would think the use of that volume of water is likely to take an age to leave the fabric of the building.
 
I wouldn't power wash it. Put on some good music, elbow grease, bucket and bristle brush. Problem solved. It doesn't need to be spotless.
 
Thanks both. Malcolm, that is exactly my concern - what sort of machine do you have in mind? A concrete grinder or something? And Roger, that is the other alternative. If it was July I'd be happy power washing it, but it's not. I'll try to get some photos so you can see what I am dealing with here, but a comination of a rough surface; a bricklayer and labourer who made a mess of the slab (see photos on previous page); and then me and a labourer walking all over it in muddy boots have left a serious mess that I do think needs quite a bit of water to clean off.

The Ardex SLC can be laid over damp surfaces, but they do have to be clean (They have some clever science at Ardex).
 
I have no idea what machines may be available, but if there are any, I'm sure someone here will know.

Otherwise, It looks like Roger says that elbow grease, a wet vac and a leaf blower to dry the elbow grease might be what it needs.
 
Do you need a concrete floor? It is cold, dusty and damages anything dropped on it. Laying P5 T+G chipboard would be the way I would go, either straight onto the floor (+/- membrane) or on bearers if you want insulation and can afford the height.
 
Thanks both. Malcolm- I suspect if I go that route it will end up with doing a few rounds of scrubbing, vacuuming and drying!

I'd never even considered a chipboard floor - it seemed an unnecessary task/cost to install one as I thought I'd have a good flat clean concrete floor. I don't really care what my finished floor is made of, as long as it is flat, level, clean, dry and durable.

The slab should be dry - the builder put in a DPM under the concrete. But obviously this is not built to building regs standards and despite my little trench around the outside which should reduce moisture getting in to the side of the slab, it is surely inevitable that some moisture will find its way through. So I cannot bring myself to just put chipboard (or OSB or whatever) directly onto the concrete. I do however have a lot of DPM left so could easily put that down underneath. Not sure there would be any downside to this, so for now let's assume I'd do that.

As regards insulating under a chipboard floor: Height-wise, I am struggling a bit. Inside, it is just about head height at the side walls, and about 2.1m under the ties. It feels fine at the moment because I've not lined the roof - it is going to be a bit tighter when I do. But One more importantly, my doors open inwards so clearance is an issue. I think there is about 50mm potentially - the new brick plinth is maybe 20mm higher than the last one, and there was a timber strip under the doorway in the previous location so adding those things together, I get to a potential 50mm clearance before I need to adjust the doors (I would install door stops anyway to avoid excess drafts.) So there might just be about space for 25mm of PIR insulation under a chipboard floor, which I think would still leave acceptable headroom. I am assuming that the thermal benefit would be negligible. (I am discounting poystyrene - just don't like it).

To be honest the main function of the insulation for me would be to flatten out the rough bits so the chipboard has a smooth flat surface to rest on! The cheaper alternative would be to use a normal flooring underlay under the chipboard, like you might with a floating engineered wood floor.

So my options are:

1) clean floor and put down SLC wear layer and paint (hard; time consuming; surprisingly expensive; but doesn't reduce headroom)

2) 22mm chipboard (or OSB, ply) layed directly over concrete with DPM underneath (cheap, quick, clean, more comfortable, no material reduction in headroom; but as concrete floor isn't great I'm not sure how good this would feel)

3) 22mm chipboard (or OSB, ply) layed over 25mm PIR insulation with DPM underneath, either on bearers or as a complete "sheet" covering the floor (more expensive than option 2 but still considerably cheaper and considerably easier than 1; expect it to feel nicer under foot; loss of headroom / door clearance should be manageable. Thermal benefit expected to be negligible)

4) 22mm chipboard (Or OSB, ply) floated over laminate underlay like Timbermate Excel, with built-in DPM. (cheap and quick, minimal impact on headroom; no concerns on door clearance)

The more I think about it, the more I am tempted by options 3 and 4. I would still give the concrete a decent brush and vacuum, but if nothing else it will save me about £250 on the Ardex SLC (and let's be honest - I could easily make a mess of doing the SLC on an area that large, it is twice as large as any I've done before). I'd paint the chipboard with floor paint to brigthen it up a bit and to increase durability. The only concession I think I'd make is to make sure everything that goes in there- workbench; saw; shelving etc goes on castors so it doesn't scratch up the floor if I'm dragging them around. But that is no real hardship.

Are there any downsides to options 3 and 4 that I am missing?
Thanks!
 
I have a variant on 3.
Concrete base with DPM like yours turned out less than perfect finish.
I screwed 25mm tiling battens down with packers to get it dead flat, then filled all gaps under battens with mortar.
25 mm polystyrene in all the gaps and 18mm sheathing ply screwed into the battens. 2-3 coats of water based floor varnish. just starting to wear in busy patches after about 13 years
Not fantastic insulation but better than nowt but the wooden surface is so much nicer to stand on if I'm out there all day.

No regrets over this method.

Bob
 
I have a floating floor, chipboard on pir.

Pir will deform if there are point forces applied to it so I suspect you'll be OK and it would absorb some of your lumps and bumps.
 
I'll second the idea for everything on castors. Absolutely everything in my 'shop is on wheels. You'd be surprised how much rearranging you do on the fly just get the spac to get one job done, and how easy it is when they're on wheels.

I can recommend the quality and value of Coldene Castors.

https://coldene.co.uk/

Made in Britain and much better quality and tolerances than cheaper ones available in large outlets.

I found the rubber wheels, even on painted shuttering ply, deformed under heavy loads, so get the hard polypropylene wheels, and I particularly favour the twin versions for heavier stuff.

https://mendipcastors.co.uk/product/black-polypropylene-twin-wheels-bolt-hole-braked/
 
greeno":2hxnv972 said:
I have a floating floor, chipboard on pir.
Same here. My floor is fully suspended and if you were to lift one of the ply sheets on the floor (covered with hardboard) the earth would be at least 300mm underneath. As I've done it this way, its easy to run the ring main underneath the floor so that power could be supplied to the router table and AirPress that both sit slap bang in the middle of the shop - Rob
 
Thanks all.

I went out to measure the gap under the doors. It's nothing like the 50mm I estimated- it's 30mm at best.

So if I want a chipboard* floor, and I think I do, then I can either shave 10mm or so off the top and bottom of each door with a circular saw and go with the 25mm PIR/22mm Chipboard option; or save myself a job and just use laminate underlay and an 18mm chipboard floor.

I therefore have 2 questions:

1) I am fairly sure I want to float the chipboard floor in either case. It will be fully supported on PIR/underlay, which is entirely supported by the slab. Any reason why I'd go with 22mm instead of 18mm?

2) Any thoughts on the viability of the laminate underlay? I can't see why it shouldn't work, but I might be missing something.

Thanks!

*chipboard or ply- if ply, 18mm is surely enough. I read through Greno's posts and based on his comments, I have discounted using OSB for the floor.
 
If you've a heavy bench or machinery I certainly would go for 22mm rather than 18. OSB is completely unsuitable as a final floor finish, as others have said, and whatever you go for it should be T&G all round and fully glued.
 
Just for once Mike I feel I have to disagree with you, my workshop floor is 18 mil tongue and groove edge OSB 2.4 x 600 mil, I have very heavy cast-iron bits on it which I slide about a bit now and again, and it still looks as good as the day went down about eight years ago with 2or 3 coats of water-based polyurethane floor varnish. Just screwed down to joists at 16 inch centres, no noggins I relied on the T&G. Ian
 
Thanks all. I don't have any really heavy stuff to be honest. My workbench is the heaviest thing and that is a DIY job, made from 8x 47x100 timbers and a bit of 25mm plywood. If it is 50kg I'd be surprised. So 18mm might be enough.

Out of interest, what is the specific problem with OSB as a floor? I've used 18mm OSB to board out parts of the loft, which is used for storage of lightweight stuff.
 
The problem is splinters. It's essentially made up of a whole lot of splinters glued together, and any damage will leave a whole lot of them sticking up ready to catch the unwary.
 
It'll raise your threshold slightly but what is do is run a course of bricks across the threshold, you have a half brick on one side, you'll easily be able to cut that out to make it neat. This gives you a new floor height.

With mortar you will have 75mm so plenty of depth for chipboard and insulation.

If you go chipboard, get the flooring (think it's 600x2400). It's all moisture resistant.

The s stuff for lofts isn't.
 
Back
Top