• Hi all and welcome to TheWoodHaven2 brought into the 21st Century, kicking and screaming! We all have Alasdair to thank for the vast bulk of the heavy lifting to get us here, no more so than me because he's taken away a huge burden of responsibility from my shoulders and brought us to this new shiny home, with all your previous content (hopefully) still intact! Please peruse and feed back. There is still plenty to do, like changing the colour scheme, adding the banner graphic, tweaking the odd setting here and there so I have added a new thread in the 'Technical Issues, Bugs and Feature Requests' forum for you to add any issues you find, any missing settings or just anything you'd like to see added/removed from the feature set that Xenforo offers. We will get to everything over the coming weeks so please be patient, but add anything at all to the thread I mention above and we promise to get to them over the next few days/weeks/months. In the meantime, please enjoy!

Patio table refurbishment

Lons

Old Oak
Joined
Jul 21, 2014
Messages
2,973
Reaction score
1,127
Location
Northumberland
Name
Bob
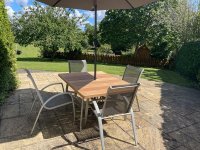
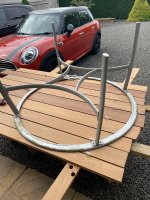
We bought an aluminium and Glass topped table and four chairs from Costco donkeys years ago and my wife hates the glass top which always looks scruffy. She's been making noises for ages about buying a new set but the prices of decent stuff definitely doesn't appeal to me at all. :rolleyes: So after close inspection, the chairs are in good nick as is the aluninium frame and legs so I decided to make a hybrid table using the reclaimed science bench tops that Ray bet his house on being iroko. :)

I originally intended to just plant it on top of the existing round frame maybe in a bit like a sunburst pattern but decided to use just the legs and make a rectangular shape instead of around 1100 x 1400. My intention is to fit breadboad ends and sides around 50mm deep.

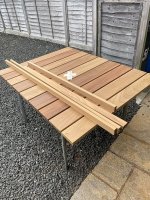
Initial spacing out
01.JPG:cautious:

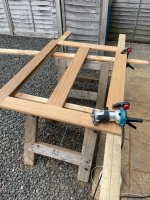
Frame glued and clamped having dug out my old little used biscuit jointer for the joints. (Some of us don't own a domino) and dowels would have been more hassle.

02.JPG

Frame sanded and all edges rounded with the screaming Makita midget.
03.JPG

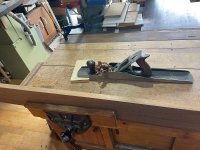
A bit of enjoyable edge planing of the top sections using the lovely Bedrock I managed to aquire from a mate - thanks Sam (y)
04.JPG

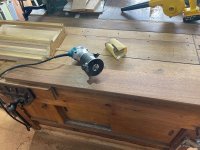
Then more routing

05.JPG

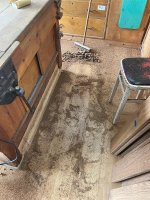
I hate the mess they make. :sick:

06.JPG

A quick session with the ROS

07.JPG

Then out with the Titebond premium and loads of screws.
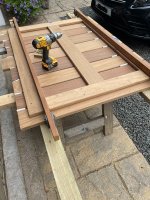
08.JPG

09.JPG

That's enough for today and hopefully I can get back on to it over the weekend so the next step is to use a tracksaw to trim the top to size and I intend to fit a 50mm deep edge all round probably using the biscuit jointer again, round everything over including the corners, drill a hole in the centre for the brolly, final sand and treatment before fixing to the legs which need cleaning up first.

Happy wife, no out of pocket expense so happy me and I'm sure it will be worth oodles of brownie points from the missus. :)
 
That looks like an ideal way to make use of the ready made frame and some beautiful suitable wood.
I wonder if you have kept the glass top?!
 
...........I wonder if you have kept the glass top?!

Still have it at the minute Andy and the circular aluminium ring (1200mm). The glass is frosted, presumably toughened and I have no idea what I could use it for so I'll need to get rid.

Will the frame need some gloop to protect it before the top goes on?

I've already glued and screwed it on Andy. I did think about that but decided it would affect the glue so opted for treatment at the end and I'll make sure it's applied everywhere. I'm more concerned about it warping than rotting tbh.
 
Nice and tidy workshop Bob. I spent an hour tidying mine up last night and it still looks a mess!

I see it as a mess Robert :oops: I try to do a quick clean up after every session even if just to keep on top of the thick stuff as I hate starting the next day wading through shavings.
The brushes, vac and blower are the most used items in the workshop. Not so keen on vacuuming the house though, that's just a chore especially as our old Labrador is shedding atm and the vac gets used twice a day. I don't understand how she's not bald.
 
I've already glued and screwed it on Andy. I did think about that but decided it would affect the glue so opted for treatment at the end and I'll make sure it's applied everywhere. I'm more concerned about it warping than rotting tbh
Sorry Bob I meant the Aluminium frame.
 
Sorry Bob I meant the Aluminium frame.
The circular section is being discarded Andy so just the leg ends screwed to the wood frame. The whole thing has to be cleaned up but it's anodised and in reasonable condition so won't need anything. I might put a thin rubber gasket (inner tube) between the metal and wood, haven't decided.
 
Looks great. Was it iroko? You'd know as it's a horrible smell. Great stuff but hateful to work with.
 
Looks great. Was it iroko? You'd know as it's a horrible smell. Great stuff but hateful to work with.
I don't know Dave but going off responses when I originally planed it up a couple of months ago it is. Raymedullary said he'd bet his house and tools on it. :ROFLMAO:
 
I managed a couple of hours this afternoon so a little progress............


Fixed the aluminium frame to the top with thick rubber gasket and screw bolts. It's nice and sturdy.

10.JPG

Trimmed the top to final size using the tracksaw with plastic spacers between the gaps to help avoid breakout

11.JPG

Put the edge trims through the little drum sander

12.JPG

And ready for the next steps another day.

13.JPG
 
Looks great Bob. Is it to late to separate those two darker planks to end up with light/dark alternating?
Oops my mistake has been uncovered, well spotted Andy. :)
I had laid them out alternating as much as possible but got it wrong when assembling, too late now as they're glued as well as screwed (so I'm screwed as well :ROFLMAO:). It is what it is now but I think from past experience using this wood outside that the colours will change anyway.

I haven't decided what to treat it will, teak oil was the first that came to mind but any suggestions for iroko would be welcome. Would have to be an oiled finish as I don't want the varnish option.
A mate recommended Osmo protection oil he used on his gate but I have no experience of that and he lives too far away for me to try some of his.
 
The dark planks look good together to me - naturally random and unique.
Lovely work and it will be useful.

I have (had) a square glass topped table from Freecycle
The top was ' bonded' to points on the frame.While being carried on its side the glass dropped off
Didnt break so I thought it could be bolted back on.
Glass drill bit did around two seconds spin and " fst"
The glass was transformed into sixteen million diamonds sparkling in the sun.
Still finding them 12 months on.
Its due to be replaced with some reclaimed decking.
 
................Glass drill bit did around two seconds spin and " fst"
The glass was transformed into sixteen million diamonds sparkling in the sun.
Still finding them 12 months on.............

I was building a posh stone garden room for a customer years ago and had the toughened double glazed units delivered. They were large heavy units and while I was fitting one of them into the frame, my customer, a friend decided to help and without asking me carried one of the units from his garage to the extension. He had seen me lower the units on to my boot before lifting into position so tried, missed and it touched the gravel path and explosed into a million bits. The look on his face was priceless but even more so when I told him how much he'd have to pay for a replacement. :ROFLMAO: He was banned from the site from then onwards.
 
I haven't decided what to treat it will, teak oil was the first that came to mind but any suggestions for iroko would be welcome. Would have to be an oiled finish as I don't want the varnish option.
A mate recommended Osmo protection oil he used on his gate but I have no experience of that and he lives too far away for me to try some of his.
I would personally leave it naked and let it go grey, maintenance free😃
I also like the patina that comes with the odd spill here and there, it tells the story of life.
But I know most like that new shiny look, including my dear wife.

I’ve tried different oils on outside tables and can’t honestly say I didn’t noticed any difference in any of the makes/brands, they all need re oiling
 
I haven't decided what to treat it will, teak oil was the first that came to mind but any suggestions for iroko would be welcome. Would have to be an oiled finish as I don't want the varnish option.
A mate recommended Osmo protection oil he used on his gate but I have no experience of that and he lives too far away for me to try some of his.

Here's a photo taken today of a TREATED iroko door (with treated Siberian larch panel) with an UNtreated iroko door frame and adjacent untreated Siberian larch siding. The door was painted only once 5 years ago and never touched again. Sorry, it's a varnish I think but as stated it's only been on once in 5 years.

PXL_20260726_101429149.jpg

Ok, it's not a completely fair comparison to a table as the orientation is different and it's always facing east but gives an idea.

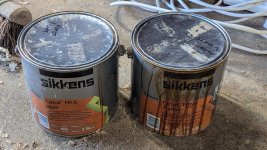
Treated with this stuff which costs a clean fortune but seems to work a treat. Drying time may be longer than expected as the wood is oily but that's the only other drawback.

PXL_20260726_101855848.jpg

I've used various other oils apparently with UV barriers on garden benches etc but they have needed reapplied perhaps every year or 2. Otherwise with Iroko I'd second letting it just go grey.
 
It did take a long time though I did that job in the winter and left the doors in a cold garage so wasn't ideal... After smelling the iroko though I could take anything.
 
I made my Iroko widows approximately 20 years ago and then stained and varnished with Renner water based varnish. They are still looking good with zero maintenance.
The great thing about Iroko is it doesn’t move and it’s the movement that destroys most paint finishes on joinery.
Renner paint has some elasticity which also helps.
 
More progress and nearly there now.

50m x 25mm edging glued and with biscuit joints, I really need to get some longer clamps or more clamp heads. None of my sash clamps are long enough.. I had to utilise some old flooring straps.

15.JPG

And here it is trimmed, routed and umbrella hole drilled. There are imperfections and old screw holes yet to be filled before a final scrape and or sanding and finish or not to be decided after consultation with the person who cooks my meals and washes my clothes. :) She's easily impressed though as always. :ROFLMAO:

16.JPG
 
Last edited:
Back
Top