• Hi all and welcome to TheWoodHaven2 brought into the 21st Century, kicking and screaming! We all have Alasdair to thank for the vast bulk of the heavy lifting to get us here, no more so than me because he's taken away a huge burden of responsibility from my shoulders and brought us to this new shiny home, with all your previous content (hopefully) still intact! Please peruse and feed back. There is still plenty to do, like changing the colour scheme, adding the banner graphic, tweaking the odd setting here and there so I have added a new thread in the 'Technical Issues, Bugs and Feature Requests' forum for you to add any issues you find, any missing settings or just anything you'd like to see added/removed from the feature set that Xenforo offers. We will get to everything over the coming weeks so please be patient, but add anything at all to the thread I mention above and we promise to get to them over the next few days/weeks/months. In the meantime, please enjoy!

Pete's Workshop Build

Surface mount the electrics either in your own wood boxing or plastic conduit. Makes rejigging the layout when new machines are bought a doodle. I have never regretted putting a socket in the floor either ( the only one that was not surface mounted :) )
 
Peteh":1apftn1r said:
Malc2098":1apftn1r said:
looking good.

Thanks.

I'm currently looking into roofing materials and basically want some kind of lightweight sheeting on top of OSB3. I've found some "Corotiles" which look similar to what you fitted. I think they claim a guarantee of 15 years so presumably the life expectancy is around 20 years.

I recall you use Anduline but I don't see them stocked anywhere so can't tell what the claimed longevity of them is. Any thoughts?

Pete


Pete,

I used Aquapan. http://www.metrotile.eu/en/aquapan

For an amateur like me, it was easy, and the neighbours like it.
 
Starting to get the roof built and we are wondering about continuing the roof overhang at the back of the workshop to provide covered space.

This will place the edge of the roof within 2m of the boundary. Does this mean it is no longer permitted development or is the 2m measured to the outside wall?
 
Pete, I'm afraid the answer is that it is any part of the building.

"If any part of the building, container or enclosure is within 2 metres of the boundary of the
curtilage of the house, then the height limit for the total development is restricted to 2.5
metres if it is to be permitted development.
"

From:https://assets.publishing.service.g...e/830643/190910_Tech_Guide_for_publishing.pdf

Why don't you build your roof with a normal overhang, then just under the eaves start a new lightweight roof with a separate light frame supporting it, so that if the council stamps its foot you could just remove the secondary structure without doing additional work to your main building.
 
Mike G":v5dooc9v said:
Pete, I'm afraid the answer is that it is any part of the building.

"If any part of the building, container or enclosure is within 2 metres of the boundary of the
curtilage of the house, then the height limit for the total development is restricted to 2.5
metres if it is to be permitted development.
"

From:https://assets.publishing.service.g...e/830643/190910_Tech_Guide_for_publishing.pdf

Why don't you build your roof with a normal overhang, then just under the eaves start a new lightweight roof with a separate light frame supporting it, so that if the council stamps its foot you could just remove the secondary structure without doing additional work to your main building.

Well, I will reduce the additional overhang but this is what our friendly Building Control Surveyor had to say on the subject!

"Hi Peter
I’ve always taken it to the wall elevation (and so does the building regs), and the planning portal information seems to confirm this. https://ecab.planningportal.co.uk/uploa ... ldings.pdf "
 
My post was a direct quote from the Planning Portal, and the thing you link to is the broad summary advice, saying nothing at all about where the measurements are taken.

Don't forget that Building Control has nothing whatever to do with Planning. You've just asked a tennis player about the offside rule in football.
 
The weather isn't quite so good as it has been in recent weeks so progress is becoming a little slower.

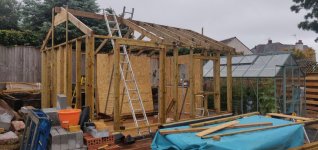
The frames were all completed in a couple of days and put into place the following day. The folding wedges and the bed of mortar worked out really well.

The roof is a much slower entity altogether. I'm working on my own and have tried placing the rafters individually and also as a built unit of two rafters and their cross tie. I don't know which is easier but I'm sticking with the individual pieces of wood due to the weights involved for one person.

I've found the best method for placing the cross ties is to use left over removal strapping which holds the cross members nicely and allows easy height adjustment by sliding up and down the rafters.

Maybe I didn't need to be using 6x2 cross ties but too late for a change now as only two left to pop up. Tomorrow's job as it's a bit wet today!

Thanks to Malcom for his Workshop blog - I think mine's going to bear many similarities!
IMG_20200727_121956.jpg
 
A busy few days during which time the concrete has more or less dried out after last weeks downpours which turned the base into a paddling pool.

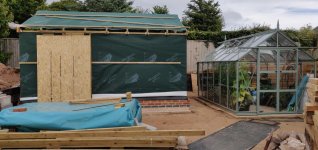
The thermalite blocks seem to take the longest to dry out and whilst removing some internal OSB sheathing I noitice the wood was damp on the block-facing edge. Appreciate this wood is fairly water replusing but decided to slip a 300mm vertical section of Damp Proof course vertically between sheathing and the blocks around the circumference of the structure.

Since I didn't want major water problems again, with the help of the good lady we pretty much wrapped the building in membrane yesterday and will unpin it to put the insulation in place and to finish it off properly.

Save for the gable ends and extra membrane at the roof edges, this is looking much more water tight.


IMG_20200731_171641.jpg

The fold at the bottom of the membrane is a temporary feature whilst we work out the hospital corners on the DPC, it allows us to get the square shape.
 
I have a question on insulation for the roof.

I note on Mike's shed build he used Glass fibre and filled the whole 6 inch cavity without an air gap, also sealing the eaves with the wooden contraptions.

Yet on Malc's build he was very careful to leave a 50mm air gap.

Anyone care to speculate why the difference or otherwise?

And any advice for me? I'm looking at a metal coated tile like sheeting (similar to what Malc used) which will sit on battens on top of breather membrane.

I may of course have now answered my own question in that perhaps the battens provide the required air gap...
 
Peter,

If I've understood all the technical stuff I had to learn, the metal roof will get hot and cold at various times, so whatever is underneath it will have some air and so some moisture in it. So that air needs to ventilate. If it doesn't, any moisture will stay on the timber and precipitate its rotting.

The insulation underneath will also have an effect on any air above it.

If I recall on mine, the insulation stopped 25 mm (ish) below the top of the rafters, and I put a 25 mm roofing batten across the rafters creating a 50mm gap.

I also ensured that the air could travel up and over the ridge and also along the roof from one end to the other.

Hope that helps.
 
I have a question on cladding. The wood has arrived and I'm wondering if there's a right and wrong way round to fix it to the battens.

The featheredge profile is basically a right angled triangle and does it matter whether the right angle goes on the batten or away from the batten.

Does it need to be consistent?
 
Either way will do, but don't mix it up, because it shows. A bit.
 
Progress has been slower with the inclement weather but the insulation is all in place.

IMG_20200813_114828.jpg

And the bulk of the roofing has been done. I used Britmet Ecopan plus which they say is either an aluzinc (??) or galvanised 0.9mm sheet covered in a textured acrylic material and formed to be lightweight and to have the appearance of tiles.

20200817_095207.jpg
 
And last night disaster struck in the form of the storm.

The floor is flooded and I don't know how.

I have a theory.

IMG_20200819_102229.jpg

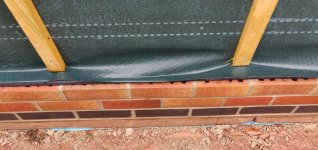
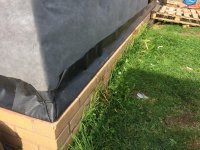
I put some of the battens on yesterday and the breather membrane no longer overlaps the entire brickwork.

I think the holes in the brick have filled with water which has found its way into the inside. It's only a theory but the best I can come up with...

What do I do? I have a number of options:

- Nothing because the routed edge of the bottom featheredge board will cover the brick
- Fill-in the "holes" in the brick with mortar and SBR which will make it waterproof
- Extend the breather membrane with some more breather membrane or DPC

A more elaborate extension of the third option would be to form the DPC under the breather membrane and then use silicone to stick it on the top outer edge of the bricks providing a proper seal.

This is a horrible setback, particularly since the weather isn't great.

The Thermalite blocks will hold water like a sponge. Fortunately I put some DPC between the blocks and the OSB inner lining.
 
Maybe.

I thought the breather membrane had to overlap the folded back DPC.

I got mine wrong to start with.

IMG_1296.JPG

Then was advised by more experienced members to overlap the DPC.

IMG_1300.JPG

Which allowed the battens to be almost as proud as the DPC wrapped around the arris rail along with the wedges will then let the cladding, particularly the bottom board, to overlap the brick plinth, as well as provide somewhere to staple the insect mesh.

IMG_1404.JPG

But I think you should definitely find the source of the ingress and real with it, if it isn't the membrane.
 
I hope you get your leak sorted. Fingers crossed re your roofing decision. The house we bought has a log store - admittedly built in 1980 or so. It has metal sheets that look like tiles. And leak like a sieve.
 
The building is well covered in breather membrane and the leak is definitely not from the roof. Whether the tiles will perform over time remains to be seen.

The leak is definitely around floor level so I extended the membrane with DPC so there is no water run-off into the hollow cavaties of the brick.

De-humidifier is on max!!!!!
 
Used a mop and now the dehumidifier to dry it all out.im certain the issue is water pooling in the brick cavities but time will tell.

The inclement weather really takes its toll.
 
My small store shed leaked before I boarded it, and I discovered that the source of the problem was water running under the DPC. I waited until it was dry and ran a bead of low-modulous silicon around the outside between the DPC and the brick it was sitting on. That solved the issue.

I'd not bother with a de-humidifier. Just throw doors and windows open.
 
The water ingress was definitely happening either under the DPC (most likely) or through the brick cavities. An extra layer of DPC under the membrane and overlapping the brickwork has cured the issue.

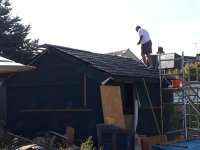
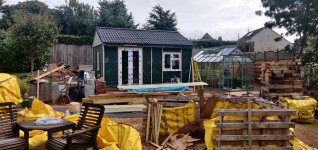
Cladding is underway although a bit back to front. We did the gable ends first in order to finish off the roof detail with the scaffold tower on site.

As well as the cladding have started the roof insulation (100mm Xtratherm) and just finished the windows and door.

The cladding really eats up the Bedec barn paint. First three 5l tons gone and another 5 on order. Not cheap at 60 quid a pop.

IMG_20200903_123735.jpg
 
TrimTheKing":31cq8d1g said:
Looks good. Aren’t you supposed to water down the first coat, which would make the paint go further?

Yes I added 30 to 40 percent water for the first coat
 
TrimTheKing":3tq79w6s said:
Peteh":3tq79w6s said:
TrimTheKing":3tq79w6s said:
Looks good. Aren’t you supposed to water down the first coat, which would make the paint go further?

Yes I added 30 to 40 percent water for the first coat

Wow!

Yep, but it's right. I've used thinner than that. The first coat really penetrates the surface of the wood, sealing it up so that the subsequent coats aren't soaked up so readily.
 
Mike G":2esrwnx8 said:
Yep, but it's right. I've used thinner than that. The first coat really penetrates the surface of the wood, sealing it up so that the subsequent coats aren't soaked up so readily.

Sorry Mike I wasn't suggesting it was wrong, more surprised that he's having to use so much paint given the thinned primer coat. How much would be required if the thinner primer coat wasn't going on... :eusa-think:
 
Yeah, Bedec costs a lot, and you need lots of it. I wish it weren't so......
 
It's been some time since any updates. We managed most of September away in the caravan in Hamble and the New Forest which proved to be a well earned break from all the building work going on at the house and with the workshop.

Since we returned we have tiled the new porch floor and had all the electrics fitted for the en-suite and the porch extension.

Progress has also been excellent on the Workshop but thankfully it's all been a little routine. Lots of painting of cladding and we now have only a couple of boards left to fit.

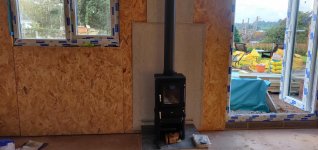
We also moved inside and insulated the rafters with 100mm Xtratherm. Sealed it all up with expanding foam. Bought a proper gun from Screwfix and it's a totally different proposition than when I last used expanding foam a couple of decades ago. So much more controllable.

Have now got half of the OSB board on as the ceiling.

Plus the "Hobbit" arrived from Salamander stoves so all cosy and warm and a "pathway" for any failed woodworking projects!!!

A few pictures below.

IMG_20201018_164431.jpg

In fact I can't find other pictures so will need to take some more tomorrow...
 
Back
Top