• Hi all and welcome to TheWoodHaven2 brought into the 21st Century, kicking and screaming! We all have Alasdair to thank for the vast bulk of the heavy lifting to get us here, no more so than me because he's taken away a huge burden of responsibility from my shoulders and brought us to this new shiny home, with all your previous content (hopefully) still intact! Please peruse and feed back. There is still plenty to do, like changing the colour scheme, adding the banner graphic, tweaking the odd setting here and there so I have added a new thread in the 'Technical Issues, Bugs and Feature Requests' forum for you to add any issues you find, any missing settings or just anything you'd like to see added/removed from the feature set that Xenforo offers. We will get to everything over the coming weeks so please be patient, but add anything at all to the thread I mention above and we promise to get to them over the next few days/weeks/months. In the meantime, please enjoy!

Router plane

Lurker

Old Oak
Joined
Nov 26, 2020
Messages
3,274
Reaction score
603
Location
Loughborough
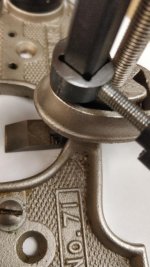
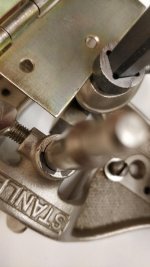
I have a Record 71 and it serves its purpose.
Is it just me or do others have a similar gripe with these.

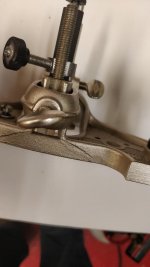
The depth adjustment works fine downwards, but I have to partly dismantle the blade to go up (retract).

Anyone got a solution?
 
I have a Record 71 and it serves its purpose.
Is it just me or do others have a similar gripe with these.

The depth adjustment works fine downwards, but I have to partly dismantle the blade to go up (retract).

Anyone got a solution?
I don't quite understand what you mean.

With the way I use mine, it's the same three-step process every time - slacken off the screw on the locking collar, advance the threaded knob on the vertical threaded rod by a fraction of a turn, retighten the collar screw.

Retraction only happens when I need to start a new cut somewhere else, or to sharpen the cutter, or to pack the tool away. If I'm starting a new cut, I'll just slacken the collar a bit more than usual, so the threaded knob will easily spin upwards.

(Mine's a Stanley, but the Record is a very close copy, I think.)
 
Ditto to what @AndyT said, although I tend to do it in a different order for lowering the cutter:
  1. Turn the adjuster knob on the vertical threaded rod taking up some or all of the backlash on in the cutter slot (with the locking knob still tight)
  2. Loosen the locking collar while applying gentle pressure onto the top of the cutter (or the top of the blade of the cutter) - this causes the cutter to "jump" down until the top of the notch is resting on the adjuster knob.
  3. Tighten the locking collar
For raising the cutter, I loosen the locking collar and just turn the adjuster knob anticlockwise until it's where I want it to be.

I used to do the lowering operation the same way @AndyT describes but I found that the cutter would occasionally slip lower during use (as the adjuster is pushing the cutter down at the bottom of the backlash rather than stopping it from lowering at the top of the backlash). That was mainly a problem on my Veritas one (before I replaced the locking collar knob with a bigger one), but I use the same method on both the Veritas and the Stanley now as it seems a bit safer (less risk of cutting too deep).
 
I loosen the collar quite a bit but I can’t raise the cutter using the adjustment knob.
I have to loosen the collar disengage the cutter from the knob, raise the knob and then re engage the cutter before tightening the knob.
If it’s just me, I’ll have a closer look to see if something is fowling.
 
I've not been and looked, but I wonder if the post that supports the cutter is at exactly 90 degrees to the base, or if it slopes by a degree or so, by design. Just thinking that a tiny bit of slope might make the action easier one way than the other...
 
Scrub that suggestion. Right angles as far as I can measure them.
The sides of the grooves where the stem of the cutter rests are clean and smooth on mine - if yours aren't, you could try gentle use of a slip stone or similar, or even a rub with a candle. I don't think that would spoil the gripping action of the collar or the positive vertical stop provided by the threaded adjuster.
Has your router ever been rusty?
 
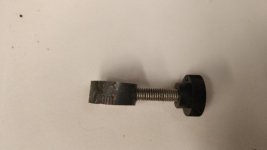
Yeah my plan is to give the back faces of the cutter a bit of a polish.
Will examine the slot in the cutter where the adjustment knob slots in.
Have already checked the grooves and they look fine.
Something somewhere is misaligned I think.
Until now, I had just assumed that they were all like mine.
 
I seen to remember having the same problem and realizing the section the cutter rides on is tapered so its gets tighter as you lift the blade.

Its not the usual direction of blade adjustment so I didn't do any thing about it, a detent drilled in the casting might hold the clamp still stopping it from locking.

Pete
 
I usually use my 71 with a home made depth stop.
Some time ago I made a depth collar for the blade from a circle of metal cut from an old 3/8 socket, drilled and tapped for a locking screw. This stops against the top of the blade mounting post.
depth_stop.jpg

Since it's directly on the blade and working against a solid mount it doesn't have any adjustment slop like a collar on the depth adjusting screw, plus the fixing screw is against the side of the blade - not against threads.

For small depths I don't use the depth adjusting flanged nut. I just install the blade, set (and tighten) it down against a flat surface and then use the hardware or a gauge block to set the depth stop. Easy enough to work down in small increments to the stop.
setting depth.jpgdepth_set.jpg

While leafing through a woodworking catalogue I read about the spring loaded blade holder on the Veritas router. I clipped a small length from a larger spring and put it round the screw on my 71. It works just as on the Veritas, the blade holding thumb screw can be slackened off without the blade trying to fall out the bottom.

spring_holding_blade.jpg

I slightly angled up the tapped hole for ease of use and the side towards the adjusting screw has to be thinned for clearance.

depthstop_top.jpg
depthstop_side.jpg
 
Spring loaded! When did I loose the spring for my veritas router plane. It is definitely not there. I will need to empty my tool box carefully and hope it is in there.
At least I now know it is missing in action.
 
Well I did what I said I would do and it adjusts much smoother, no particular reason just cumulative tweaks, I think.
It doesn’t really matter as, like you say it’s the blade lowering that matters and that’s nice and smooth.

The significant improvement is Jim’s suggestion of a spring on the collar screw, as he says, it keeps everything in place.
I’m sure most of you are like me and save odds and sods that might be useful so it was a simple matter of finding a suitable spring in the spring drawer and cutting it to length.
 
Back
Top