

It's always interesting to come across some aspect of a familiar tool that you were not aware of.
I think my experience of the Stanley 71 router plane is fairly common - when I first got one, the method I worked out is what I expect most of us do. Set the "shoe" to level the gap and leave it there. Set the cutter a little below the sole of the plane. Take a cut, lower the depth of the cutter, repeat and continue until you get to the depth you marked out in advance. You soon get used to the rhythm of turning the adjuster a few degrees to lower the cutter by the thickness of the shavings you want to take. It felt a fiddly approach at first, but it's logical and it worked.
Later on, when I got a copy of "Planecraft", the 1950s book promoting the whole range of Record planes, I was reassured to see that the instructions in there were along the same lines and I had been using the tool as intended.
But the depth gauge never made much sense. It looks a bit odd and inconvenient, so people wonder why it was designed as it was. The book said it could be used in two ways. As a separate depth gauge like this:

Or like this, assembled loose above the arch, set so that it just touches down onto the body as the required depth is reached:
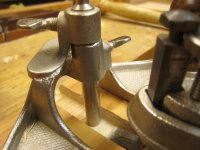
That's ok-ish, but it's not easy to see when the two bits of metal are touching and there's nothing to prevent you carrying on cutting deeper.
So I was intrigued to read in a recent issue of "Quercus" an article by Scott Wynn pointing out that the original Stanley instructions suggest a different approach altogether. (It's in issue 18, May/June 2023.)
Apparently, the cutter should be set at the full depth of the housing you are making and the tip of the gauge post just a little bit above the level of the cutting edge. That way, the post works as a crude sole or skate, preventing the cutter from diving into the cut. You set it up once, then work away, with no further adjustment needed. The original instructions suggest a difference of 1/16 of an inch, which seems rather a lot, so I tried a bit less. (You can read the originals here
https://archive.org/details/StanleyRout ... 1/mode/1up)
I thought I had better try this out. I sawed the sides of a housing on a bit of scrap softwood:

Set the cutter to the full depth:
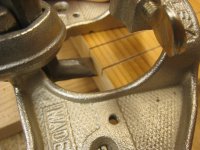
Set the tip of the post a shaving away from the cutting edge:

and set to work, with no preliminary chiselling:
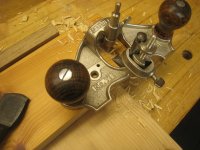
Well, it felt rather odd. It did work, sort of, but there were some issues. The tool feels out of control, as it's free to wobble about, without the usual reassuring contact between sole and wood.
Also, there's no depth limit at the far end of a cut, as the post is out in the air, doing nothing:
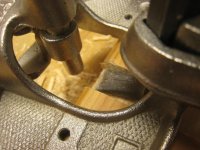

so if you think you can just mindlessly scrub back and forwards, think again. Or at least, work in from each side.
So where does that leave us? Maybe the post-controlled depth of cut would make sense on bigger work, such as staircase stringers, but it seemed crude to me. If you did most of the work with chisels, and only levelled the last little bit with the router, it would be much quicker and you wouldn't need the extra faff of setting the rod.
And as for Record's idea of the separate depth stop, a nail through a scrap of wood is better - it will scratch the high spots and show you where to cut next.
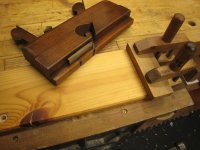
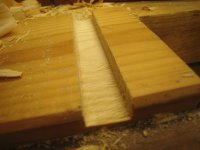
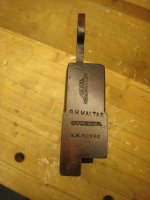
But is there a better way for the hand tool worker to cut housings? Yes there is, and it's the Dado or Trenching Plane. Here's a nice old example by Varvill of York, showing how it works. There's no need for any marking out - you just clamp or pin on a guide for the first few strokes. A pair of nickers sever the fibres and the cut goes down until the nice positive depth stop meets the surface. Very simple, very efficient. Even better on a wide board for deep shelves.



So what have I learned? That not every manufacturer's claim about a tool is always absolutely true for everyone. And that a wide selection of tools gives a wide choice of methods of reaching the required end.
I think my experience of the Stanley 71 router plane is fairly common - when I first got one, the method I worked out is what I expect most of us do. Set the "shoe" to level the gap and leave it there. Set the cutter a little below the sole of the plane. Take a cut, lower the depth of the cutter, repeat and continue until you get to the depth you marked out in advance. You soon get used to the rhythm of turning the adjuster a few degrees to lower the cutter by the thickness of the shavings you want to take. It felt a fiddly approach at first, but it's logical and it worked.
Later on, when I got a copy of "Planecraft", the 1950s book promoting the whole range of Record planes, I was reassured to see that the instructions in there were along the same lines and I had been using the tool as intended.
But the depth gauge never made much sense. It looks a bit odd and inconvenient, so people wonder why it was designed as it was. The book said it could be used in two ways. As a separate depth gauge like this:
Or like this, assembled loose above the arch, set so that it just touches down onto the body as the required depth is reached:
That's ok-ish, but it's not easy to see when the two bits of metal are touching and there's nothing to prevent you carrying on cutting deeper.
So I was intrigued to read in a recent issue of "Quercus" an article by Scott Wynn pointing out that the original Stanley instructions suggest a different approach altogether. (It's in issue 18, May/June 2023.)
Apparently, the cutter should be set at the full depth of the housing you are making and the tip of the gauge post just a little bit above the level of the cutting edge. That way, the post works as a crude sole or skate, preventing the cutter from diving into the cut. You set it up once, then work away, with no further adjustment needed. The original instructions suggest a difference of 1/16 of an inch, which seems rather a lot, so I tried a bit less. (You can read the originals here
https://archive.org/details/StanleyRout ... 1/mode/1up)
I thought I had better try this out. I sawed the sides of a housing on a bit of scrap softwood:
Set the cutter to the full depth:
Set the tip of the post a shaving away from the cutting edge:
and set to work, with no preliminary chiselling:
Well, it felt rather odd. It did work, sort of, but there were some issues. The tool feels out of control, as it's free to wobble about, without the usual reassuring contact between sole and wood.
Also, there's no depth limit at the far end of a cut, as the post is out in the air, doing nothing:
so if you think you can just mindlessly scrub back and forwards, think again. Or at least, work in from each side.
So where does that leave us? Maybe the post-controlled depth of cut would make sense on bigger work, such as staircase stringers, but it seemed crude to me. If you did most of the work with chisels, and only levelled the last little bit with the router, it would be much quicker and you wouldn't need the extra faff of setting the rod.
And as for Record's idea of the separate depth stop, a nail through a scrap of wood is better - it will scratch the high spots and show you where to cut next.
But is there a better way for the hand tool worker to cut housings? Yes there is, and it's the Dado or Trenching Plane. Here's a nice old example by Varvill of York, showing how it works. There's no need for any marking out - you just clamp or pin on a guide for the first few strokes. A pair of nickers sever the fibres and the cut goes down until the nice positive depth stop meets the surface. Very simple, very efficient. Even better on a wide board for deep shelves.
So what have I learned? That not every manufacturer's claim about a tool is always absolutely true for everyone. And that a wide selection of tools gives a wide choice of methods of reaching the required end.


 ) trip to Bristol Design. Who knows what I'll come away with :lol: