• Hi all and welcome to TheWoodHaven2 brought into the 21st Century, kicking and screaming! We all have Alasdair to thank for the vast bulk of the heavy lifting to get us here, no more so than me because he's taken away a huge burden of responsibility from my shoulders and brought us to this new shiny home, with all your previous content (hopefully) still intact! Please peruse and feed back. There is still plenty to do, like changing the colour scheme, adding the banner graphic, tweaking the odd setting here and there so I have added a new thread in the 'Technical Issues, Bugs and Feature Requests' forum for you to add any issues you find, any missing settings or just anything you'd like to see added/removed from the feature set that Xenforo offers. We will get to everything over the coming weeks so please be patient, but add anything at all to the thread I mention above and we promise to get to them over the next few days/weeks/months. In the meantime, please enjoy!

Small workshop

Hi Bob
Nothing Temporary on this job unless by temporary you men 20 years.

I appreciate now the joints should be the other way vertical rather than horizontal.
Time for a rethink of the doors..
 
MY63":1vrcaid9 said:
Hi Bob
Nothing Temporary on this job unless by temporary you men 20 years.

I appreciate now the joints should be the other way vertical rather than horizontal.
Time for a rethink of the doors..

Some how I thought you were talking about temporary doors for some reason. Might have mixed it up with Malcolm.

Bob
 
Why not just make some temporary doors out of 2 pieces of osb to make your workshop secure and weather tight and then once you have the workshop operational with a bench etc. (assuming it is a workshop for woodworking) then one of your first projects after making a work bench could be making some decent doors. That will give you time to work out how to make them properly so that they stand a chance of lasting 20 years.
 
Moteyi":zfosvs13 said:
Why not just make some temporary doors out of 2 pieces of osb to make your workshop secure and weather tight and then once you have the workshop operational with a bench etc. (assuming it is a workshop for woodworking) then one of your first projects after making a work bench could be making some decent doors. That will give you time to work out how to make them properly so that they stand a chance of lasting 20 years.

Thanks Moetyi the primary function is for leatherwork although I will have space for my band saw and sanders which are used for making moulds.

If I want to continue with this design would using either two lower rails vertically or alternatively a 95mm x 95mm lower and upper rail.

I also have a bit of an issue at the bottom of my doors my frames are 150mm x 45mm to allow for the cladding but my upper sill plate is 100mm x 45mm

2019-03-08_03-11-21 by my0771, on Flickr

I had envisioned having a piece with an angle here
 
This gives an idea of how to make a framed ledged and braced door. You might be able to use 2 of your rails for the top rails but the mid and bottom rail need to be thinner by the thickness of your cladding. You will also need to rebate the stiles and top rail by the thickness of your cladding.

framed_ledged_lined_braced_2.png
 
Doors aren't usually insulated and if they are they would be a sandwich construction - external mdf or ply either side of a thin (25mm) celotex core with 25mm thick battens round the edge. The faces would be glued and maybe pinned to the frame. This would give a 50mm thick door using 12mm sheet material.

Sent from my SM-G930F using Tapatalk
 
Michael, if your budget can stretch then I'd definitely make your doors like Moteyi has suggested.
 
In an ideal world I would start over but I spent the last of the increased increased budget (if you get my meaning) on the feather edge board which was delivered this morning.

I started this morning with new side pieces and plan to use the existing rails increasing the size of the tenons.
And cutting the mortices in the right place this time if they are no good I will have to consider boarding up the opening as the forecast mentioned snow for tomorrow.
 
All of the rails fit really well except one second one from the bottom is 10mm short if I have a piece of timber I will make another tomorrow when I start the other door weather permitting of course.

2019-03-09_05-14-55 by my0771, on Flickr

Forecast is for rain now but I can work under cover now it is surprisingly warm in the workshop even without doors once sheltered from the wind it makes a huge difference.
 
Nice frame, Michael. Much better than my long term temporary one.
 
No snow :eusa-clap: but we do have freezing rain and of course wind, cold wind.

So I made a temporary workbench inside the workshop not quite level but it gives me a chance to decide the final height of my fixed benches.

2019-03-10_12-52-00 by my0771, on Flickr

I have a new pile of timber that arrived yesterday waiting to be stained.

2019-03-10_01-03-06 by my0771, on Flickr
 
Out of curiosity, looking at the tools on your bench, are you also drilling out the bulk of the mortice first before venturing with your chisels ?
 
RogerS":2qb2anfu said:
Out of curiosity, looking at the tools on your bench, are you also drilling out the bulk of the mortice first before venturing with your chisels ?

Yes Roger it did not take me long to work out that it easier to drill out the bulk of the wood. Although I did have an hour when I worked by hand because I had not charged the batteries over night. You know it never crossed my mind to run an extension out there and use my mains drill.
 
I now have two frames everything I make has to be checked here are two of the inspection team checking my work.
This is Diesel

2019-03-10_05-51-19 by my0771, on Flickr

And little Zoe

2019-03-10_05-51-45 by my0771, on Flickr

I have left all of the ends long just in case there were any more splits.
I dont have any long clamps so I applied the glue on one side and brought them together with a rubber hammer and clamped the two pieces together. I had to use a hammer and pry bar to get them apart so there has been no movement. I used an expanding glue for the joints to fill some of the gaps.

I know nothing about fitting hinges so if anyone has any tips I would appreciate them as my cladding around the door will come up to the edge of the frame I would like the cladding to continue across the doors.
I think I am going to bend the hinges as MikeG did not really for security but I think it looks good.
 
I don't think you need to bend strap hinges, Michael. You can just use ordinary butt hinges with a framed door like that.
 
Mike G":1f64y7cm said:
I don't think you need to bend strap hinges, Michael. You can just use ordinary butt hinges with a framed door like that.

Thanks Mike I should be able to return them and get the correct ones.
When you have a minute I could do with some advice on the edges of my roof a few pages back I have left it as I am unsure how to proceed. I have filled the lower void where airflow was restricted and created a new void with battens but I am stuck on the edges.
 
If I remember I'll have a look in the morning. If I forget, jog me along.
 
Thanks Mike to save you going looking here are the relevant pictures, Roger mentioned that the airflow was blocked by the ridge.

2019-02-23_06-21-39 by my0771, on Flickr

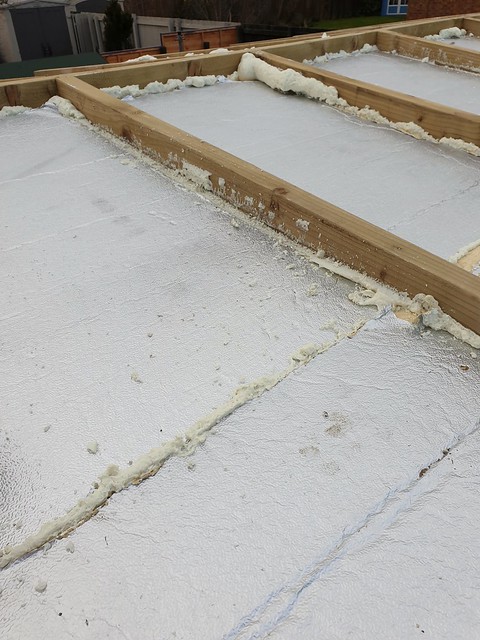
Although you said the airflow was not essential in this roof I filled the gap with more insulation and added battens on top.

2019-03-02_06-05-30 by my0771, on Flickr

I thought I needed to carry the edge of the roof forward at the front and back so cut some pieces to fit but I dont know where they should go.

2019-03-02_06-05-30 by my0771, on Flickr

I am also unsure how to finish the side edges for the EDPM I am going to use the metal profile edging that you discussed with Coolhands on his post.

I have enough OSB3 to cover the roof and have not ordered the EDPM as yet as I was not sure of over hangs.
I had to buy a second roll of membrane is there any point in applying it below the OSB3 layer so you would have the two layers of membrane facing each other either side of the 50mm air gap.

Thanks in advance.
 
Blimey, that's complicated it a bit. We now have to get the airflow along the length of the roof, from verge to verge, rather than up and over the roof, from eaves to eaves.

Let's deal with the easy stuff first. There was no need for any membrane up there at all. It's not doing any harm, so leave it alone, but you'd be wasting time and membrane to put any more up.

You are now going to need an overhang at each verge, because the air is going to have to get in under the OSB. The best place now for that is the soffit of the overhang. Tell you what.......it's probably best if I draw it. Give me a minute.
 
Believe it or not mike I got a piece of 95mm x 45mm 1.8m the hinges and still got £2 back :) from the cost of the galvanised strap hinges.

I am really happy with this door the other one is more of a problem child more of that later.

2019-03-11_03-16-23 by my0771, on Flickr

This is what I want to achieve with the feather edge board equal with that on the walls but still allowing the doors to open.

2019-03-11_03-17-17 by my0771, on Flickr

Is it possible and if so how?
 
You will either need to move the door outwards so the door body is flush with the outer surface of the frame and chamfer the cladding back on the door and the wall by 45 degrees.

Or have the door set back by the dept of the cladding and a gapwice the depth of the cladding than created by shortening the cladding pieces on the door.

Neither are ideal but first one possibly least worst.

Bob
 
MY63":34nipf5x said:
Thanks Bob I was hoping these Parliament hinges would work seriously expensive though.

2019-03-11_04-14-12 by my0771, on Flickr


Yes they would work but they are not the hinges you showed us earlier today?
Any method of moving the pivot point out further than the extent of the cladding will do the job.

Bob
 
You are correct Bob after I posted I did some research and spoke to the supplier so off I went to get the parliament hinges.

I decided to surface mount them first to make sure I had them in the right place.

2019-03-11_05-48-50 by my0771, on Flickr
 
Deejay":3uy3jxut said:
Morning Michael

If you want to improve security on outward opening doors, have a look at ...

https://www.youtube.com/watch?v=1RIgFpa5yv8

Google 'Hinge bolt' for alternative suppliers

Cheers

Dave

Good morning Dave
Thanks for your suggestion I will add them to my list.
Although the hinges are made of stainless steel and would be difficult to cut I don't see any reason to take chances.


My first door which is going to be the main door because it fits :eusa-dance: the other door is the problem clearly it has got wet and shrunk it is 735mm at one end and 738mm at the other end it should be 740mm at both ends.
Any advice appreciated.
 
3 options:

1) remake it
2) ignore it (the cladding will hide it)
3) give it a tap on one corner to make it square

So long as it fits in the hole you don't have a major problem, and if your doors are closing onto a frame of some sort then 2mm is not going to let in drafts.
 
Thanks Stevie
I have now hung the second door again surface mounted I know the frame is square and the door is a little out but the gap is equal.

2019-03-12_11-54-14 by my0771, on Flickr

2019-03-12_11-55-33 by my0771, on Flickr

I intend to put some wooden lining around the inside of the doors which will stop any drafts.
My plan is to use bolts for the left door and two mortise locks for the right hand door.

Clearly when I let the hinges into the frame and the door the gap will grow to 15 to 20 mm is it ok to glue and screw a strip to each door?
 
You know that blind man my old dad used to talk about, he'd be pleased to see that! :)
 
I would simply put a cover piece over the gap and leave the doors otherwise unchanged. The cover strip would obviously be on the main leaf. That's exactly how my doors are.
 
Back
Top