

Dr.Al
Old Oak
Carolyn's Mum came down for a few days to help out with care and that gave me the opportunity to have a couple of day trips up to Herefordshire to do a greenwood stool making course with Touch Wood. I'd originally been booked on the course a few weeks ago, but had to cancel with only a few days notice as a result of Carolyn's car crash. Despite the late notice, the tutor, Maurice, very kindly allowed me to shift to another course, which was this week.
The workshop was in the woods near Much Marcle (birthplace of Fred West in case anyone's interested) and consisted of a simple marquee with various pole lathes and shave horses set up inside.

It was a beautiful & peaceful location with zero facilities apart from a lovely cast iron kettle (which could be lowered on the frame to heat the water to boiling and provide an endless supply of tea):

There were three students and two teachers on the course; the other two students were making shave horses so I ended up with Maurice showing me the ropes pretty much 1:1, which was lovely. I didn't take many photos on the first day, but the focus was making the legs. It started with a lump of ash, which was split into quarters with a froe and then roughed to shape first with a single-bevel hatchet and then with a drawknife on the shave horse. Finally, it was onto the pole lathe to turn them to some sort of similar-ish shape to one another. It was my first time using froe, shaping with a hatchet, holding things on a shave horse, using a draw knife and also using a pole lathe, so lots to learn in a day!

After a fairly long day, Maurice took the spindles away with him to stick them in the oven and dry them out as much as possible (I've no idea how successful that was, but I guess we'll find out in a few months if they shrink a lot).
Day two started with a plank of 50 mm thick walnut. I'd had a look at it on the first day and had come prepared with some drawing pins and string to draw an ellipse onto the board as it seemed like it would suit it (Maurice had never seen the string & pins way of drawing an ellipse, so I managed to teach him something as well as the other way round!)
With the shape marked up on the walnut, I used a frame saw, aka turning saw (another first for me) to rough out the shape:

The walnut was narrower on one side than the other, but that felt like something that could be used in the end design. The next job was lots more hatchet work, to bring that bevel all the way round:

Once it was mostly there and my arm had a well-established ache, I moved onto the drawknife, this time clamping the walnut to the shave horse rather than trying to hold it with the pivot-y bit (which I'd used for the legs):

Finally for the bevel, I used a wooden spokeshave to clear up the drawknife marks.
For the top of the seat, I removed the sawmill marks with a travisher, another first for me:

The original intention was to leave the travisher marks as the final finish, but for reasons I'll explain later, that didn't happen in the end.
The now-baked spindles had a bit more attention, first using a bit of wire to make burnt black marks around the narrow bits:

The top end of the spindles then got reduced to final size with a Veritas 38 mm (1¼") tenon cutter in a Makita cordless drill. One of them ended up a bit lop-sided (I don't think I had the drill aligned that well), but the other two were okay.
Next, the holes were drilled (at 18°) in the seat, drilling from above with the seat clamped to an offcut of the walnut to reduce tear-out on exit. There was a choice of two drill bits, an old screw-tipped auger bit for use in a brace or a very expensive looking screw-tipped (which surprised me) auger bit for use in the cordless drill. After trying both in a bit of scrap, the old brace bit left a really rough finish and tore out a lot on entry (it might have been a bit blunt I guess), so I decided to wimp out and use the powered drill (the posh power-tool auger bit left a lovely clean hole). Edit, the posh auger bit was this one I think: https://tftools.com/collections/woo...ng-auger-bit-7-1-2-length?variant=19540107399
After cutting some slots in the legs and preparing some oak wedges, it was time to glue it all together (with Cascamite). This didn't go quite according to plan . The leg with the slightly wonky tenon on the end came out of the top with a big gap on one side and, more upsettingly, the walnut seat split by one of the other leg joints. I'm not sure what happened, I can only assume I wacked it in a bit hard.
We applied some glue to the crack and got a heavy duty ratchet strap around the top of the seat (ellipses aren't the easiest things to clamp!), then glued and knocked the wedges in and decided to call it time for tea and biscuits. After sitting and nattering for a while, it felt like the best option was for me to take the seat back home and try to finish it off in my own time once the crack-joining glue had cured. I was prepared to take Maurice's ratchet strap off and rush it home and get a replacement on, but Maurice wouldn't hear of it and told me to take the ratchet strap with me.
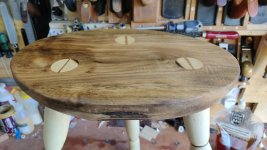
Back home the next day, I took the strap off and had a go at dealing with the issues. The crack was still quite visible so I used some walnut dust and thin superglue to try to make it at least flush with the surface - I don't think I can do better than that really. Where the wonky tenon emerged from the seat, I had some fun cutting (with a coping saw and then a chisel & a gouge) a bit of ash (and a small bit of oak) to insert into the gap to try to make the gap less obvious. All things considered, I was quite pleased with how it came out:

You'll notice the finish doesn't look very rustic any more on the top. Given that I'd had to sort that and the crack out (you'll see the crack in the photos below) and that I needed to bring the sawn-off-at-home tenons down to meet the surface of the seat, I spent a while pondering the best approach. In an ideal world, I probably would have got the travisher out and gone over the whole surface again. However, the travisher is in Herefordshire in someone else's workshop, so I decided to use a Stanley #4½ instead and just smooth out the whole surface.
The leg ends were marked by lifting them up with wedges until the seat was level on the bench and then marking around the bottom. I chopped them off with a Kataba and applied a slight bevel to the ends with a block plane (which was quite hard to do - I suspect there's an easier way to chamfer round things without using a lathe - perhaps a chisel would have been a better option).
Finally, it was just a case of applying a coat of the usual Mike's Magic Mix (it'll get a few more coats over the next few days):

For a sense of scale, it's 525 mm from floor (bench in that photo) to seat, which feels very comfortable for my lanky frame. The seat is 360 mm wide and 260 mm deep.

You can see the crack on the right-hand side of this image:
The black marks on the ends of the tenon were from the oven that dried the legs out overnight.
I really like the interesting grain patterns on that bit of walnut:

The workshop was in the woods near Much Marcle (birthplace of Fred West in case anyone's interested) and consisted of a simple marquee with various pole lathes and shave horses set up inside.
It was a beautiful & peaceful location with zero facilities apart from a lovely cast iron kettle (which could be lowered on the frame to heat the water to boiling and provide an endless supply of tea):
There were three students and two teachers on the course; the other two students were making shave horses so I ended up with Maurice showing me the ropes pretty much 1:1, which was lovely. I didn't take many photos on the first day, but the focus was making the legs. It started with a lump of ash, which was split into quarters with a froe and then roughed to shape first with a single-bevel hatchet and then with a drawknife on the shave horse. Finally, it was onto the pole lathe to turn them to some sort of similar-ish shape to one another. It was my first time using froe, shaping with a hatchet, holding things on a shave horse, using a draw knife and also using a pole lathe, so lots to learn in a day!
After a fairly long day, Maurice took the spindles away with him to stick them in the oven and dry them out as much as possible (I've no idea how successful that was, but I guess we'll find out in a few months if they shrink a lot).
Day two started with a plank of 50 mm thick walnut. I'd had a look at it on the first day and had come prepared with some drawing pins and string to draw an ellipse onto the board as it seemed like it would suit it (Maurice had never seen the string & pins way of drawing an ellipse, so I managed to teach him something as well as the other way round!)
With the shape marked up on the walnut, I used a frame saw, aka turning saw (another first for me) to rough out the shape:
The walnut was narrower on one side than the other, but that felt like something that could be used in the end design. The next job was lots more hatchet work, to bring that bevel all the way round:
Once it was mostly there and my arm had a well-established ache, I moved onto the drawknife, this time clamping the walnut to the shave horse rather than trying to hold it with the pivot-y bit (which I'd used for the legs):
Finally for the bevel, I used a wooden spokeshave to clear up the drawknife marks.
For the top of the seat, I removed the sawmill marks with a travisher, another first for me:
The original intention was to leave the travisher marks as the final finish, but for reasons I'll explain later, that didn't happen in the end.
The now-baked spindles had a bit more attention, first using a bit of wire to make burnt black marks around the narrow bits:
The top end of the spindles then got reduced to final size with a Veritas 38 mm (1¼") tenon cutter in a Makita cordless drill. One of them ended up a bit lop-sided (I don't think I had the drill aligned that well), but the other two were okay.
Next, the holes were drilled (at 18°) in the seat, drilling from above with the seat clamped to an offcut of the walnut to reduce tear-out on exit. There was a choice of two drill bits, an old screw-tipped auger bit for use in a brace or a very expensive looking screw-tipped (which surprised me) auger bit for use in the cordless drill. After trying both in a bit of scrap, the old brace bit left a really rough finish and tore out a lot on entry (it might have been a bit blunt I guess), so I decided to wimp out and use the powered drill (the posh power-tool auger bit left a lovely clean hole). Edit, the posh auger bit was this one I think: https://tftools.com/collections/woo...ng-auger-bit-7-1-2-length?variant=19540107399
After cutting some slots in the legs and preparing some oak wedges, it was time to glue it all together (with Cascamite). This didn't go quite according to plan
. The leg with the slightly wonky tenon on the end came out of the top with a big gap on one side and, more upsettingly, the walnut seat split by one of the other leg joints. I'm not sure what happened, I can only assume I wacked it in a bit hard.We applied some glue to the crack and got a heavy duty ratchet strap around the top of the seat (ellipses aren't the easiest things to clamp!), then glued and knocked the wedges in and decided to call it time for tea and biscuits. After sitting and nattering for a while, it felt like the best option was for me to take the seat back home and try to finish it off in my own time once the crack-joining glue had cured. I was prepared to take Maurice's ratchet strap off and rush it home and get a replacement on, but Maurice wouldn't hear of it and told me to take the ratchet strap with me.
Back home the next day, I took the strap off and had a go at dealing with the issues. The crack was still quite visible so I used some walnut dust and thin superglue to try to make it at least flush with the surface - I don't think I can do better than that really. Where the wonky tenon emerged from the seat, I had some fun cutting (with a coping saw and then a chisel & a gouge) a bit of ash (and a small bit of oak) to insert into the gap to try to make the gap less obvious. All things considered, I was quite pleased with how it came out:
You'll notice the finish doesn't look very rustic any more on the top. Given that I'd had to sort that and the crack out (you'll see the crack in the photos below) and that I needed to bring the sawn-off-at-home tenons down to meet the surface of the seat, I spent a while pondering the best approach. In an ideal world, I probably would have got the travisher out and gone over the whole surface again. However, the travisher is in Herefordshire in someone else's workshop, so I decided to use a Stanley #4½ instead and just smooth out the whole surface.
The leg ends were marked by lifting them up with wedges until the seat was level on the bench and then marking around the bottom. I chopped them off with a Kataba and applied a slight bevel to the ends with a block plane (which was quite hard to do - I suspect there's an easier way to chamfer round things without using a lathe - perhaps a chisel would have been a better option).
Finally, it was just a case of applying a coat of the usual Mike's Magic Mix (it'll get a few more coats over the next few days):
For a sense of scale, it's 525 mm from floor (bench in that photo) to seat, which feels very comfortable for my lanky frame. The seat is 360 mm wide and 260 mm deep.
You can see the crack on the right-hand side of this image:
The black marks on the ends of the tenon were from the oven that dried the legs out overnight.
I really like the interesting grain patterns on that bit of walnut:
Last edited:


 When I did it, I used a bit of wire that had been attached to a couple of cylinders of wood - one sat under the "ways" of the lathe and the other was held in the hand (you can see that end in the photo above) so I didn't have to touch the wire.
 ). Of course I've never tried using a pole lathe (or a draw knife, or a hatchet, or a travisher....) with any dry wood, so perhaps I would change my mind quickly if I had a fair comparison.