• Hi all and welcome to TheWoodHaven2 brought into the 21st Century, kicking and screaming! We all have Alasdair to thank for the vast bulk of the heavy lifting to get us here, no more so than me because he's taken away a huge burden of responsibility from my shoulders and brought us to this new shiny home, with all your previous content (hopefully) still intact! Please peruse and feed back. There is still plenty to do, like changing the colour scheme, adding the banner graphic, tweaking the odd setting here and there so I have added a new thread in the 'Technical Issues, Bugs and Feature Requests' forum for you to add any issues you find, any missing settings or just anything you'd like to see added/removed from the feature set that Xenforo offers. We will get to everything over the coming weeks so please be patient, but add anything at all to the thread I mention above and we promise to get to them over the next few days/weeks/months. In the meantime, please enjoy!

Workshop build - woodwork started at last !

chataigner

Old Oak
Joined
Jul 23, 2014
Messages
1,127
Reaction score
55
Location
Périgord-Limousin National Park, SW France
I'm well on the way with my new workshop - longstanding members may remember the build thread that was on WH1. However... as the workshop is in an old barn there is no natural light. The barn attached to the house, so that wall cannot have windows, the front has big barn doors but we are in a conservation area so changing those for lots of glass is not permitted. Because the barn is built into a slope the west wall is fully below ground, so that leaves the south wall which is along the rise of the hill, so partly below ground. The powers that be have agreed that I can put a window into the south wall provided it is all in oak (including the lintel etc.) and so I've started excavating the outside so that the window will be at a sensible height inside.
Here is the site :

workshop%20window%20008_1.jpg


This is the only practical approach open to me, as putting the window any higher will place it above the workshop ceiling/mezzanine floor.

workshop%20window%20010_1.jpg


The plan is to use the stone from the wall (70cm thick) to build a retaining wall for the excavation. The window position is marked in red, it's about 2m by 1m.

workshopwindow1.png


Here is the same view from inside - the red arrow points to the pilot hole I drilled which is roughly at the original ground level on the outside.

workshopwindow2.png


Bit more digging to do, then I attack the wall !!
 
That should give you some good exercise David!

I opted for no windows in my shop when putting up the building on the combined grounds of security and sods law of putting a window just where I later wanted a cupboard or a machine plus vulnerability of flying objects.

At least you will have the option of fitting shutters for when you are away.

Looking forward to the rest of the WIP especially the lintel method.

Bob
 
I suppose the first step is to insert a lintel but how do you do that on a rubble wall construction ?
And I suppose you'll have to drain your newly excavated hole?
Just an idea but would a higher window and a series of reflectors work - seen similar things done on "Grand Designs" where they call them light boxes?

Rod
 
Rod":38vikgyk said:
I suppose the first step is to insert a lintel but how do you do that on a rubble wall construction ?
And I suppose you'll have to drain your newly excavated hole?
Just an idea but would a higher window and a series of reflectors work - seen similar things done on "Grand Designs" where they call them light boxes?

Rod

You punch a couple of modest size holes above where you want the lintel at around 1/3 and 2/3 of the width, pass a couple of chunks of suitable RSJ offcuts through and support them with Acros. Then you cut out for the lintel, fit it and replace the masonery above. Lintel is a challenge because the wall is 70cm thick and all of the thickness has to be supported, so you put in several lintels, one behind the other. The outer one will be oak to comply with the approval, then the others will be steel or perhaps concrete cast in situ.

I have done this before by the way...

Drain it, yes, already done, 8m of 100mm pipe with a 4% slope emerging further down the hill !
 
David, when you have a mo could you show me how you connected your cyclone to the box below and how you disconnect to empty the contents.
I have a twin motor camvac coming in a couple of weeks and with plenty of room above my workshop I am thinking about placing it "upstairs" as you have done.

many thanks
 
Morning David

Where I lived in Devon there were lots of old buildings with stone walls with rubble cores. Are your walls built this way?

To prevent an avalanche of rubble when they fitted lintels over new holes, the local builders would inject non expanding foam just above the site of the hole to lock the rubble in place.

I know you've done it before, so, sorry if it's a Granny and eggs thing :)

Cheers

Dave
 
David, I feel your pain.
I have a history of lower back problems (i'm currently recovering from proplapsed discs and am having hydeotherapy), and something that has been recommended to me by the physios and by just about everyone else i've spoken to who has suffered badly, is swimming. Get yourself down to the nearest lac or piscine. It works wonders as a cure and preventative. You'll be surprised.

Nice bit of landscaping though. Looks lime an ideal place to put a BBQ, table and chairs?

Cheers, and hope you get better soon,
fred
 
That's a helluva lot of soil to shift, not surprising you are feeling the pain.

Can't quite see from the photos if you have dug a drain to allow rainwater to flow out of that hole and down the slope?
 
chataigner":1gfdstf7 said:
......... Lintel is a challenge because the wall is 70cm thick and all of the thickness has to be supported, so you put in several lintels, one behind the other. The outer one will be oak to comply with the approval, then the others will be steel or perhaps concrete cast in situ. .......

I'm curious about this. My instinct is to not mix materials, and so in masonry walls such as this I always specify PC conc lintels, or a stone lintel. I'm not sure why you might choose to use steel. Cast in-situ would be fine if it weren't so awkward to do. So much easier when you can pour into formwork from above, but in your case, "above" is inconveniently filled with many tons of stone wall.
 
No special reason for choosing steel Mike, except that I'm working mainly alone and steel of appropriate dimensions will be easier to lift into place than concrete.

You are quite right of course about the difficulty of casting in situ, but it is the other alternative where the weight is manageable. Probably too tricky in the circumstances.
 
Can you get pre-stressed lintels in France from the Brico?
Ours are typically 65 x 102 section to match brickwork and not to difficult to manhandle (mind your back!!)
You could use oak on the outside, infill with concrete lintels and leave a pretty oak one on the inside.

Each of our lintels is man enough for the average window width/garage door opening and the masonry above in a typical build which must weigh about the same as your stone/rubble infill.
Sorry Mike rather hand wavy but you know what I mean hopefully.

Bob
 
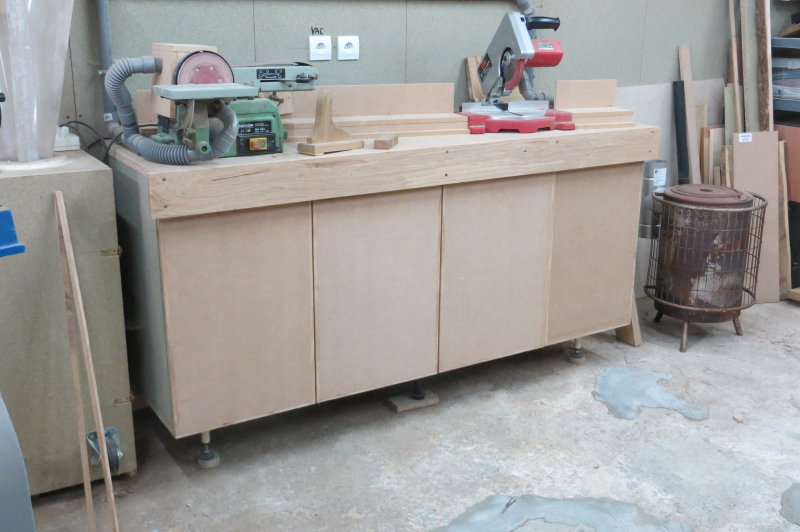
Made and fitted the landmark final set of doors to the workshop under-bench store cabinets yesterday. I was actually supposed to be working on cutting out the window aperture, but after a couple of hours with a club hammer and cold chisel my arm was complaining, so turned to a less physical job for a bit !

last%20doors.jpg


Notice the little stove - picked it up for 15€ - bit of warmth for the winter and a use for those little offcuts !!

hole.jpg


Regarding the window - so far I've cut a hole for a temporary support (200x75 joist for reference) and started excavating below for the lintel. The previous job like this was at my former home and I must say that the walls here are a lot tougher - the masonry is better made with bigger stones and the mortar is stronger too. Kind of reassuring, but much harder work than I had expected !
 
Perhaps a bigger hammer is required. :D More seriously perhaps a trip to local equipment hire for a breaker of some sort.
 
A inexpensive sds drill and chisels will make this job much less physical they are good but try not to use the m/c as a lever when pulling it free as it can damage the main casting, recommended and not as fierce as a demo. hammer.
 
I have a big SDS (10Joule), and while I love it for drilling - 30mm dia holes through a 1m thick stone wall for 22mm water pipes for example - I find it very tiring to use, especially on a ladder, because it is very heavy and the vibration does my elbow no good at all. All in all, hammer, chisel and what our US cousins call a wrecking bar seems to work fastest for me. Punched another hole right through for a support at the left hand end this morning. Tiring, but satisfying. Perhaps I'll give the SDS a go for the next part of the hole for the lintel.
 
In many ways for an old property I think your more manual approach is a lot gentler for the fabric. I know that if I use an SDS drill on some parts of our house then the soft mortar between the stones turns to dust.
 
chataigner":28r8luki said:
Tiring, but satisfying.

I may be crazy, but as somebody who has the dubious pleasure of spending their days working in front of a computer I find a bit of physical graft very satisfying!

Terry.
 
kirkpoore1":2lzmclc5 said:
Once you dig your way out of the Château d'If, do we get to call you the Count of Monte Cristo?:)

Kirk

Funny I'm currently reading the Count of Monte Christo. Seems a good read good so far. Went for the abridged version but its still a long (e)book.
 
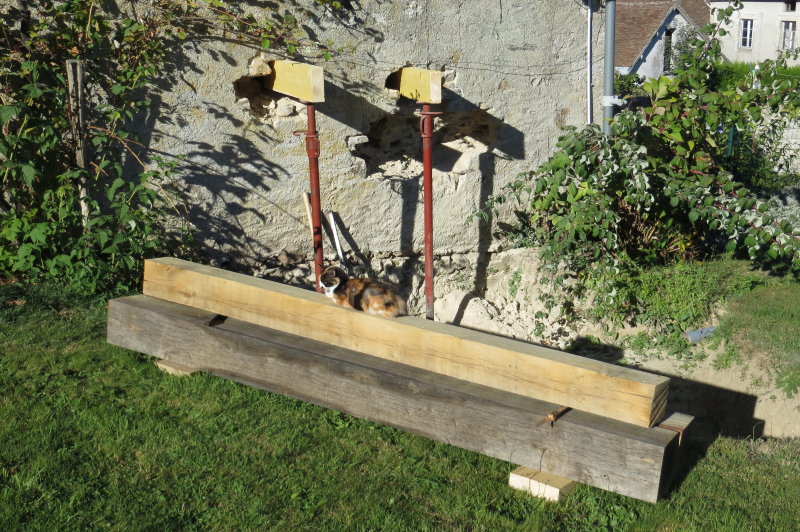
Visited my local saw mill yesterday and found 2 oak beams that would suit perfectly. 200 x 200 x 2500, at 600€/m3 that works out at 60€ each. I'm due to collect them today. :D :D

Might need some help getting them into place though : 0.1m3 green oak must weigh around 80kg I suppose... :eusa-think: :eusa-think:
 
I've now got the lintels and have started cutting out the hole to fit them. No further progress this weekend as there are other commitments, but on monday I will get straight into demolition and get the first lintel fitted.

poutres%20001_1.jpg


poutres%20002_1.jpg


Because this is a rather wide opening and it is a fully structural wall, I've decided to play safe and cut half way through the wall, fit one lintel, then cut the rest away from the inside and fit the remaining ones. I'm probably being over cautious, but better safe than sorry. It also means I can keep working even if the weather changes...
 
Whew ! Cut out the last of the masonry to fit the lintels yesterday and, as expected, the central block between the supports came crashing down ! Because I had expected it, I'd made sure I had a quick exit route so as not to have crushed feet. In the event it was fairly controlled, but a lot of the stone and old mortar fell inside the workshop which is going to need some very serious cleaning up.

Lifting the lintels into place was an interesting challenge - they are far too heavy at 85/90kg each to simply be lifted in one go ! I did it by building a couple of one legged saw horses in front of the hole in the wall, the other end being supported on the wall itself, then sliding the lintels onto them using levers and lots of grunt.

linteaux%20001_1.jp


Once positioned in front of the hole, it was a simple matter to slide them back onto the nice level masonry pads that I'd built the day before. Here you can see the first of the infill stonework (on the left) built this morning.

This is very tedious as the access is restricted by the supports and the depth means you have to keep walking around to the other side to tidy up the opposite face of the wall. Progress will be rather slow untill enough is built to be able to remove the supports.
 
chataigner":16r3mmmb said:
Whew ! Cut out the last of the masonry to fit the lintels yesterday and, as expected, the central block between the supports came crashing down ! Because I had expected it, I'd made sure I had a quick exit route so as not to have crushed feet. In the event it was fairly controlled, but a lot of the stone and old mortar fell inside the workshop which is going to need some very serious cleaning up..........

Just pondering.........

I wonder if a whole lot of expanding foam sprayed into the nooks and crannies would have held everything together? It's amazing stuff. Did you know that the decline of the leaning tower of Piza was at first arrested and then partially reversed by strengthening the ground around it with expanding foam?
 
Mike G":29um5yzx said:
....
Just pondering.........

I wonder if a whole lot of expanding foam sprayed into the nooks and crannies would have held everything together? It's amazing stuff. Did you know that the decline of the leaning tower of Piza was at first arrested and then partially reversed by strengthening the ground around it with expanding foam?

Absolutely....works like a dream and regularly used around our way where walls have a loose infill between stone. Not sure it would be enough to hold the stones up but would stop the insides emptying out.
 
Nice job David. What is the plan with the section of wall below the lintels? Will you chop out the two sides and hope the middle can be persuaded to fall forward out of the hole, or is there another cunning plan?

Terry.
 
9fingers":i56rex1e said:
Excellent progress David!

Looks like you are past the worst of the brown trouser moments. Is the internal beam in place yet?

Cheers

Bob

Yes Bob, I slid them both in from the outside. I've managed to avoid a central one too. The 20 x 20 turned out to be 21 x 21, so 2cm gained. The wall is actually a bit thinner than I thought, so with both lintels inset by 1cm, 2cm gained, plus 2cm for the thicker lintels, plus a small gap in the middle, easily bridged by the masonry - voila - no central lintel. On the underside, I will fit a small trim piece between the two to hide my shameful economising !
 
RogerS":1w2bdmv6 said:
Mike G":1w2bdmv6 said:
....
Just pondering.........

I wonder if a whole lot of expanding foam sprayed into the nooks and crannies would have held everything together? It's amazing stuff. Did you know that the decline of the leaning tower of Piza was at first arrested and then partially reversed by strengthening the ground around it with expanding foam?

Absolutely....works like a dream and regularly used around our way where walls have a loose infill between stone. Not sure it would be enough to hold the stones up but would stop the insides emptying out.

Afternoon all

DIY expanding foam more or less doubles in volume as it goes off.

I overdid it a few years back, filling a gap between a door frame and the lintel above. It bent the top of the frame.

I'd be wary of using it in an old stone wall.

As I said in my earlier post, the local builders where I lived in Devon use the non expanding version.

Cheers

Dave
 
A week has passed and I've worked on refilling above the lintels as often as I could bearing in mind other activities and some foul weather, probably around 12h in all.

It is done at last ! :D :D

wall%20done%20001_1.jpg


Infill with irregular stone is one of the most tedious jobs I've ever done. The access gets smaller and smaller as you work, the thickness of the wall makes the middle part quite difficult to reach and the stones have to be selected to fit the space vertically as well as horizontally. As if that was not enough, when you remove the supports as the job progresses, you risk large chunks dropping onto your arm as you work - the old lime mortar really has no "sticking" properties at all. Not a job I would want to repeat.

I propose to give myself a break and do something else for a week or so before cutting out below the lintel for the window itself. Then it will be a few days to create and tidy the aperture, a week perhaps to make the window from scratch in oak and I'll be installed in a workshop with natural light before the frosts...
 
I think your plan is a good one. Love thick oak beams and I see you brought lunch with you. :lol:
 
I wouldn't mind betting that your infill is probably neater than the rest of the wall. Shame in a way that the render will hide it.
 
Andyp":2dzyhums said:
I wouldn't mind betting that your infill is probably neater than the rest of the wall. Shame in a way that the render will hide it.

Not sure that's really the case, the photo is quite forgiving ! The render however is a big head ache - how on earth do I match 100yr old (probably) render ? It will look terrible in a different colour...

My best hope is to train the grape vine to the left over the offending patch !
 
Lime mortar, an appropriate coloured sand and some cow dung might work.
 
chataigner":1jutoxuc said:
Andyp":1jutoxuc said:
........Not sure that's really the case, the photo is quite forgiving ! The render however is a big head ache - how on earth do I match 100yr old (probably) render ? It will look terrible in a different colour.........

You don't. You strip all the render off and show the stone everywhere. ;) :eusa-whistle:
 
Had an overdose of motivation yesterday and demolished the wall below the lintels to start fitting the window. 1m80 x 1m x 60cm, that's over 2 tonnes of material demolished, sorted, stacked (the stone) barrowed away (the old mortar) and tidied up. Finished this at around 3pm and decided to clean up the surrounding stonework and make the "bed" for the bottom beam. Got carried away and actually laid it, got it level first time too, then cut the uprights to length and fitted them - loose tenoned into the lintel and bottom beam - and ... the light failed with a load of mortar made up !

Finished as much of the infill as I could see to do in the dark and cleaned up by around 20h !

No photos of the outside for the moment as I fitted a couple of sheets of hydrofuge chipboard to keep the rain off and to keep visitors out.

aperture%20001_1.jpg


aperture%20002_1.jpg


The big beam at the bottom and at the sides is to mimic the traditional form of construction. This was a condition of the planning consent, though I would have done it this way anyway for aesthetic reasons. I will add the traditional pegs at top and bottom of the uprights (they would have been drawbored in the 19th C) but mine will only be dummies. I could not see a simple way to build downwards from the lintel and fit uprights with traditional tenons. It would have involved "hanging" everything from the lintel with the bottom beam suspended over a space big enough to allow the tenons to be inserted and then the stone infilled underneath it after. Didnt fancy that, so my "tenons" are large chunks of 20mm dia steel rod into drilled holes deep enough to house the whole tenon in the upper part and allowed to drop into sockets in the lower part as they came into alignment. A rebate in the lower beam keeps things square and resists any tendency of the old wall to push out towards the aperture. Fast and effective. The oak will corrode the steel of course, but 20mm will last quite a while I think and the corrosion will lock them tighter into place !

aperture%20003_1.jpg


Of course, in the traditional form, there would have been a matching frame on the inside, linked by horizontals in the thickness of the wall. This arrangement avoided having outside corners on the masonry and tied everything together in the days before steel masonry fixings. No point in doing this here as the inside will be hidden by the dry lining which will go into the aperture and up to the back of the window frame.

I confess I also chickened out as far as the width of the aperture is concerned. When I saw how close to the sections of old rubble wall supporting the lintel I would need to demolish to achieve the width I had hoped for, I played safe and left rather more in place than I'd originally planned. A consolation is that the proportions of the window aperture are rather more pleasing than the very wide low window I had sketched up. A bit less light of course, but you cant have everything.

It remains only to remove the last of the stone from the inside on the left and point up before starting to make and fit the actual window.
 
Looking good!

Your use of steel rods is very pragmatic, and is also standard practice amongst jobbing builders around here. It works, and, as you say, the corrosion helps lock the steel into place.
 
Back
Top