• Hi all and welcome to TheWoodHaven2 brought into the 21st Century, kicking and screaming! We all have Alasdair to thank for the vast bulk of the heavy lifting to get us here, no more so than me because he's taken away a huge burden of responsibility from my shoulders and brought us to this new shiny home, with all your previous content (hopefully) still intact! Please peruse and feed back. There is still plenty to do, like changing the colour scheme, adding the banner graphic, tweaking the odd setting here and there so I have added a new thread in the 'Technical Issues, Bugs and Feature Requests' forum for you to add any issues you find, any missing settings or just anything you'd like to see added/removed from the feature set that Xenforo offers. We will get to everything over the coming weeks so please be patient, but add anything at all to the thread I mention above and we promise to get to them over the next few days/weeks/months. In the meantime, please enjoy!

Joint Practice

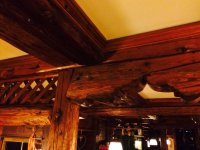
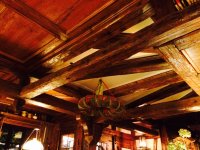
Pretty interesting joinery. Its funny, a few years back, traveling to Germany for work, i stopped in Heidelberg on my way to Munich. I went to this old pub in Heidelberg (i think from 1700s?) . Everyone else in there is enjoying the food and beer and I am sitting there admiring all the old joinery. Especially the timber framing and how some of the cross beams were cut to fit. Just a couple of the probably 50 pics i snapped in there

IMG_3508_Original.jpeg
IMG_3501_Original.jpegIMG_3500_Original.jpeg
 
Yes I can see exactly what attracted you to it, I’m a bit the same, this is from a pub in Dunmow High Roding in Essex, dates way way back. I have another pic showing very old designs painted onto the uprights too.
Your pics are much more atmospheric than mine though!

IMG_4849.jpeg
 
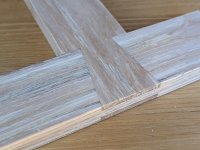
Yesterday's effort, planed and (because it's Ash) card scraped clean this afternoon - a dovetailed bridle joint:

11627.jpg

For anyone who hasn't seen it before & wants to try to figure out/guess how it goes together, I'll wait until tomorrow before sharing the internal details.

If you know how it works, please keep it to yourself so others can think about it.

Views from multiple sides:

 
Yesterday's effort, planed and (because it's Ash) card scraped clean this afternoon - a dovetailed bridle joint:

View attachment 58532

For anyone who hasn't seen it before & wants to try to figure out/guess how it goes together, I'll wait until tomorrow before sharing the internal details.

If you know how it works, please keep it to yourself so others can think about it.

Views from multiple sides:

I have an idea, but will wait
 
I promised an explanation so here it is.

It's a very silly (and weak) joint with no practical application. I'll take it into work along with the other two & see whether any of the mechanical engineers can figure them out :devilish:🤣

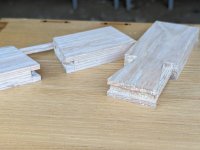
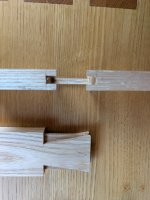
The two parts look like this, so it isn't really a bridle joint:

11566.jpg

11567.jpg

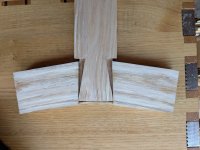
It relies on the wood being moderately bendable, so the little bridge gets steamed or, in my case, has a kettleful of boiling water poured over it. That allows it to be assembled like this:

11569.jpg

The glue on the little hidden wings of the dovetail provides the only strength to the joint.

Pointless, but a fun exercise & good practice at cutting without breaking a fragile part. It'll also be fun to watch the clankies (mechanical engineers) squirm as they try to get their head round it!
 
Neatly done.

Have you also explored the various metal puzzle equivalents, like the two headed bolt with a loose nut in the middle?
 
I promised an explanation so here it is.

It's a very silly (and weak) joint with no practical application. I'll take it into work along with the other two & see whether any of the mechanical engineers can figure them out :devilish:🤣

The two parts look like this, so it isn't really a bridle joint:

View attachment 58614

View attachment 58615

It relies on the wood being moderately bendable, so the little bridge gets steamed or, in my case, has a kettleful of boiling water poured over it. That allows it to be assembled like this:

View attachment 58616

The glue on the little hidden wings of the dovetail provides the only strength to the joint.

Pointless, but a fun exercise & good practice at cutting without breaking a fragile part. It'll also be fun to watch the clankies (mechanical engineers) squirm as they try to get their head round it!
Interesting! Never would have guessed that. My guess was that the dovetails were cut super thin near the base and slowly tapered out to to full width at the end. And the thinness at the base allowed you to bend out the tails and then press back down.

Although obviously this one is a novelty, slightly similar joint the dovetailed lap joint can be super strong and provide ridgity when used correctly
 
Thanks

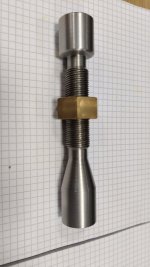
I've already got one of those on my desk (made mainly as a way of practising cutting multi-start threads):

View attachment 58617
There used to be a novelty shop at the mall that had a bunch of puzzles. We would go and sit there for hours in high school trying to figure them out. I can’t even remember them all. Except the one that is 2 horseshoes chained together, and there is a metal ring between them that is too small to go over the horseshoe but if you position everything correctly you can get the ring off. I am guessing on this though you cannot remove the nut?
 
There used to be a novelty shop at the mall that had a bunch of puzzles. We would go and sit there for hours in high school trying to figure them out. I can’t even remember them all. Except the one that is 2 horseshoes chained together, and there is a metal ring between them that is too small to go over the horseshoe but if you position everything correctly you can get the ring off. I am guessing on this though you cannot remove the nut?
It's possible to remove it (otherwise it would be impossible to make). It's basically two screws fixed together end-to-end. The transition between the two screws happens part-way along the thread & is almost invisible.

To make it, you start with two bits of steel (stainless in this case) make some way of joining them together (a tapped hole in each & some threaded rod in this case) & very carefully face the end that will be joined so that it's extremely flat (the flatter they are the less chance of a visible join).

When the two pieces are then screwed together the two flat faces join with an almost invisible seam. You can then turn them as if they're a single piece, including cutting the thread. Finally, the parts are separated, the nut screwed onto one of them & then the parts rejoined tightly together.
 
Back
Top