• Hi all and welcome to TheWoodHaven2 brought into the 21st Century, kicking and screaming! We all have Alasdair to thank for the vast bulk of the heavy lifting to get us here, no more so than me because he's taken away a huge burden of responsibility from my shoulders and brought us to this new shiny home, with all your previous content (hopefully) still intact! Please peruse and feed back. There is still plenty to do, like changing the colour scheme, adding the banner graphic, tweaking the odd setting here and there so I have added a new thread in the 'Technical Issues, Bugs and Feature Requests' forum for you to add any issues you find, any missing settings or just anything you'd like to see added/removed from the feature set that Xenforo offers. We will get to everything over the coming weeks so please be patient, but add anything at all to the thread I mention above and we promise to get to them over the next few days/weeks/months. In the meantime, please enjoy!

A Japanese style garden shed

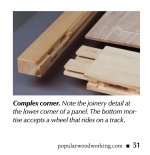
Ah yes thanks, I suppose the advantage is that the corner of the door is unlikely to be able to move even if it could but loses a little strength? Or did they do it because they could and it gives a pretty pattern?
 
I think there are two functional reasons for the quad tenons. First is the advantage of twin (side-by-side) tenons. According to Stan Covington (Japanese tool expert):

Twin tenons have three advantages that justify the extra work. First, while they may have the same or even less cross-sectional area, they have more surface area than a single tenon in the same space, creating greater friction when assembled, if properly cut, creating a joint that is much more likely to stay assembled when stressed.
Second, this larger surface area also means a larger glue area, a big advantage with the right glue.
And finally, twin tenons are much more resistant to twisting, an huge advantage for highly stressed joints in operable doors and windows. This is their biggest advantage and is nothing to sneeze at. If you want a door to last, always use twin tenons, at least at the bottom rail.


And then dividing the twin tenons again with a gap between them means that you avoid the problem of having, say, a 6 inch tall tenon which might move too much seasonally and loosen in its mortice. So have two, 2.75 inch tenons instead, which will move less than half as much. You also remove less wood from the stiles.

Here are the doors made by Toshio Odate that I partly copied for my version.


Screenshot 2024-07-28 at 5.56.01 PM.jpgScreenshot 2024-07-28 at 5.56.43 PM.jpgScreenshot 2024-07-28 at 5.57.15 PM.jpg
 
That’s whatI was trying to say - badly lol. Hadn’t considered the movement of the tenon, quite right there.
That’s a whole load of work on those "glazing bars" !
Yes, the Odate doors are remarkable. One big downside of his design is that he captured the glass behind the lattice in a groove in the rails and stiles. That seems fine to me for a wood panel, but if/when the glass breaks and needs to be replaced the whole door needs to be disassembled or more likely tossed.

An acquaintance of mine made these kōshi-do doors in a similar style. He is better at this than I am!


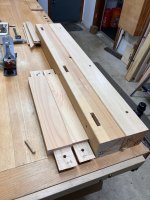
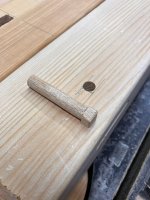
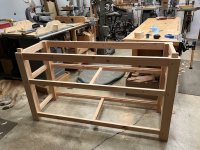
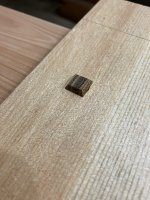
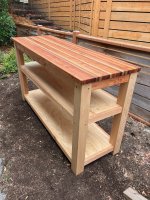
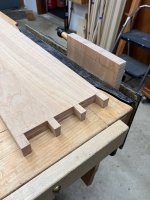
I've been working on M&T joints for the potting bench. That last couple of days I drilled and chiseled the mortices and bands sawed and hand sawed the tenons. Today I did the draw bored holes. I prefer the look of square pegs but didn't want to make 24 square holes in the frame and 24 more in the tenons so as an experiment I decided to try Paul Sellers' hybrid method of drilling 3/8" holes and then shallow 3/8" square mortices for round pegs with square heads. Lots of extra and repetitive steps but the work is quiet and not that difficult. I'm using hickory for the pegs. Not sure how well I will like this method. But it is just a potting bench so the stakes are low.

EC05960C-520C-44D2-AA79-7472E6D88583.JPG12E8F7F9-2365-4961-B701-8B7B1493BFB0.JPG
 
How do you decide how much draw to give the tenons when drilling for the pegs Gary? I must confess I’ve never done them as they don’t suit my style of Furniture, on those I would guess 1 1/2 to 2 mm? I do seem to remember there is a formula or a gizmo.
Ian
 
I don't do it often enough to know if there is an optimal offset but a millimeter seems about right. I've read recommendations of 1/32" and 1/16" so all of the those probably work. It doesn't take much, that is for sure.
 
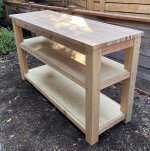
I decided that making round pegs with square heads that way was too fussy. I found it easier to drill the holes, and chop shallow mortices for separate plugs. Did that, and assembled the base. The shelves will be just 1/2" plywood dropped into the rebates on the rails. Tomorrow I'll start milling boards for the top.

E37A9A4F-0BF2-4050-A037-33C786C66E25_1_105_c.jpeg

22338886-9312-480F-82B3-5C93F3E523D5_1_105_c.jpeg
 
I don't do it often enough to know if there is an optimal offset but a millimeter seems about right. I've read recommendations of 1/32" and 1/16" so all of the those probably work. It doesn't take much, that is for sure.
I've got it wrong once or twice, and ended up with a needle file trying to adjust, without elongating the hole on the show-face.
 
I've got it wrong too..not pretty when it happens, in onc case part of the dowel came out the middle and part out the edge but it was still okay mechanically. I found the key is to taper the dowels and make them quite a bit longer than needed. I aim for around 1mm offset, depends on the wood species, the smaller it is generally the less of an offset.
 
Last edited:
I got a couple of these wrong on the bench. I somehow missed drilling the tenon hole on one of the rails and didn't notice until the whole was assembled. I wondered why those two pegs just didn't want to go in! Not a huge mistake in this case since I just drilled through the mortice into the tenon. No draw but with all the other joints helping, not a tragedy.

Some folks glue the tenons in into their draw bored joints as well. I don't see the need. I guess the idea is "belt and braces," and the draw boring simply takes the place of clamping. But if properly fitted I think the peg should be plenty by itself, and gluing adds to the stress of assembly. Am I wrong?

I also think the pegs are best done with a wood at least as tough as the stock it will be pounded into, with no grain runout, and not likely to shatter or fray when struck with a mallet. I have read that some folks rive their pegs to assure no grain runout but I didn't do that.

Also, on another woodworking forum a member whom I respect greatly (classical furniture training and decades of experience) suggest this approach:

There's no need to spend time rounding those pegs, leaving the ends square, and cutting square mortises for their heads. A chorus of North Bennett Street grads are having a chuckle over that one. Make your pegs square, slightly less in width than the diameter of the hole. Knock the corners off the leading end to help start them in the hole, and drive them in. Their corners will get mostly rounded by driving them, but the corners will also square out the hole enough so that it will end up with a square peg showing.

I had already chopped the mortices for the peg heads but I was intrigued by his suggested technique so I gave it a try on some scrap:
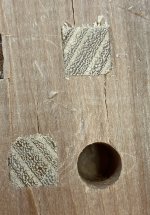
09D3122F-7A51-4EE7-A4F1-3DF3D0938E7C_1_201_a.jpeg

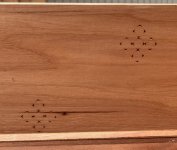
The one on the upper right was my first attempt. I didn't remove enough wood from the peg and the peg split the stock. The second attempt on the lower left went better but still some splitting. On a follow-up my friend replied that, yes, getting the peg whittled down the proper amount to fill the hole and making a square reveal without splitting the stock does take some practice and experience with the woods one is using. In this case the stock is very soft (western red cedar) and the pegs are very hard black locust. Maybe not the best combination.

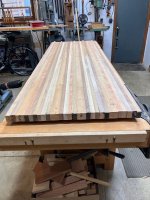
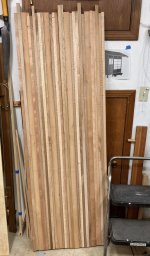
Yesterday I milled a bunch of boards leftover or rejected from other projects into strips about 40 mm x 21 mm x 1800 mm to laminate for the top. Today glued the strips into two halves. Each half a little less than 12" to pass over my jointer and planer. I'll do that tomorrow.

Madrona, white oak, butternut, cherry, and sycamore. The butternut I've had for over 40 years hauled across the country twice waiting for the right project. I guess this is the right project. The two assemblies side by side.
D59B6509-F874-47FE-938E-F0402901FAA5_1_201_a.jpeg
 
That’s not going to be the easiest of glue ups even in two lots of 15? Gary. It’s one of the reasons I like to use Evostick woodglue, just not as runny as Titebond which on a job like that would drive me nuts.
Getting them all to stay levelI will be a pain as well I suppose you could use biscuits but again that’s a whole lot of biscuits. But when it’s done that stripey top will be good.
I know I’m fussy, just can’t stand drips of glue on the assembly table and glue on my cramps, I’ve put electric tape on the bars of my sash cramps before now, but of course that stops the glue setting in that area a bit, problems.
Ian
 
Ian, like you I’m fussy about keeping the metal bar on the sash cramps clean.
Wax the bar and nothing sticks to it, when I was in the uk it also stoped them from rusting, thankfully don’t have that rust problem nowadays.
 
Ian, like you I’m fussy about keeping the metal bar on the sash cramps clean.
Wax the bar and nothing sticks to it, when I was in the uk it also stoped them from rusting, thankfully don’t have that rust problem nowadays.
Now why on Earth didn’t I think of that! Definitely cracking up, trouble is I haven’t thought of doing that for year after year ++. Obviously a blind spot.
So where are you @Jonathan ?
 
That’s not going to be the easiest of glue ups even in two lots of 15? Gary. It’s one of the reasons I like to use Evostick woodglue, just not as runny as Titebond which on a job like that would drive me nuts.
Getting them all to stay levelI will be a pain as well I suppose you could use biscuits but again that’s a whole lot of biscuits. But when it’s done that stripey top will be good.
I know I’m fussy, just can’t stand drips of glue on the assembly table and glue on my cramps, I’ve put electric tape on the bars of my sash cramps before now, but of course that stops the glue setting in that area a bit, problems.
Ian
It actually wasn't that bad. They key is to have low standards! I didn't worry about keeping the strips perfectly flat since they are slightly different heights anyway. I set them so the lower surface is flat against the (waxed) clamp bar to have one reasonably flat and level surface. And I spread minimal glue. I also don't like glue dripping out all over the place. This approach seemed to work fine. They are reasonably flat now and will go over the jointer and through the planer to knock off the high spots. I'm not after any particular final thickness. It will probably end up around a little over 30 mm thick, which will be enough for the span of the bench and its intended use.


 
That’s going to be a colourful top.
Yes, too colourful for my taste at the moment. I find it a little busy and distracting. But I assume that over time and use in the garden it will all settle down to a more uniform dirty gray/brown.

Here it is at the end of today after machine jointing and planing and the two halves glued together. It ended up being about 34 mm thick.

08D96BA6-39B0-4926-A9D2-A7D8DD7A867F.JPG
Tomorrow I'll trim the ends square, chop mortices underneath for the stub tenons from the base that will register the top, and plane the top surface enough to remove milling marks and other irregularities.
 
Top is fit to the base and shelves are cut to fit but not tacked down. I'll use bamboo pegs for that. The top will get sanded and a few coats of a linseed oil/beeswax/pine rosin blend. While that is curing I'll make the border boards. F0DD0358-86A9-47C6-ADA1-217B03E8D865_1_201_a.jpeg
 
Last edited:
Yes, too colourful for my taste at the moment. I find it a little busy and distracting. But I assume that over time and use in the garden it will all settle down to a more uniform dirty gray/brown.

Here it is at the end of today after machine jointing and planing and the two halves glued together. It ended up being about 34 mm thick.

View attachment 27863
Tomorrow I'll trim the ends square, chop mortices underneath for the stub tenons from the base that will register the top, and plane the top surface enough to remove milling marks and other irregularities.
Love the laminations, what product will you use to seal the surface Gary?
Sorry, I didn't see your last post. Looks great!
 
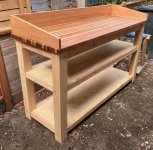
Incremental progress. Shelves glued in (the bamboo pegs didn't work well here) and two coats of oil down on the top.

9A71A3F4-848D-4A48-80DF-321D8617AFDF.JPG

And started the corner joinery for the three border boards. The wood is unusual even in the US because of its habitat is limited to northern California and southern Oregon: golden (or giant) chinkapin. It is lovely to work with.


CB894868-5EA6-40C1-B97A-CB6946D26F47.JPG
 
Add that to the list of new wood species I heard of for the first time in this project.
 
I like the simple decorations. Adds an extra touch of care and quality.
 
My next diversion is to try my hand at adze finishing, which I understand is called chouna shiage in Japan. Here is a guy in Japan who specializes in this kind of decoration in Japanese chestnut. I have in mind making an octagonal hand rail somewhat as he does.


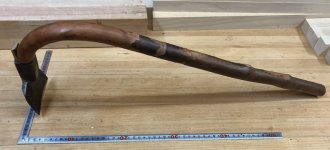
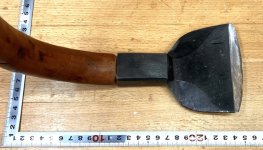
There are several kinds of chouna with different shapes and uses. I happen to have friend who lent me his clamshell shaped adze to try, which is curved in two dimensions.The bent wood handle with the bark attached is traditional.

7D4E89CF-406A-4EFB-A1ED-B5B9F2B66126_4_5005_c.jpeg

51EBA135-B8AC-42D2-8F4E-1670B2F7148E_4_5005_c.jpeg
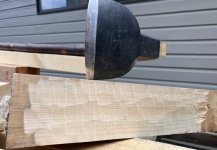
My research tells me that this style is used to make multiple small, shallow cuts. After some truly terrible first attempts I think I'm starting to get the hang of it. Here is an attempt on some Port Orford cedar:

659F4AA7-3A0D-4CCC-858E-BE9A8197A73A_1_105_c.jpeg

And another attempt in western red cedar:

B114BFD0-2F5E-468F-A8A5-A7AEAE72628A_4_5005_c.jpeg

Early days and both sharpening the curved surfaces and learning the best cutting angle, speed, stance, effort, etc are a challenge. I'm not very good yet but I'm having fun so far.

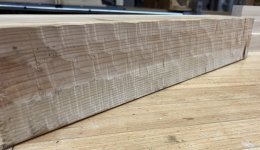
Any tips or suggestions are welcome.
 
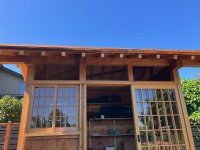
My almost last woodworking subproject for the shed is to make the fixed sash for the three transom spaces above the window and doors.

97A325AF-EF1B-4A67-9C73-423339B134AA.JPG

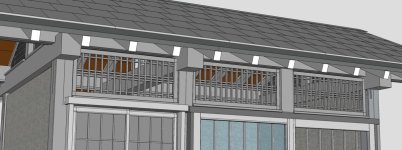
My original idea was to have a set of lattices like these thinking they would add some extra light and ventilation.

A5A65C50-AD5D-4764-9FF9-AE2B577BB7F0_1_105_c.jpeg


But the more I thought about it the more they looked too busy and the extra light and ventilation was unnecessary given the doors, windows, and gable lattices. I also was not eager to mill and join all of those lattice parts.

One alternative would be to just fill and plaster the openings to match the plaster I intend for the walls. But I had one more wide and long and beautiful clear vertical grain cedar board from the same set of boards I used for the doors that was begging to be seen. So I decide to make solid panels instead of lattices.

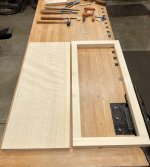
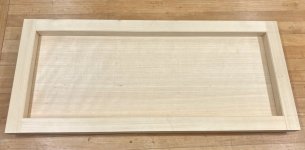
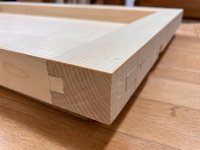
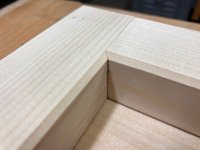
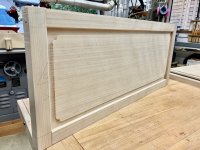
Here is one in process. A simple frame and panel with haunched through tenons and a cope for a bevel on the outside aspect the same as I used for the doors and windows. I still have to rout the groove for the panel and finish the panel but this will give an idea of the effect.

34570B9F-B434-4DEF-ACFC-611E08A97288_1_105_c.jpeg
B5F9354D-9A8E-4A33-A3AC-C0490EFC369F_1_105_c.jpeg


1828617E-63C2-43C3-97B7-7DD0743A3B07.JPGC1B74E05-E2DF-4CD7-89A3-49550CB59915.JPG
 
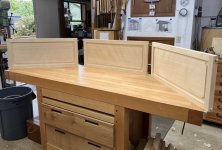
I was off traveling around Oregon with some old friends (old as in, I've known them for 60 years). On Wednesday I'm off again with my wife and the dogs for a week at Glacier National Park. But today is an in-between day with some time to work on the panels for the transom sash. I was going to make simple rectangles but in the end decided to make them raised with re-entrant curves in the corners for a little more interest. Here is one dry fit.

1862F80D-00B5-4D71-ACD6-B14034D54465_1_201_a.jpeg
 
How did you make that corner detail?
Was it start square, cut down, level off with chisel/router?
Certainly looks smart.
 
How did you make that corner detail?
Was it start square, cut down, level off with chisel/router?
Certainly looks smart.
Yes, that's it. The curved cut I did with a single gouge of that sweep so it took just two chops per corner. Then I leveled the bottom with chisels.
 
Yes, that's it. The curved cut I did with a single gouge of that sweep so it took just two chops per corner. Then I leveled the bottom with chisels.
Difficult process to do cleanly; I can see from one of the pics where the bottom has been levelled with a chisel. I might have used a small router for that job - Rob
 
Rob, I've been away traveling for a couple of weeks. You are correct, a few corners came out a little rough. I should have take more time or used a router. I hope viewers without a ladder won't be able to see those given the sight angles when mounted.

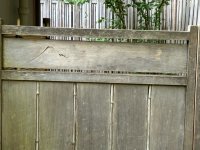
I have another idea for the panels I'm mulling over. A friend recently visited the Japanese Garden in Portland ( a couple of hours drive away) and sent me this picture of a gate there. I like the through carved profiles that hint at mountain peaks.

7A59BB8B-B122-4B4E-9E67-52FF0AEF1128.jpeg

I'm thinking of adding (subtracting?) something like that to one more more of the panels I've just done. Perhaps one can be a suggestion of Marys Peak, a 4000 ft peak that dominates the western skyline where I live. Not a classical volcanic peak but meaningful and recognizable to locals:

View_to_Marys_Peak,_Bald_Hill_Natural_Area.jpgmaryspeak-600x400.jpg
 
I gave up on the idea of carving the panels. I might have tried if I hadn't already glued them into their frames but having them already framed introduced an additional obstacle I wasn't ready to tackle.

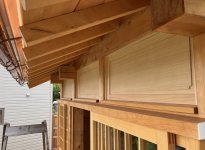
But I did get them mounted along with trim strips to hide gaps. I will confess to using metal nails for the trim. Don't tell anyone.
A woodworker friend who is originally from Singapore dropped by today and spontaneously proclaimed that, "They look Asian!" That did my heart good.

691C3A18-4268-4E92-AC7D-E5E744A266B6_1_201_a.jpeg


This will probably be the last addition to this thread for a few months. We will be entering the rainy season soon so I've decided to leave the plastering, steps, and regrading until the spring. But I have another project in mind that I hope to start soon and will probably take several months. Which means another WIP, I hope.
 
Back
Top