• Hi all and welcome to TheWoodHaven2 brought into the 21st Century, kicking and screaming! We all have Alasdair to thank for the vast bulk of the heavy lifting to get us here, no more so than me because he's taken away a huge burden of responsibility from my shoulders and brought us to this new shiny home, with all your previous content (hopefully) still intact! Please peruse and feed back. There is still plenty to do, like changing the colour scheme, adding the banner graphic, tweaking the odd setting here and there so I have added a new thread in the 'Technical Issues, Bugs and Feature Requests' forum for you to add any issues you find, any missing settings or just anything you'd like to see added/removed from the feature set that Xenforo offers. We will get to everything over the coming weeks so please be patient, but add anything at all to the thread I mention above and we promise to get to them over the next few days/weeks/months. In the meantime, please enjoy!

Another plane

Lons

Old Oak
Joined
Jul 21, 2014
Messages
2,972
Reaction score
1,124
Location
Northumberland
Name
Bob
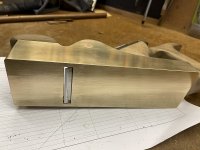
I've just finished this apart from honing the blade properly and will just give brief details for those who might find it interesting as it's pretty straightforward.

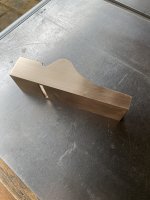
I had intended making a dovetail plane out of brass and steel but stumbled across a cheap bronze casting on ebay so couldn't resist. The casting was as rough as the proverbial, far worse than I expected so using files and hand sanding (my belt sander was out of action) it took a long lo....ng time to get it flattened and all the pitting and defects out, probably longer than making one from scratch also I found cutting the mouth more difficult than it was the last time on a flat piece of steel before assembly.

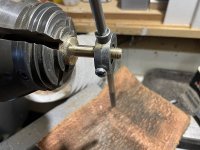
Wood is walnut and the screws holding it in were replaced with glue and brass screws later filed down flush, I cut the cap from 12mm brass and turned the screw from bar. The iron is an old Alex Matheson salvaged from a scrap wooden plane.

Especially for Andy who likes to see shavings apparently ;) I tried it before polishing the handles and before the blade has been honed. Reasonable results on some sapele that tends to tear out.
 

Attachments

  • 12.jpg
    12.jpg
    260.4 KB · Views: 3,860
  • 11.JPG
    11.JPG
    232.5 KB · Views: 3,860
  • 10.JPG
    10.JPG
    150.6 KB · Views: 3,860
  • 09.JPG
    09.JPG
    101.3 KB · Views: 3,860
  • 08.jpg
    08.jpg
    153.4 KB · Views: 3,860
  • 07.jpg
    07.jpg
    216.2 KB · Views: 3,860
  • 06.JPG
    06.JPG
    114 KB · Views: 3,860
  • 05.JPG
    05.JPG
    194.7 KB · Views: 3,860
  • 03.jpg
    03.jpg
    219.2 KB · Views: 3,860
  • 02.JPG
    02.JPG
    249.3 KB · Views: 3,860
  • 01.jpg
    01.jpg
    177.6 KB · Views: 3,860
That's beautiful.

Now I'm feeling very tempted to look for plane castings on ebay :lol: (although the sanding will probably do the job of putting me off!)
 
Very nice Bob........but I never suspected you were short of planes. ;)
 
Mike G":28vndx51 said:
Very nice Bob........but I never suspected you were short of planes. ;)

:lol: :lol: I'm not. Just a fad I'm going through. I suspect my son will want this, though he'd never use it so might make a box and he can have it when I pop me clogs. Not quite ready to do that just yet. :shock:
 
Great restoration, Bob. Pity you're not closer as you could have had my belt-sander on longterm loan as I never use it.
 
I'm curious how you get from your 8th photo to your 9th. You have 3 temporary screws in the first of those, and they gone in the next. The thing is, there is no evidence they were ever there. You've done something very neat to lose the holes entirely.
 
Mike G":bfnnefz1 said:
I'm curious how you get from your 8th photo to your 9th. You have 3 temporary screws in the first of those, and they gone in the next. The thing is, there is no evidence they were ever there. You've done something very neat to lose the holes entirely.

I have some photos somewhere I think Mike. Those temporary screws were there holding the wood while the epoxy dried after which I replaced them with slotted brass screws also dipped in epoxy. I'd countersunk the holes very slightly bashed the screw heads a little then filed and sanded them off. They are visible as the brass is slightly yellow compared to the bronze but the aren't clear in the photos.

Strangely, the brass rods holding the cap are more visible but that's from bar stock so must be a different composition to the screws.

EDIT. Have just taken this which shows one of the screws
 

Attachments

  • IMG_1773.JPG
    IMG_1773.JPG
    328.7 KB · Views: 3,676
Could I ask for a bit more detail on the lever cap?

Was this "just" done by sawing and hand filing? I know people who have balked at this step and bought a ready made one instead!

And the shape - how did you arrive at it? In the first picture it looks a little unrefined but when we see it from above in the assembled plane it looks just right, with the transitions from round boss to concave scoop to straight sides all lining up most elegantly.
Proper job! :eusa-clap:
 
I'm not sure what I can add Andy.
I'd bought a piece of 12mm brass off ebay a while ago, it was slightly undersized for the width of this casting but I packed out with a couple of thin steel washers, with hindsight maybe I should have made brass ones.
I played around with a bit of card to get a shape and then cut it out with a hacksaw, files and abrasives, the hole is just drilled and tapped to 10mm to suit the screw I turned and tapped.

It's not perfect but got to the point where enough was enough.

My son asked me to put my initials on it and name and date on the wood. (Maybe that's in case he forgets who I am? :eusa-think: :lol: ) Just something else to be passed down along with carvings and other stuff that dad / grandpa made.
 

Attachments

  • IMG_1774.JPG
    IMG_1774.JPG
    155 KB · Views: 3,659
  • IMG_1775.JPG
    IMG_1775.JPG
    147.8 KB · Views: 3,659
Cabinetman":2ruocg11 said:
It’s beautiful Bob, quick pic of some shavings, does it work as well -or better than hoped?
Some shavings in the original pics Ian, you know what it's like, just have to try it out before it's finished. ;) The blade was reasonably sharp but I haven't honed it so I don't know what I expected but happy with the results. I might hone it this afternoon and try again.
 
Back
Top