• Hi all and welcome to TheWoodHaven2 brought into the 21st Century, kicking and screaming! We all have Alasdair to thank for the vast bulk of the heavy lifting to get us here, no more so than me because he's taken away a huge burden of responsibility from my shoulders and brought us to this new shiny home, with all your previous content (hopefully) still intact! Please peruse and feed back. There is still plenty to do, like changing the colour scheme, adding the banner graphic, tweaking the odd setting here and there so I have added a new thread in the 'Technical Issues, Bugs and Feature Requests' forum for you to add any issues you find, any missing settings or just anything you'd like to see added/removed from the feature set that Xenforo offers. We will get to everything over the coming weeks so please be patient, but add anything at all to the thread I mention above and we promise to get to them over the next few days/weeks/months. In the meantime, please enjoy!

Conversion - bathroom to en-suite

It's not all bad then - you get a ready made route for the new pipe and when you weigh in all the old bodges at the nearest scrapyard, you'll have enough cash to pay for it!

Sorry about your soaking though, that's no fun.
 
Looking at some of your pictures it is almost requiring an archaeological survey, those pipe fittings are antique and why is there so much rubbish under the floors.

View attachment 39743

This bit of plunbing says it all about that bodger who sold you the house, is it plumbing or some attempt at modern art.

View attachment 39744
I may be doing him a disservice in all honesty. There were a couple of switched fused spurs on the landing and I asked the vendor what were they for. He told me that they'd been put in by the previous owner and that he had no idea. Well, there is also one inside the bathroom and when I took off the cover discovered that there were no wires attached :unsure:

He'd lived there for forty years and in my mind's eye I was not visualising the timeframe properly. After all, forty years ago is only 1985 and all that MK stuff was available long before 1985. The kitchen extension pre-dated him and given that the then owner 'borrowed' the wall from the adjacent walled garden to form one of the kitchen walls explains the movement in that part of the building. Well, I'm making an understatement as the whole building has hairlines cracks. See me out hopefully.
 
Progress has been slow. Finished doing the main gutting of the original room and washbasin temporarily plumbed in.
Stripping out ongoing.jpg

I'd forgotten how much I hate the waste pipe aspect of plumbing. Great chunky compression connecters in a tight space not good for control of profanities in the workplace and I have the scars to prove it.

20260310_165231.jpg

20260310_165319.jpg

And adjustable spanners are The Spawn of Satan. Constantly re-adjusting themselves while you're tighteninng a compression joint and I swear that they randomly change the direction of the knurled knob you turn to adjust the jaw opening. I'm going to treat myself to a set of proper spanners and sling the adjustables in the skip. :mad:

Remember that pipe of unknown provenance that ran horizontally. Well, that was cut and a 22mm stop end put on the remaining length protruding from the wall. I'd still not thought how I could actually cut that piece flush or even below the surface of the wall, add a stop end ...belt and braces. So I started to chisel out a bit of the crumbly wall surrounding it. Once I had made a bit of a hole I found out that the pipe was loose and not connected to anything. Result!

Also decided that all walls and ceilings will be plasterboarded. The alternative is a shed load of work stripping wallpaper off which had been painted over. The clean-up continued removing as much extraneous 'add-ons' so as to give a cleaner line. The last remaining part of that pipe went. (AndyT ...I stuck all the pipe in the skip. I've had it for over a month so I reckon I've got a good deal). Discovered that the door was double-skinned and solid T&G for acoustic isolation. Double-glazed glass panel above with wide spacing - ditto for acoustics.

old doorway cleaned up.jpg

Must say that I'm not enjoying this one bit. I'd forgotten just how many different trades' are needed in a bathroom - plumbing, timber work, electric (under supervision from a tame sparks !). So many different tools and I have zero space to put them. It's a dogs dinner.

Tight working space 1.jpgTight working space 3.jpgTight working space 2.jpg

and it's doing my head in.

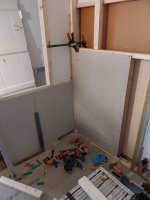
But now we come to the interesting bit. The two walls where the corner shower is going are not at 90 degrees. Nowhere near. To compound the problem, the shorter wall is stepped in the vertical sense. Used to be a mirror in there.
Stepped wall.jpg

Using the laser level this is the reference line telling me how much to bring out the bottom half - which is pretty vertical. Not so the top half that shrinks away from the vertical.

Reference line - stepped wall - .jpg

That board is screwed down as a reference line from which to work off. Trouble No. 2 is that there is a rafter too close to where the shower drain is positioned

Too tight fit for shower waste ....jpg

and so that reference line needs to come out probably 22mm ie one sheet of ply and one sheet of NoMorePly cement board.

I then put a square on that reference line and fixed the other side to give me the 90 degree outline for the shower tray. That's when I discovered that the two walls are not square. These are the two ends of the shower back wall (1 meter)

Out of square walls 2.jpg

Out of square walls 1.jpg


I'm tempted to treat the back longer wall as the master and fiddle about with the shorter wall as I'll have to fiddle with it anyway to take into account that step. And as I type this I'm thinking that maybe if I remove the covering....top half lath and plaster, bottom half ...who knows..and get some 4 x 2 then I could screw them to the original uprights but offset forwards to (a) get rid of the step (b) make the wall vertical (c) square on to the back wall and (d) give me the sideways shift I need to cler the shower tray drain away from that rafter. Only problem....I have no 4 x 2.

But we're getting there.
 
I thought the idea of your move Rog was meant to be no more workshop and no more DIY. Instead it appears to be fairly major and fiddly renovations. :censored:
 
You've got my sympathies Rog... I can fully understand what you mean about the plumbing side - as well as no 90° to the walls.

This place that we've been in for night on 40 years (this Dec) was built around 1796 - I've old deeds showing a sale in 1824 for £25...

It's on a curve in the main road... bit dangerous with the speed some vehicles come along it! Because of this curve the house is wider at the back than the front the walls run out accordingly. Same applies for the vertical - wider at the top than bottom of the walls.

Fitting the latest kitchen wall units I had to true up and batten the wall and attach plasterboard!

Hence my sympathies for what you're finding and having to put right.
 
I thought the idea of your move Rog was meant to be no more workshop and no more DIY. Instead it appears to be fairly major and fiddly renovations. :censored:
You are absolutely correct. But then we got here and reality set in.
 
Other than your wounds Roger, how is your back holding up?
I also hate working in small tight areas cluttered with tools.
 
Other than your wounds Roger, how is your back holding up?
I also hate working in small tight areas cluttered with tools.
Thank you for asking, Scott. Backs OK thank you.
 
The adjustable is not for the nuts but to hold the body whilst tightening a nut, bad practice to try and tighten both nuts at the same time without holding the body.
 
The adjustable is not for the nuts but to hold the body whilst tightening a nut, bad practice to try and tighten both nuts at the same time without holding the body.
All the compression joints I’ve ever used had flats on the body for a normal spanner.
 
There's a number of jobs I wanted (want still!) to do in this property we've been in for just over 39 years but the wife (along now with refuced funds 😕) are *half the problem* ...
 
All the compression joints I’ve ever used had flats on the body for a normal spanner.
The two advantages of that adjustable are that it is very short in length and the jaws themselves are very narrow, with straight fittings often not a problem but elbows and tee's are another game.
 
I have a couple of exactly those open ring spanners. They're helpful, but not as much as I hoped, as they're quite long. And they're only hex, rather than twelve facets, so that can be awkward too. They're also a very loose fit, although they are very well chromed.

Every time I go to use them, I consider cutting them in half, but then that's four to misplace rather than two...

My friend Al who's a professional plumber does use adjustables, but I think they're really expensive ones. I want to say "Bahco" but possibly even more expensive. His ones don't work loose tho.
 
I inherited "King Dick" adjustables from my engineer father. They stay where they are put. But not cheap even back in the day. Sloppy ons are nigh on useless.
 
I inherited "King Dick" adjustables from my engineer father. They stay where they are put. But not cheap even back in the day. Sloppy ons are nigh on useless.
They're being manufactured again in the USA: https://www.handtoolrescue.com/
I, too have an original (one of the posh ones), and it's a favourite.
 
Decent adjustables are handy, cheap adjustables cause more problems than they are worth. When your long spanners cannot get in then these short adjustables can save the day and are also good in that they help prevent the overtightening of compression fittings due to less leverage.

Another area where short adjustables that have a wide opening ability come in usefull is with the pump isolation valves.
 
I have a couple of exactly those open ring spanners. They're helpful, but not as much as I hoped, as they're quite long. And they're only hex, rather than twelve facets, so that can be awkward too. They're also a very loose fit, although they are very well chromed.

Every time I go to use them, I consider cutting them in half, but then that's four to misplace rather than two...

My friend Al who's a professional plumber does use adjustables, but I think they're really expensive ones. I want to say "Bahco" but possibly even more expensive. His ones don't work loose tho.

I have at least half a dozen all Bahco in various sizes, had them for years and used them in my business and they never let me down though I don't know if the quality of current offerings are comparable.

if you cut those spanners in half, drill a hole in the ends and put them on a HD ring or a snap fastener to keep them together.
 
Last edited:
"You plonker, Rodney Roger"

Not seeing the bigger picture. I was focussed in a very linear way when getting all the plumbing in. I reached this point and added T-connectors so that I could extend to feed the shower. Eventually ended up with this.

20260313_150253.jpg

When a bit of forethought could have simplified it thus.....doh !

20260312_152614.jpg

Over the last few days I've been fitting (and cursing) the shower backer boards. In the past I've used Hardiebacker boards which I found very user-friendly and easy to work with. However, for this project, somewhere/somehow I bought NoMorePly fibre cement boards. maybe I misremembered what my tiler asked me to get. I know not. What I do know is that this make of board is a truly bastard of a product. Bloody heavy, especially going round our tortuous staircase. It needs a special type of blade to cut using the tracksaw. No such thing as 'score-and-snap' like Hardiebacker. They provide special screws that are supposed to drill their way in without a pilot hole and special heads that will self-countersink themselves. They do neither and I have got through many 4mm drill bits and written off my 'snail'.

Bottom line DO NOT USE NoMorePly. Ever.

I mentioned the out-of-square walls and so my second mistake that wasted a lot of time was in treating this wall as the 'master' and then fudging the back wall to become 90 degrees to the former.

20260322_155529.jpg

The back wall could have been reworked by making a supplementary frame fixed to the existing wall but (a) since every inch is needed because the enquite is so, so tiny and (b) that back wall was pretty much straight and vertical, after two days fighting, I realised my error and used that back wall as the reference. (view of the back of it) and lots of room to run the shower pipes up. Luxury.

20260322_121650.jpg

After cutting and fitting the NoMorePly to the back wall, I had a lightbulb moment and realised that I'd effectively created a frame for the shorter wall and that all I needed to do was disconnect from the old house wall at one vertical end and then pivot it to become square with the backwall. Result. Now why didn't I think about that several days ago ?
 

Attachments

  • 20260321_164049.jpg
    20260321_164049.jpg
    131.6 KB · Views: 8
Hindsight is a great thing Roger, next time you'll remember how you did it.

Oh there isn't going to be a next time is there. ;)
 
What is this doing under a floor, and clearly looks out of align going by the nuts shown on the left side not being parallel ? I only use compression type fittings where the pipe connects to a trap, or sometimes onto a stack and everywhere else are solvent weld and also avoid tight bends, if you can use swept bends as they reduce flow restriction and possible blocking.

1774258780893.png
 
What is this doing under a floor, and clearly looks out of align going by the nuts shown on the left side not being parallel ? I only use compression type fittings where the pipe connects to a trap, or sometimes onto a stack and everywhere else are solvent weld and also avoid tight bends, if you can use swept bends as they reduce flow restriction and possible blocking.

View attachment 40182
Next time you're here you can show me how it's supposed to be done. Especially when you can see that the layout of the existing pipes dictates some further add-ons being 'out of line'. Really sorry that it's not up to your standards.

Must be some eggs around here.
 
Probably telling granny, but...

... I always go to some lengths to make sure any plastic joints have no burrs, and facing upstream, a bit of an inside bevel. At one point while we've been here, my wife and both daughters had long hair, and loved showers (you can guess!).

Also on waste pipes, I use solvent-weld fittings as much as possible, and only use "compression" ones where unavoidable. I wipe the inside of the joint too, if I can reach it, so any squeeze out doesn't become the start of a blockage either.

Your 'concertina' pipe will probably work with solvent, too, but you might consider replacing it with hand-bent uPVC (normal pipe) achieved with a hot air paint stripper (very cautiously - keep rotating it as you heat it).

Personally, I think having that concertina in a near-horizontal run is asking for trouble. I only have one (1 1/4") in the house, and it's in a straight-ish drop in a stud wall from a washbasin, teeing into 1 1/2" waste from the shower in that bathroom. It's only there to give enough movement for dismantling and reassembling the basin trap if needed. If it ever failed, a repair would be nightmarish.
 
I don't think people are trying to be critical Roger. Just suggesting that you have a lot of joins and right angle bends in the waste pipe which will inevitably increase the risk of blockages and air locks. I too would be tempted to re-do the waste runs and smooth it all out. As an example I have a much simpler run from a twin bowl kitchen sink (each bowl has an overflow and a chrome trap) flowing to an external grease trap and despite being a simpler run than yours, I still get occasional air locks. I know I need to install a pressure release valve / vent when I get round to it.

I too am doing a bathroom at the moment, and the instructions for the shower tray trap were very clear about correct fall, not using any concertina type pipe, and not having any right angle bends in the waste pipe runs.

I sympathise re the board. I used 12mm cement board (because I already had it in stock, to create the insulated internal walls of the bathroom. The Mafell tracksaw cuts it really well, but I had to buy a special blade designed for cement board. I find it drills quite well with masonry bits and I used a TCT countersink to screw the boards to the studwork I put in. (This was an ex kitchen and I built an internal structure to allow thick insulation all round.

In my case our trusted plumber Ollie did all the hot and cold plumbing, which is quite complex as we used a push button shower unit with various switchable outlets and a wall hung lavatory with cistern and frame inside the wall. I did the tiling. Will put some pictures up when it is finished.
 
In the 50 odd years of doing up old houses and using both solvent, compression, flexible connections, we have never had either an air lock or a pipe blockage. I didn’t sign up to do this renovation, thought those days were over but Sod came to visit and we are where we are.

It takes time, effort and energy to post these sort of threads. Time that I would much rather spend carrying on with everything else. Having done the work, I really didn’t want to be told to suck eggs. The waste piping is good enough.

Whatever. There will be no further posts from me in this thread.
 
It takes time, effort and energy to post these sort of threads. Time that I would much rather spend carrying on with everything else. Having done the work, I really didn’t want to be told to suck eggs. The waste piping is good enough.
Roger no offence was meant, I was just pointing out what for me was obvious and your thread is helpful for many other people who are looking and maybe thinking of taking on a major renovation. I will add that the bathroom is probably the worst room in a property to do when it comes to a complete rework because everything involves everything else and you are all to often restricted by the stack and direction of the joist. So please keep posting and if nothing else it will be something to look at if you ever get the urge to move again.
 
Please keep posting your updates of the work you're finding you have to do @RogerS 🙏.

When you're under pressure to get these jobs done it's easy to 'not see the wood for the trees' k8nd of thing - easy for others to point out a different way or route that they'd have taken... When your under pressure you're under pressure... I've been there my friend - believe me.

You're doing great with what you've had little choice but to undertake 👍
 
Roger. everyone is actually being nice. It is after all a discussion forum.

I dare not post my latest disaster. Also involves a bathroom and a wall hung toilet, not installed by me, coming adrift from the in-wall mountings and the ceramic cracking.
 
Roger. everyone is actually being nice. It is after all a discussion forum.

I dare not post my latest disaster. Also involves a bathroom and a wall hung toilet, not installed by me, coming adrift from the in-wall mountings and the ceramic cracking.
Must say I’ve always wondered if they were a good idea!
 
Must say I’ve always wondered if they were a good idea!
They are a good idea in some ways - gives a clear and easy to clean floor. But the frame in the wall (which includes the cistern too) has to be really well anchored. The issue here though appears to be that the bolts have somehow pulled free of the frame. It's very hard to know what has gone wrong at this stage as I didn't do the installation. The one we've just installed should be bomb proof as I built the timber frame, bolted to the wall, exactly to fit the steel hanger. Ollie the plumber plumber used loctite on the threads for the lavatory bolts, and the unit we bought this time has a steel frame combined with the porcelain.

However, we intend to built two more downstairs loo cubicles for our little restaurant and they will have conventional loos that will cope with guests of generous proportions....
 
that will cope with guests of generous proportions.

I am in the process of rebuilding the bathroom in our house in Sweden and bought a wall-mounted toilet for it. I use this frame: Geberit Duofix Element UP320 and according to the documentation it will handle up to 400 kg. I don't think the weight will be a problem. Not even for the generous types...
 
I am in the process of rebuilding the bathroom in our house in Sweden and bought a wall-mounted toilet for it. I use this frame: Geberit Duofix Element UP320 and according to the documentation it will handle up to 400 kg. I don't think the weight will be a problem. Not even for the generous types...
Yes, we used Gerberit too. The issue is not the strength of the frame. That will support a Sherman tank plus a skinny model. It is the leverage of someone heavy (pre mounjaro?) botting down on the lavatory creating lots of leverage on both the frame anchorage and the ceramic anchorage, and the lower abutment point on the wall. The toilet fixing is just two threaded bolts (or threaded steel rods in actuality) and if they come loose at either end - you are potentially in deep sh1t
:cool:
 
  • Like
Reactions: HdV
These wall hung toilets must require some serious wall reinforcing in a modern house, the concept of the close coupled cistern was that the weight of the cistern / water would be transfered into the foor via the pan rather than loading a flimsy stud wall and now they want to hang a toilet on the wall !!
 
These wall hung toilets must require some serious wall reinforcing in a modern house, the concept of the close coupled cistern was that the weight of the cistern / water would be transfered into the foor via the pan rather than loading a flimsy stud wall and now they want to hang a toilet on the wall !!
Ours is very modern. Frame goes back to 1680, so barely youthful. Mind you chav dodgy builders hacked it about expertly (not) a while ago. Bloke who built it lacked a level, string and straight edge. Antoni Gaudi would bee proud.
 
These wall hung toilets must require some serious wall reinforcing in a modern house, the concept of the close coupled cistern was that the weight of the cistern / water would be transfered into the foor via the pan rather than loading a flimsy stud wall and now they want to hang a toilet on the wall !!
The toilet is not hung on the wall though. It's hung on a welded steel frame concealed behind tilling or whatever, and that is bolted to the floor and whatever studwork is built around it. In my case we also tied the steel frame back to the wall as well.
 
Back
Top