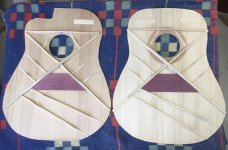
• Hi all and welcome to TheWoodHaven2 brought into the 21st Century, kicking and screaming! We all have Alasdair to thank for the vast bulk of the heavy lifting to get us here, no more so than me because he's taken away a huge burden of responsibility from my shoulders and brought us to this new shiny home, with all your previous content (hopefully) still intact! Please peruse and feed back. There is still plenty to do, like changing the colour scheme, adding the banner graphic, tweaking the odd setting here and there so I have added a new thread in the 'Technical Issues, Bugs and Feature Requests' forum for you to add any issues you find, any missing settings or just anything you'd like to see added/removed from the feature set that Xenforo offers. We will get to everything over the coming weeks so please be patient, but add anything at all to the thread I mention above and we promise to get to them over the next few days/weeks/months. In the meantime, please enjoy!

Dreadnought SS Guitar (Demo Time)

Thanks for the explanation. That bracing looks like a cats cradle and easy to ping a few off! Patience is clearly one of your virtues.
 
I did see the link re bracing. Where I was coming from is that there are lots of bracing patterns and as many opinions on top thickness, scalloped bracing, etc. But it's very rare that you can compare like for like with everything else as a constant.

It does make a difference for sure, but hard to know unless you can compare two guitars that are otherwise identical.

For example the first jumbo I ever kept has a pretty thick spruce top and pre-war martin style bracing. It looks very nice as a guitar, but is hopeless for finger picking, especially for recording. The Taylor I currently have as my main acoustic player, is in contrast hopeless for flat picking. Much thinner top and far less bracing in comparison.
 
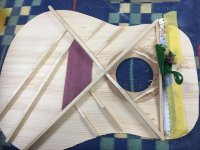
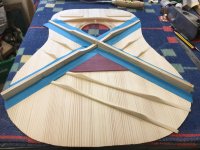
Soundboard removed from the go-bar deck and carving started in situ.

First the top cross brace.

8B5F51D6-CACC-4CB3-BAAC-2B229D958F72.jpeg

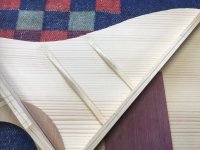
Next the two soundhole braces.

04C6AA6B-E908-4066-AA0E-2BF474754602_1_201_a.jpeg

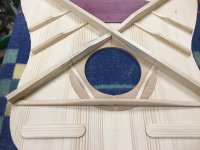
Those three braces completed.

AF597EBA-21B2-4475-BBB2-75A309D4F582.jpeg

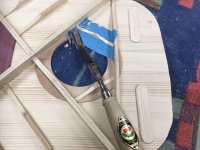
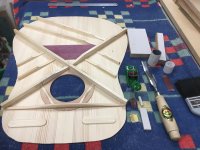
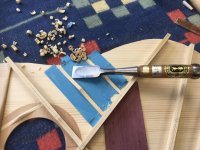
The tools I use to shape the braces. Actually, I haven't used the two larger sanding blocks yet, nor the two tubed blocks. Just the small bits by the chisel.

331E07BF-540B-4DEE-A84F-64347E251880.jpeg

The hole in the cross brace is to accommodate a hex tool to adjust the truss rod within the neck.

I don't know about you, but I find carving, and especially sanding, quite therapeutic.
 
Malc2098":3tepa5wv said:
I don't know about you, but I find carving, and especially sanding, quite therapeutic.

I find carving a bit stressful and sanding incredibly boring, but each to their own I guess :lol:
 
I quite like sanding as well. I think anyone who does luthiery work whether it be violins or guitars, has to like sanding. I don't even mind machine sanding of tabletops and suchlike. It's always transformative. Carving is fine, but I wish I was better at sharpening the tools quickly.
 
More brace carving and sanding. More Boom Light! :)

2A21A70E-B2A4-498C-AFC3-EFBC5780F545_1_201_a.jpeg

4BB9C1E8-B54C-4C2A-AB17-31B3779A82E9_1_201_a.jpeg

FFAFDA3D-7C57-4EFE-B067-B057F3361910_1_201_a.jpeg

That took me a few hours.

I tried a tap-tone this afternoon (for those who understand these things - I don't, properly) and I got a pleasant note and counted a 2 to 3 second sustain. And I haven't even started on the X brace yet!
 
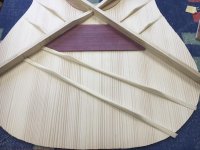
The main tone braces.

66727009-1393-40FE-B7D8-B8194E52E3E1.jpeg

AA2DB61E-5F8F-4C31-A246-B588516DCE46_1_201_a.jpeg

I am not experienced enough to know how to achieve it, but by varying the cross section, scalloping, taper and height etc, this can give the instrument its tone variation and 'flavour'.
 
This is all a completely alien world to me and I haven't got anything interesting to say, but I'll just say: keep going, it's fascinating.
 
Quality work as always Malc.

I'm sure you have explained in the past but remind me why you carve the braces after gluing them on and not before? Must need so much more care working on the front panel compared to in the vice where you could make the shape on a wide strip then saw it off for use.
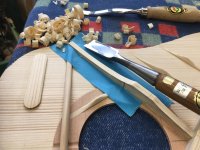
 
You can't really tune the top to a pleasing resonant frequency unless you do it with the braces in situ.
 
Robert":2jn1tkko said:
Quality work as always Malc.

I'm sure you have explained in the past but remind me why you carve the braces after gluing them on and not before? Must need so much more care working on the front panel compared to in the vice where you could make the shape on a wide strip then saw it off for use.

Thanks, Gents.

Good question, Robert.

I could choose a pattern and mill the 2D scallop shapes, or any other, on the CNC machine and then glue them to the inside of the sound board. I could even hand carve the PARd blanks into their 2D section and then glue them. The tallest brace was only 19mm and the smallest was 8mm so clamping and carving would be tricky, as I carve with a chisel held upside down using the grinding angle as a fulcrum to create the curve.

But I enjoy the carving in situ. The PARd blanks are robust when glued under the go-bar deck, and the workpiece is flat on the bench and it takes quite a bit of force to carve those curves and just on a blanket to protect the top face and my arm on a flat bit, it doesn't move.

But if you want to get into the really professional and possibly nerdy reason, it's just as Adrian said, for full time luthiers, they tap-tune the top by listening for a pleasant resonant frequency and adjusting different tone bars to achieve the tone and 'flavour' they want.

I'm not that good. I'm following plans of a previously made successful design and my tap-tone sounds nice, and I can hear and feel the sustain for a couple of seconds or so. So I leave it at that.

Chisels and finger planes or violin planes are traditionally used to achieve the 2D and 3D shapes. I just use a chisel and various grades of abrasive on various shapes.

Anyway…..Starting to carve the X Brace.

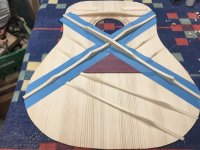
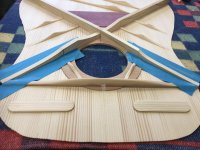
I use two layers of masking tape to protect the inside of the soundboard. The first layer I press on to my jumper or the blanket covering the work board to reduce its stickiness so that it doesn't tear out the Spruce fibres when I pull it off.

F3D87BD3-F34E-4080-AE8C-4A9A7DE5F57E.jpeg

At first, I only carve the 2D shape of the X Brace around all four arms.

0FE35280-01CB-4684-ABF8-F49D7AE2CAF1.jpeg

Masking all four arms.

6510F092-BF7A-46DF-A372-73D1521E3487.jpeg

2D carve of all four arms.

3FB13B70-82D7-4386-9C40-C48348659B92_1_201_a.jpeg

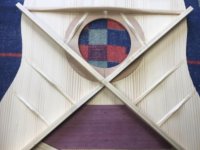
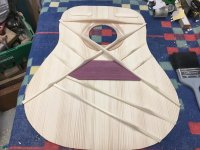
3D carve of all four arms.

55FE8EE2-6FB4-4160-9DD8-5A4AED1A0EDA.jpeg

The X brace has taken me the best part of the day, with generous breaks, to complete.

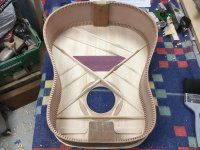
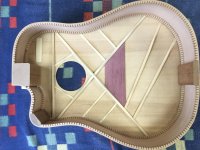
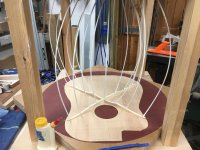
When I place the instrument rim over the finished soundboard, I get to see what nobody else except me - and of course the privileged viewers on this forum - gets to see! :)

03BDFE57-281C-46A2-ABC4-7EEF32AA9B37_1_201_a.jpeg

Now, I get to do it all over again for the cutaway model.
 
Malc. That is looking really professional and I think you should be proud of this attention to detail and quality of work. I for one am impressed.
 
AJB Temple":383el6ua said:
Malc. That is looking really professional and I think you should be proud of this attention to detail and quality of work. I for one am impressed.

:text-+1: :text-bravo:
 
AJB Temple":24j5sh0e said:
Malc. That is looking really professional and I think you should be proud of this attention to detail and quality of work. I for one am impressed.

:text-+1:

Enjoyable and educational read.
 
I can’t hold back on this question any longer. Who and why decides where those bracing bars go? They all seem to be parallel/symmetrical except for the two longest one.
 
Andyp":20mn43s9 said:
I can’t hold back on this question any longer. Who and why decides where those bracing bars go? They all seem to be parallel/symmetrical except for the two longest one.

Thanks, Andy. Another good question.

I believe there may be countless ways of bracing guitars, all to achieve the sound and tone the player wants, be they classical, flamenco, gypsy, country, folk, bluegrass, flat pick, finger pick………. the list goes on.

The model instrument - shape, size, design etc - I'm making is called a Dreadnought. It was introduced by C F Martin & Co way way back. The style of X Bracing they introduced in 1843! Please read the following for more details.

https://www.thaliacapos.com/blogs/blog/three-ways-martin-revolutionized-acoustic-guitar

You spotted the two loner tone bars in the lower bout were not symmetrical to the body. That's because this is a right handed instrument. Viewed from the front when played, the thicker bass strings are on the top coming downwards to thinner treble strings. The asymmetrical bracing helps the different frequencies the strings create resonate around the soundboard. If the instrument were strung for a left handed player, but with right handed bracing, it wouldn't sound 'nice'. ;)
 
Perhaps also worth mentioning the thorny issues of cold creep (deformation kind of) and bridge leverage. Some makers use floating bridges, not dissimilar to a violin really, and these place much less strain on the top (but have other issues). You sometimes see old arch top guitars and occasionally flat top parlour guitars from around the 1920s or earlier that just have two longitudinal braces.
 
As Adrian quite rightly said, the pressure on the bridge caused by the tension of the strings is quite considerate. The X Braces along with the bridge reinforcement plate seek to spread those forces across the soundboard.

Early Gibsons, so I've read, had a habit of bellowing up, where the back of the bridge pulls the body upwards from the tension of the strings because their bracing was insufficient to prevent this.

The transverse top brace prevents the fretboard overhang from exerting pressure down onto the soundboard and the short top flat braces prevent the soundboard splitting across the top.

The other bars are not braces, but tonebars, and help to create the tone and flavour of the sound of the instrument through influencing resonant frequencies.
 
OK,thanks
The link you posted Malc has this image with the two longest braces parallel. So is it upto maker's preference as to where exactly they are placed?
martin_x_brace_large.png
 
Andyp":uyai6lng said:
OK,thanks
The link you posted Malc has this image with the two longest braces parallel. So is it upto maker's preference as to where exactly they are placed?
martin_x_brace_large.png


Exactly, Andy. But, they are not braces, they are the tone-bars. Rather than providing strength they are affecting the resonant frequencies by their position size and shape.

The X, the two transverse and the little soundhole braces are all braces. The remainder are tone-bars.
 
I agree with Al. :)

I am damn sure that my ear would struggle to differentiate between the differing tone that the two different configurations would produce.
Fascinating nonetheless.
 
This is what often is regarded as differentiating the top violin makers in (say) Cremona from most. When you tap carved violin tops you can hear the resonance developing as the top is thinned. The wood rings. Some people have a real ear for this and some have cloth ears. It's quite remarkable when you are in a Cremonese workshop and get to tap 30 or 40 prime grade lids. They vary a lot.

Presumably guitar tops are similar. I've tapped a few and can hear the resonances, but never had the opportunity to compare a lot at the same time. Guitar tops in general are not carved in anything like the same way that violins (etc) are, but some makers do thin them in strategic places and no doubt if you are working in Santa Cruz or Taylor custom shop you get to hear the tonal differences. Previously I remarked that it's a black art and I still think thats true, as there is no formula that will guarantee consistency at the high end level of elite performance instruments.
 
Andyp":1yf7ygt6 said:
I agree with Al. :)

I am damn sure that my ear would struggle to differentiate between the differing tone that the two different configurations would produce.
Fascinating nonetheless.

Nor, me, Andy. That's why I'm following a known pattern rather than tap, chisel, listen tap, chisel, listen etc.

But I do tap before joining the two bookmatched sides, after sanding them. And I do have a listen after I've glued all the braces and bars and shaped them. I still find it a pleasant sound.
 
It's hardly surprising guys. You would be surprised how difficult it is for some people to determine pitch. When I audition a potential new piano student (usually teenagers) I always get them to close their eyes and then I play a note, then half a step above or below and ask them which is the higher or lower. Many people can't tell (in which case you are onto a loser teaching them). The ones who can't do this, usually can't recognise exact octaves either. Even fewer can sing that tone and then an octave above or below, even if you get them to do doh ray me fah soh etc to help them get there.
 
Just for a change, I've pre-carved the X braces' 2D shapes on the bobbin sander before gluing on the cutaway's soundboard.

82EB25B8-2F7B-4EEB-BCC6-00BAE5AD7612.jpeg

The tone bars are a bit fragile being smaller, so I'll carve their 2D and 3D shapes after gluing.
 
I've finished the carving of the braces and tonebars of the cutaway model.

0CA3D6F3-CC40-4DAE-AF45-27B0885AE2EE_1_201_a.jpeg

And you get to be privy to see what the inside of the cutaway model will look like.

BDE29480-E3F7-472C-BE77-2B1A66D0F470_1_201_a.jpeg

I shall be taking a break while we have some family visit.
 
What caused the chipping at the tail end of the cutaway top Malc?

Will that be largely removed when trimmed to size?

Hope you have a nice time with your visitors.
 
AJB Temple":zstudmqk said:
What caused the chipping at the tail end of the cutaway top Malc?

Will that be largely removed when trimmed to size?

Hope you have a nice time with your visitors.
That's what Spruce does if you're not careful with it. That happened when I bandsaw cut the oversize shape out.

It has also happened in a couple of places even though I roughed the masking tape on the bench blanket cover before sticking it down along side the braces and bars. When i pulled it off, it still pulled a couple bits between the growth rings.

As you can see in the image with the rim, that part will be covered/glued by the kerfed lining during box construction.

This, therefore, reminds me that when I come to fit the binding and purfling, I will have to spray a wide band of sanding sealer around the top so that the tape holding the binding/purfling while the glue dries doesn't pull the grain when I remove it.
 
Thanks Malc. I did wonder if it was that. It's quite a while since I last made an acoustic guitar, and at that time I didn't have a bandsaw. Everything was cut by hand with a fret saw, and what I was taught to do was carefully score the intended cut line with an Xacto knife first, to stop this happening. The top was moved around a metal former held in my dad's vice, so the saw was kept close to that and the thin wood fed to the saw. If I was working in premium spruce I think I would still do it the same way. The knife cut really helps.
Jewellers fret saws are slow, but can do a very fine cut.
 
Thanks, Phil. Nice.

I've got a plan of similar stands somewhere, but I've got no more floorspace for my instruments! :)

They have to hang.
 
Back
Top