-
Hi all and welcome to TheWoodHaven2 brought into the 21st Century, kicking and screaming! We all have Alasdair to thank for the vast bulk of the heavy lifting to get us here, no more so than me because he's taken away a huge burden of responsibility from my shoulders and brought us to this new shiny home, with all your previous content (hopefully) still intact! Please peruse and feed back. There is still plenty to do, like changing the colour scheme, adding the banner graphic, tweaking the odd setting here and there so I have added a new thread in the 'Technical Issues, Bugs and Feature Requests' forum for you to add any issues you find, any missing settings or just anything you'd like to see added/removed from the feature set that Xenforo offers. We will get to everything over the coming weeks so please be patient, but add anything at all to the thread I mention above and we promise to get to them over the next few days/weeks/months. In the meantime, please enjoy!
You are using an out of date browser. It may not display this or other websites correctly.
You should upgrade or use an alternative browser.
You should upgrade or use an alternative browser.
Dreadnought SS Guitar (Demo Time)
- Thread starter Malc2098
- Start date

AJB Temple
Sequoia
- Joined
- Apr 15, 2019
- Messages
- 7,725
- Reaction score
- 1,205
:text-goodpost:
He's called Adrian. Therefore must be a top bloke :lol:
He's called Adrian. Therefore must be a top bloke :lol:

Malc2098
Sequoia
AJB Temple":32on5i7u said::text-goodpost:
He's called Adrian. Therefore must be a top bloke :lol:
:lol: :lol: :lol:
AJB Temple
Sequoia
- Joined
- Apr 15, 2019
- Messages
- 7,725
- Reaction score
- 1,205
Malc - I came across this video by Dana Bourgeois. I used to have one of their guitars as it happens, when I briefly lived in the US. Silly money now. (In fact I thought it was silly money then too).
https://www.youtube.com/watch?v=Ei5-DkVTrEE
It's probably a bit of a tedious vid for anyone who is not into luthiery, but for me the interesting thing was he referred to and showed an app that he said was $10 that works on a phone and analyses the resonant frequencies from the guitar top. Gave a good idea in graph form of the power and sustain of different played notes exciting the top, and showed quite well the volume / sustain / tone compromise.
https://www.youtube.com/watch?v=Ei5-DkVTrEE
It's probably a bit of a tedious vid for anyone who is not into luthiery, but for me the interesting thing was he referred to and showed an app that he said was $10 that works on a phone and analyses the resonant frequencies from the guitar top. Gave a good idea in graph form of the power and sustain of different played notes exciting the top, and showed quite well the volume / sustain / tone compromise.
Malc2098
Sequoia
Thank you, Adrian. I have watched this a while ago.
He knows what he's listening for. I don't. I'm just listening for what sounds pleasant to me. And I'm OK with that.
At my level of experience, it's more important to me to achieve consistency in machining techniques, and consistency and accuracy in hand tooling techniques.
He knows what he's listening for. I don't. I'm just listening for what sounds pleasant to me. And I'm OK with that.
At my level of experience, it's more important to me to achieve consistency in machining techniques, and consistency and accuracy in hand tooling techniques.
AJB Temple
Sequoia
- Joined
- Apr 15, 2019
- Messages
- 7,725
- Reaction score
- 1,205
Fair enough Malc. Sorry. Have you tried the phone harmonic analyzer app as a matter of interest? I thought it might be useful to see whether the brace pattern is what you expected. Presumably the problem is you can only really use an app like this once the soundboard is already finished.
Malc2098
Sequoia
No. I don't know what to expect from this brace pattern. I will hear the tap tone and I'll hear the sound of the strung instrument. Anything else is above my pay scale.
I still get a huge buzz (pardon the pun) when I sting and instrument and hear it for the first time, and these are Nos 8 and 9.
I still get a huge buzz (pardon the pun) when I sting and instrument and hear it for the first time, and these are Nos 8 and 9.
Malc2098
Sequoia
The back braces will be housed and glued into the linings along with the back being glued to the linings. But that takes place after the top will have been glued onto the rim (sides). So there will not be the access to make adjustments to ensure that all gluing faces meet properly.
You may remember that the back is dished to a radius. The braces dish the back in one axis only (side to side). The rim (sides) have been dish sanded, so the back now needs to fit the other axis, front to back.
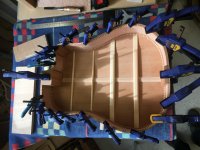
Using the sun to see if there are any gaps between the gluing faces.
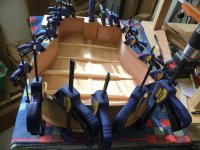
Irwin's micro clamps make an ideal replacement for spool clamps. There was a deal on before Christmas.
You may remember that the back is dished to a radius. The braces dish the back in one axis only (side to side). The rim (sides) have been dish sanded, so the back now needs to fit the other axis, front to back.
Using the sun to see if there are any gaps between the gluing faces.
Irwin's micro clamps make an ideal replacement for spool clamps. There was a deal on before Christmas.
NickM
Old Oak
That looks to fit perfectly!
Malc2098
Sequoia
NickM":2hlnj2cg said:That looks to fit perfectly!
Thanks, but don't look too closely.

Malc2098
Sequoia
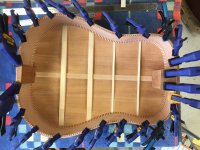
Housing the soundboard braces into the linings. Using a lamp to see if there are any gaps between the gluing surfaces.
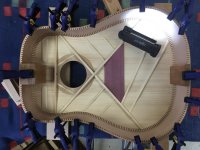
The soundboard braces do not get housed through the linings. They get stopped to give the ends of the braces minute space to move should there be any large humidity changes.
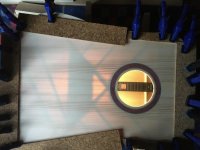
An indication of how thin the soundboard is and why it needs bracing.
The soundboard braces do not get housed through the linings. They get stopped to give the ends of the braces minute space to move should there be any large humidity changes.
An indication of how thin the soundboard is and why it needs bracing.
AJB Temple
Sequoia
- Joined
- Apr 15, 2019
- Messages
- 7,725
- Reaction score
- 1,205
Phil":2j1zby28 said:Malc, here is something to do in your spare time
Just in case you get bored .....
If any of you have a valuable or much esteemed guitar, I urge you not to use this kind of stand unless you lve alone and have no pets. You can buy a more rudimentary stage version which is almost as bad, and I have lost count of the number of times I have seen guitars damaged or broken by being bashed against the upright (by person or dog) or tipped off. Always does damage.
The top of that one is a commercial unit that screws into the wall or also comes screwed into a block for wall mounting. The rubber washers give the impression that the neck is secure at the nut, but it isn't. All it needs is a slight twist and the neck pops out and the guitar falls.
The type that has arms coming across the front when you weight the bracket with a guitar is much better. It is also much better to have a three legged base and arms (with material hat does not react with cellulose) to support the body of the instrument. With these it is very hard to knock the guitar off and quite hard to knock the stand over.
A top notch hand-made and / or branded acoustic guitar can be £2,000 to £12,000. They are vulnerable.
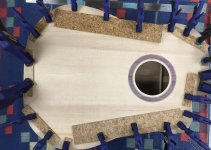
Malc2098
Sequoia
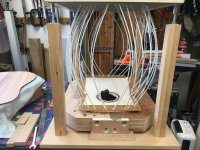
Time also to raise the top of the go-bar deck to cater for the depth of the body.
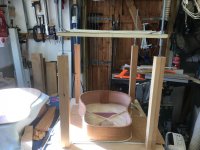
For the previous two ukuleles, this was the setup for gluing. But this way round, with the cork under the face surface of the soundboard, and without it, I just couldn't get a tight mate of the gluing surfaces. Using the lamp to show me where the gaps were I just could not exert enough clamping pressure with the rods to close the gaps. (I suppose because the rods were bearing down on the sides that were being held in shape by the mould.)
So. I turned the parts over.
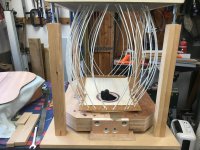
This time the rods are bearing down, through cork cauls, onto the soundboard itself, push directly on to the rim. It was a bit tricky wedging up the back rim because of its contours, but I got there in the end and the lamp method showed me there were no gluing gaps.
Stop for coffee, breathe, post this, then go back and glue it!
For the previous two ukuleles, this was the setup for gluing. But this way round, with the cork under the face surface of the soundboard, and without it, I just couldn't get a tight mate of the gluing surfaces. Using the lamp to show me where the gaps were I just could not exert enough clamping pressure with the rods to close the gaps. (I suppose because the rods were bearing down on the sides that were being held in shape by the mould.)
So. I turned the parts over.
This time the rods are bearing down, through cork cauls, onto the soundboard itself, push directly on to the rim. It was a bit tricky wedging up the back rim because of its contours, but I got there in the end and the lamp method showed me there were no gluing gaps.
Stop for coffee, breathe, post this, then go back and glue it!

Phil
Old Oak
Deserves more than coffee 
Malc2098
Sequoia
Top glued and no gaps!
Left in the mould overnight and it came out smooth.
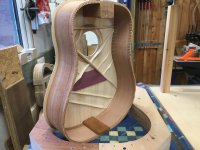
Needs some trimming to take off the excess.
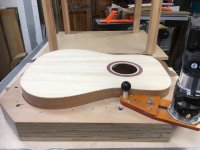
Out with the router fitted with a bearing guided cutter.
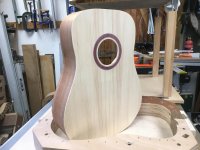
Much neater and less susceptible to damaging that edge.
Time to do a dry run of fitting the back.
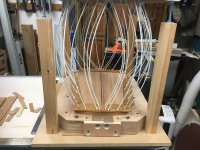
Trickier this time. I can't put the lamp inside now the top is glued on, so I have to go round with feeler gauges and see if I can slide a thin one under.
That's a job for tomorrow when my eyes are not so tired.
Left in the mould overnight and it came out smooth.
Needs some trimming to take off the excess.
Out with the router fitted with a bearing guided cutter.
Much neater and less susceptible to damaging that edge.
Time to do a dry run of fitting the back.
Trickier this time. I can't put the lamp inside now the top is glued on, so I have to go round with feeler gauges and see if I can slide a thin one under.
That's a job for tomorrow when my eyes are not so tired.
Malc2098
Sequoia
Closing the box is how luthiers refer to gluing the back plate on (if the soundboard was glued on first, obvs).
But before that, I've got to stick on my brand label and sign the inside of the back.
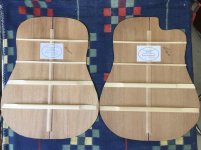
Then glue the back on, using the glue roller for an even spread around the kerfed linings and using the go-bar deck to clamp it over the contour of the back.
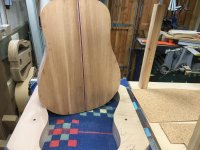
It doesn't look much but it's glued on.
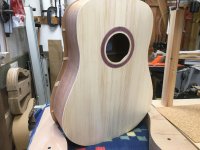
The a quick whiz round with the router and bearing follower cutter to clean up.
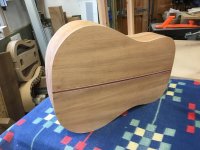
Then it's rinse and repeat for the cutaway model.
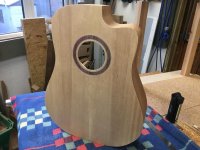
First glue the top and trim off with the router.
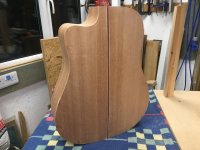
Same with the back.
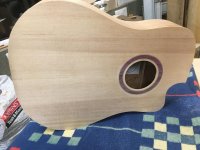
And we have a pair of closed boxes.
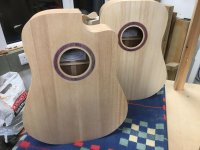
Now for a bit of a break while I design and make a jig for accurately locating and routing the end graft. Then I've got to make up some binding and purfling and bend them to shape before anything else gets done.
At least I can dismantle and stow the go-bar deck again!
But before that, I've got to stick on my brand label and sign the inside of the back.
Then glue the back on, using the glue roller for an even spread around the kerfed linings and using the go-bar deck to clamp it over the contour of the back.
It doesn't look much but it's glued on.
The a quick whiz round with the router and bearing follower cutter to clean up.
Then it's rinse and repeat for the cutaway model.
First glue the top and trim off with the router.
Same with the back.
And we have a pair of closed boxes.
Now for a bit of a break while I design and make a jig for accurately locating and routing the end graft. Then I've got to make up some binding and purfling and bend them to shape before anything else gets done.
At least I can dismantle and stow the go-bar deck again!

Good stuff Malc.
Just wondering... have you ever pushed one of those rods onto a weighing scale to see what the optimum amount of bend is? I'd have guessed just off straight would be highest pressure.
Just wondering... have you ever pushed one of those rods onto a weighing scale to see what the optimum amount of bend is? I'd have guessed just off straight would be highest pressure.
Malc2098
Sequoia
Robert":2lm5ghnc said:Good stuff Malc.
Just wondering... have you ever pushed one of those rods onto a weighing scale to see what the optimum amount of bend is? I'd have guessed just off straight would be highest pressure.
Thanks, Robert.
I posted this back in 2021 when I built the deck.
https://www.thewoodhaven2.co.uk/viewtopic.php?f=26&t=3216&p=69013&hilit=deck#p69013
'Fraid I don't know how to do a view topic properly.
But anyway, at that time I did this test.
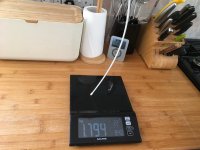
Quite significant when placed close together. Also, they can be fitted round a bend, even as tight as the cutaway, and over contours. The only other clamps that come close to doing that are spool clamps.
Link was fine. 1.7kg doesn't sound a lot but as you say adds up when multiple. Thanks.
AJB Temple
Sequoia
- Joined
- Apr 15, 2019
- Messages
- 7,725
- Reaction score
- 1,205
Looking very good.
Malc2098
Sequoia
Robert":1xj3qs9z said:Link was fine. 1.7kg doesn't sound a lot but as you say adds up when multiple. Thanks.
That equates to 1.7kgs per (generously) 4 sq mm.
Maybe someone else can do the maths to convert to PSI to confirm, but I make that about 280lbs PSI.
Malc2098
Sequoia
Next. I've made some more Purpleheart and Maple binding/purfling to complement the headstock and neck.
But, before I can fix that on I have to fit the end graft. The end graft is a piece of veneer or other cosmetic material that covers the two ends of the rim where they join at the tail of the instrument.
To accurately rout the end graft pocket on size and depth, I need a jig to hold the routing template directly over the centre line of the tail. And before I can do that, I need a safe and secure means of clamping the instrument body vertically.
First the body clamp/vice.
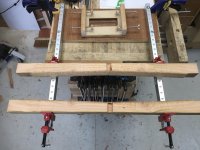
It comprises two 600mm aluminium sash clamps bolted to a piece of ply that I can clamp to my bench with the vice/clamp jaws over hanging the end of the bench.
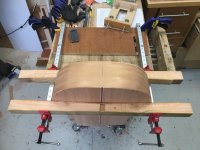
Two pieces of timber, both of which form a shallow V to the centre, are lined with cork and for the clamping cauls. The V means that they only clamp at the edges of the instrument body where it is strongest. Very little pressure is needed to make the body completely secure.
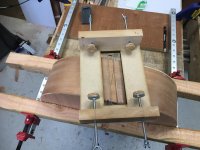
I made the end graft jig from layers of 3mm mdf and its templates from clear acrylic. The clamping bolts are double skins of cork on M5 treaded rod. I'm awaiting some knobs, but am using locked wing nuts for the time being. The rods are threaded through M5 threaded inserts in two pieces of Beech each at either end of the jig.
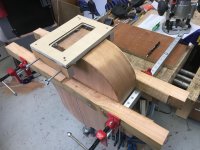
The layers of mdf and the acrylic inserts were all laser cut by Dave Neale (Laserctz Ltd) of this forum.
The first insert is just a centre line and crosshairs to centre the whole jig accurately over the centreline of the instrument body…..
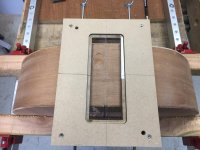
… with a finger hole to get it out again.
I've drawn two templates for Dave to cut, one straight and one tapered, but any shape and dimension can be lasered for a routing template.
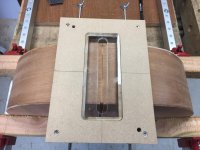
The router can now be moved safely over the template to rout the end graft pocket.
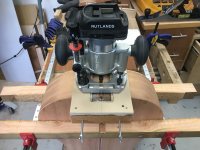
I shall be using Purpleheart veneer for the end graft bordered by Maple stringing like the back centre join, and hopefully I will be able to mitre the 1.5mm Maple where it meets at right angles with the purfling.
Fingers crossed.
But, before I can fix that on I have to fit the end graft. The end graft is a piece of veneer or other cosmetic material that covers the two ends of the rim where they join at the tail of the instrument.
To accurately rout the end graft pocket on size and depth, I need a jig to hold the routing template directly over the centre line of the tail. And before I can do that, I need a safe and secure means of clamping the instrument body vertically.
First the body clamp/vice.
It comprises two 600mm aluminium sash clamps bolted to a piece of ply that I can clamp to my bench with the vice/clamp jaws over hanging the end of the bench.
Two pieces of timber, both of which form a shallow V to the centre, are lined with cork and for the clamping cauls. The V means that they only clamp at the edges of the instrument body where it is strongest. Very little pressure is needed to make the body completely secure.
I made the end graft jig from layers of 3mm mdf and its templates from clear acrylic. The clamping bolts are double skins of cork on M5 treaded rod. I'm awaiting some knobs, but am using locked wing nuts for the time being. The rods are threaded through M5 threaded inserts in two pieces of Beech each at either end of the jig.
The layers of mdf and the acrylic inserts were all laser cut by Dave Neale (Laserctz Ltd) of this forum.
The first insert is just a centre line and crosshairs to centre the whole jig accurately over the centreline of the instrument body…..
… with a finger hole to get it out again.
I've drawn two templates for Dave to cut, one straight and one tapered, but any shape and dimension can be lasered for a routing template.
The router can now be moved safely over the template to rout the end graft pocket.
I shall be using Purpleheart veneer for the end graft bordered by Maple stringing like the back centre join, and hopefully I will be able to mitre the 1.5mm Maple where it meets at right angles with the purfling.
Fingers crossed.

Dr.Al
Old Oak
Nice work. It's interesting to see the approaches to workholding and jiggery.
Malc2098
Sequoia
Well there was no putting it off. Remember when I made this tower thingy with Dr Al's help? Well now I've got to use it.
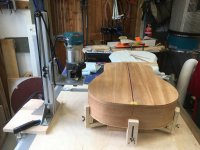
Everything was set up. The height of the body was equal back and front and contoured around the sides, which is why the tower is needed to follow those contours.
[youtubessl]d1DovgR9EdQ[/youtubessl]
I either need a taller bench or shorter legs, and I'm pretty sure the last time I saw a picture of the top of my head, there was hair on it. :eusa-violin:
But it was not my best work. Although you can't see it in the video, for some reason, I hadn't tightened the chuck up enough and the cutter extension lowered and at a couple of places cut the channel deeper than the binding will be. I'll find a way to repair that, but I'm bloomin' cross with myself.
That made the it difficult to route the purfling channel, because the deeper rebate meant the bearing couldn't follow the body shape. I'll find a way to deal with that, too.
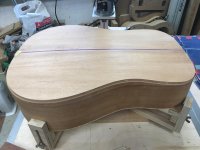
The rest of it didn't seem to come out too badly. I've dry checked fitting binding and purfling in various places and it seems to fit OK.
I sprayed a coat of sanding sealer on the soundboard so as to protect the delicate fibres of the spruce while routing its channel, just binding only, and it turned out OK.
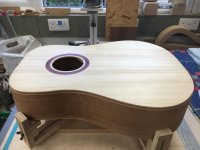
Everything was set up. The height of the body was equal back and front and contoured around the sides, which is why the tower is needed to follow those contours.
[youtubessl]d1DovgR9EdQ[/youtubessl]
I either need a taller bench or shorter legs, and I'm pretty sure the last time I saw a picture of the top of my head, there was hair on it. :eusa-violin:
But it was not my best work. Although you can't see it in the video, for some reason, I hadn't tightened the chuck up enough and the cutter extension lowered and at a couple of places cut the channel deeper than the binding will be. I'll find a way to repair that, but I'm bloomin' cross with myself.
That made the it difficult to route the purfling channel, because the deeper rebate meant the bearing couldn't follow the body shape. I'll find a way to deal with that, too.
The rest of it didn't seem to come out too badly. I've dry checked fitting binding and purfling in various places and it seems to fit OK.
I sprayed a coat of sanding sealer on the soundboard so as to protect the delicate fibres of the spruce while routing its channel, just binding only, and it turned out OK.
AJB Temple
Sequoia
- Joined
- Apr 15, 2019
- Messages
- 7,725
- Reaction score
- 1,205
Well! That made me feel nervous for some reason. I've only ever done this by hand using a traditional luthier's hand held twin blade purfling cutter made by my dad for me (many years ago mind) and that electric router on the stand, operating at eye level, looked quite scary. Don't you find it a bit strange not being able to see the cut as it is done? Worked out pretty well so kudos to you.
The purple heart has worked out well too. I particularly like the strip through the back. It's pretty.
Nice video. Sorry to hear the router bit moved and went too deep. Very frustrating. I feel for you as you try so hard to get things perfect.
The purple heart has worked out well too. I particularly like the strip through the back. It's pretty.
Nice video. Sorry to hear the router bit moved and went too deep. Very frustrating. I feel for you as you try so hard to get things perfect.
Malc2098
Sequoia
Malc2098
Sequoia
It's not all been plain sailing finding ways to repair the damage; one part has worked well and one not so well. I've still got to find a way to sort that.
But this went plain sailing!
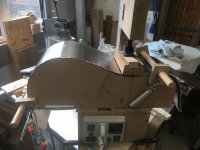
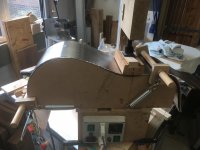
Remember this old machine? Well, I wrapped six lengths of Purpleheart/Maple binding/purfling in kitchen foil, all lined up handed properly for their sides and the cooked them at 140 for 10 minutes and let them cool down in the machine.
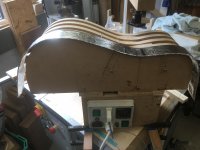
Shape looks good.
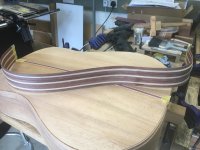
Still taped together in this pic, but turned out really well with no breakages and very little spring back. And they fit in the channels that I haven't damaged!
Why only six strips for two instruments? Well, I will bend the cutaway model's bindings by hand on the heating iron later.
But this went plain sailing!
Remember this old machine? Well, I wrapped six lengths of Purpleheart/Maple binding/purfling in kitchen foil, all lined up handed properly for their sides and the cooked them at 140 for 10 minutes and let them cool down in the machine.
Shape looks good.
Still taped together in this pic, but turned out really well with no breakages and very little spring back. And they fit in the channels that I haven't damaged!
Why only six strips for two instruments? Well, I will bend the cutaway model's bindings by hand on the heating iron later.
Malc2098
Sequoia
Having 'repaired' my cock-up which I'm not going to photo until the instrument is finished, it's time now to fit the end graft using the jig Dave Neale and I made a couple of weeks ago.
You saw how I fitted it on to the instrument body earlier in this thread.
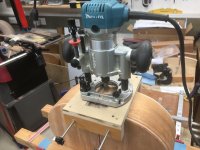
Rout to just less than the depth of the binding channel.
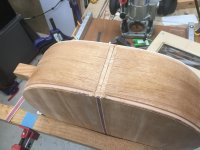
Purpleheart and Maple for the graft.
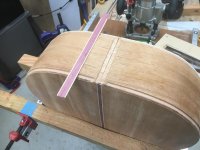
Offer into the housing.
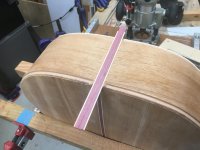
Shorten to just over length leaving enough to make the Maple mitres.
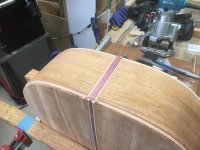
In the absence of a heavy weight, I use lots of glass reinforced tape the press the caul down onto the graft.
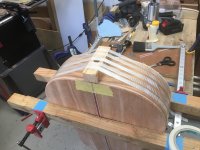
This will be the first time I've mitred the purfling on an instrument. Wish me luck!
You saw how I fitted it on to the instrument body earlier in this thread.
Rout to just less than the depth of the binding channel.
Purpleheart and Maple for the graft.
Offer into the housing.
Shorten to just over length leaving enough to make the Maple mitres.
In the absence of a heavy weight, I use lots of glass reinforced tape the press the caul down onto the graft.
This will be the first time I've mitred the purfling on an instrument. Wish me luck!
meccarroll
Nordic Pine
- Joined
- May 12, 2016
- Messages
- 815
- Reaction score
- 180
Good Luck, this is such a good thread I just wish I had took a look sooner because I have a lot to catch up on but it will be enjoyable.
Malc2098
Sequoia
Well, these old eyes could do with 100k service.
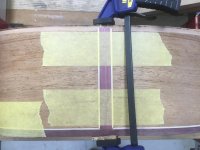
Dry fitted they look OK-ish, but they never glue the same as a dry fit, I find. Some of that dark line on the mitre is pencil, but not entirely.
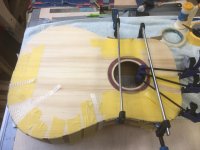
Quite a bit of persuasion needed to keep the binding in the channel. Purpleheart is quite stiff.
Dry fitted they look OK-ish, but they never glue the same as a dry fit, I find. Some of that dark line on the mitre is pencil, but not entirely.
Quite a bit of persuasion needed to keep the binding in the channel. Purpleheart is quite stiff.
AJB Temple
Sequoia
- Joined
- Apr 15, 2019
- Messages
- 7,725
- Reaction score
- 1,205
Looking great. Fiddly and painstaking work but your care is paying dividends.
Malc2098
Sequoia
That's the soundboard bound and purfled (if there is such a verb).
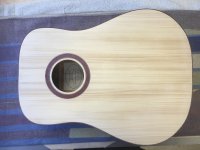
And the first pair of mitres haven't turned out too bad.
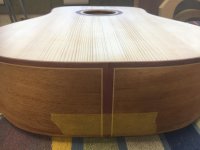
I've already started marking and cutting the binding/purflings for the back, but this is more complicated. So I've left it for tomorrow.
And the first pair of mitres haven't turned out too bad.
I've already started marking and cutting the binding/purflings for the back, but this is more complicated. So I've left it for tomorrow.

Malc2098":1mgpg6eh said:And the first pair of mitres haven't turned out too bad.
Way to modest Malc.
Malc2098
Sequoia
Andyp":3s7blvky said:Malc2098":3s7blvky said:And the first pair of mitres haven't turned out too bad.
Way to modest Malc.
Thanks, Andy. The camera mask many flaws.
Malc2098
Sequoia
Well, it hasn't been easy going. At one point, I had to heat the pallette knife and get the hot air gun out to unglue one whole section. Then I also used the bending iron to pre-bend a 1.5 x 1.5 Maple blank because the first one broke in situ 2/3rds of the way round while gluing. I did a pretty good job of disguising the join.
I got there in the end, but close up, there's definite flaws that can't be covered up. But all in all, as this is my first attempt at doing this style with two difficult woods, it's come out OK. I doub't though that I could sell it.
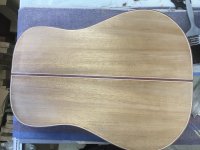
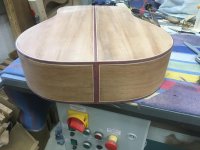
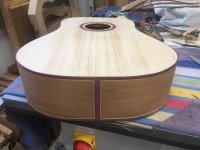
I'm sort of pleased with the end graft joins, but there's other mess ups on the way round.
I got there in the end, but close up, there's definite flaws that can't be covered up. But all in all, as this is my first attempt at doing this style with two difficult woods, it's come out OK. I doub't though that I could sell it.
I'm sort of pleased with the end graft joins, but there's other mess ups on the way round.
Malc2098
Sequoia
I was just beginning to get the hang of this heat bending lark….
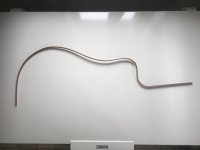
…when the heat found a couple of flaws in the wood!
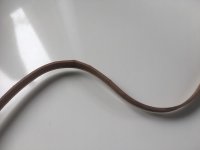
Pound to a pinch of ……… the three spares will have flaws in the same place.
Nil illegitimo carborundum.
…when the heat found a couple of flaws in the wood!
Pound to a pinch of ……… the three spares will have flaws in the same place.
Nil illegitimo carborundum.