

Dr.Al
Old Oak
The 10 mm chisel was quite bent: rather than just having been raised up at the tip, there was a clear bow to the shape with both the tip and the back of the flat area leaning away from the centre.
I'm not brave enough to try to bend a chisel back into shape, so I went with the only sensible option I could think of, grind the middle on the side of the CBN wheel:
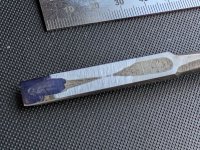
It then went onto the 240 grit waterstone until the grind marks reached the tip. This, unsurprisingly, completely removed the dip (ura?) in the middle of the back of the chisel:
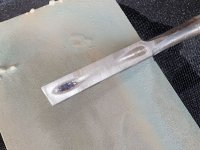
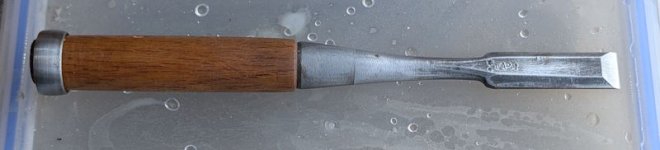
After moving to the 800 and then 8000 grit waterstones, it looked like this:
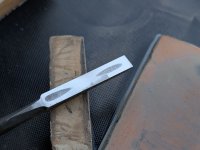
There are still some coarse grinding marks on the side in the middle: I think I must have slightly tilted the chisel as I offered it up to the side of the grind stone. I don't think those marks will have any effect on function so I'm not going to worry about them.
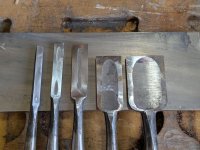
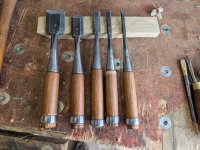
The smallest (6 mm) chisel was also a bit misshapen, but it's narrow enough that it was quite easy to just deal with it on the 240 grit waterstone. The dip in the middle was completely gone by the time I reached the tip. With that, they're all polished near the tip and of varying levels of polish further back:
In the meantime, Carolyn had taken the machine-stitched leather tool roll that they came in (which had most of the stitching coming undone) and hand saddle-stitched all the way round to give it a new lease of life (I didn't get any photos from before apart from this one) from my first post:

Next up was the bevels. I started by getting my preferred honing guide out (the Eclipse one), but the fairly short bodies of the wider chisels meant that it couldn't grip them properly. Instead I had to pull out my rarely-used Veritas guide. The 35 mm chisel went in and I set to work on the 240 grit waterstone:

After a while doing that (and several times of stopping to reflatten the stone as it was wearing down so fast), I got fed up and decided to use the grinder instead. However, just like the Eclipse jig, I was struggling to get a good grip on the chisels with the Tormek square-edge jig I usually use on the bench grinder. I went inside and spent 10 minutes in Solidworks on the computer and then set the 3D-printer going for a couple of hours to make a new jig.
While that was printing, I exchanged a few messages with the owner of the chisels. That has changed things rather dramatically, but more on that later.
Once the printer was finished, the chisel got mounted in the jig and things proceeded much quicker from then on:
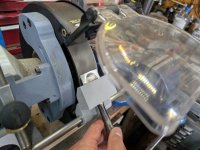
Fresh off the bench grinder (in the background you can see the pot of water that the chisel got dunked in every few seconds):
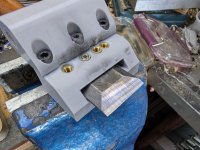
With a rough bevel ground on the end, I went for my usual sharpening approach (except for using the Veritas jig instead of the Eclipse one):
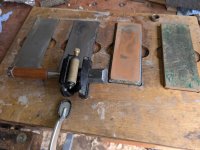
I'd been planning to sharpen these chisels by hand, by resting the rear and tip of the hollow-ground bevel on the stones and then rubbing back and forth on the stones. Given I was sharpening for someone else, I figured that would make it easier for the recipient to maintain the edges. However, as I said earlier, things had just changed a little so I just went with my normal approach.
The sharpened edge (the slight scarring on the face near where it's clamped in the jig is from the grub screw in my 3D-printed jig):

Rinse and repeat:
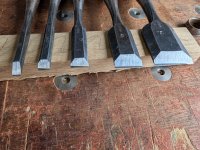
In case anyone cares, the two widest chisels have been ground at 24° and sharpened at 25°, the narrower ones at 29°/30°.
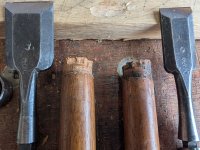
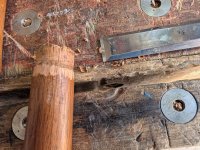
The next job will be to deal with the ferrules (but I'm going to have to read the website that @GaryR shared first). As I mentioned, one had fallen off. The ferrules on the smaller two spin freely and the one on the widest one spins with a bit of resistance. The 24 mm one has a firm ferrule but the wood has chipped slightly:

I mentioned that the situation had changed as a result of some messages exchanged while I was waiting for the jig to print.
I shared an extract from the original request before:
I had (obviously) agreed. After the chisels arrived I asked him to send me his address (I've never met him, just interacted on another forum).
After a while I'd sent another message reminding him he hadn't sent me his address yet and I got this slightly cryptic response:
So I sent him a picture of the flattened backs to show that things were progressing and again asked for his address. The response:
(that's just an extract, but it gives the general idea).
I'm slightly blown away by his generosity (especially given that I've never met him). Apparently I'm now the owner of a set of Japanese chisels
I'm not brave enough to try to bend a chisel back into shape, so I went with the only sensible option I could think of, grind the middle on the side of the CBN wheel:
It then went onto the 240 grit waterstone until the grind marks reached the tip. This, unsurprisingly, completely removed the dip (ura?) in the middle of the back of the chisel:
After moving to the 800 and then 8000 grit waterstones, it looked like this:
There are still some coarse grinding marks on the side in the middle: I think I must have slightly tilted the chisel as I offered it up to the side of the grind stone. I don't think those marks will have any effect on function so I'm not going to worry about them.
The smallest (6 mm) chisel was also a bit misshapen, but it's narrow enough that it was quite easy to just deal with it on the 240 grit waterstone. The dip in the middle was completely gone by the time I reached the tip. With that, they're all polished near the tip and of varying levels of polish further back:
In the meantime, Carolyn had taken the machine-stitched leather tool roll that they came in (which had most of the stitching coming undone) and hand saddle-stitched all the way round to give it a new lease of life (I didn't get any photos from before apart from this one) from my first post:
Next up was the bevels. I started by getting my preferred honing guide out (the Eclipse one), but the fairly short bodies of the wider chisels meant that it couldn't grip them properly. Instead I had to pull out my rarely-used Veritas guide. The 35 mm chisel went in and I set to work on the 240 grit waterstone:
After a while doing that (and several times of stopping to reflatten the stone as it was wearing down so fast), I got fed up and decided to use the grinder instead. However, just like the Eclipse jig, I was struggling to get a good grip on the chisels with the Tormek square-edge jig I usually use on the bench grinder. I went inside and spent 10 minutes in Solidworks on the computer and then set the 3D-printer going for a couple of hours to make a new jig.
While that was printing, I exchanged a few messages with the owner of the chisels. That has changed things rather dramatically, but more on that later.
Once the printer was finished, the chisel got mounted in the jig and things proceeded much quicker from then on:
Fresh off the bench grinder (in the background you can see the pot of water that the chisel got dunked in every few seconds):
With a rough bevel ground on the end, I went for my usual sharpening approach (except for using the Veritas jig instead of the Eclipse one):
I'd been planning to sharpen these chisels by hand, by resting the rear and tip of the hollow-ground bevel on the stones and then rubbing back and forth on the stones. Given I was sharpening for someone else, I figured that would make it easier for the recipient to maintain the edges. However, as I said earlier, things had just changed a little so I just went with my normal approach.
The sharpened edge (the slight scarring on the face near where it's clamped in the jig is from the grub screw in my 3D-printed jig):
Rinse and repeat:
In case anyone cares, the two widest chisels have been ground at 24° and sharpened at 25°, the narrower ones at 29°/30°.
The next job will be to deal with the ferrules (but I'm going to have to read the website that @GaryR shared first). As I mentioned, one had fallen off. The ferrules on the smaller two spin freely and the one on the widest one spins with a bit of resistance. The 24 mm one has a firm ferrule but the wood has chipped slightly:
I mentioned that the situation had changed as a result of some messages exchanged while I was waiting for the jig to print.
I shared an extract from the original request before:
I have a couple of old chisels that desperately need sharpening, I used them in anger almost every day at one time and the got an edge by any means available. Now they need some kindness and careful attention.
Would you be prepared to do this for me? I don't want "free" I am happy to pay for your efforts, I don't expect anything for nothing.
I had (obviously) agreed. After the chisels arrived I asked him to send me his address (I've never met him, just interacted on another forum).
After a while I'd sent another message reminding him he hadn't sent me his address yet and I got this slightly cryptic response:
You let me see a pic of your sharpening then we will discuss addresses.
So I sent him a picture of the flattened backs to show that things were progressing and again asked for his address. The response:
No, you are not getting it. Enjoy the chisels Al, just pleased they are with someone who will appreciate them.
(that's just an extract, but it gives the general idea).
I'm slightly blown away by his generosity (especially given that I've never met him). Apparently I'm now the owner of a set of Japanese chisels
Last edited:


 )
)





 - Rob
- Rob