• Hi all and welcome to TheWoodHaven2 brought into the 21st Century, kicking and screaming! We all have Alasdair to thank for the vast bulk of the heavy lifting to get us here, no more so than me because he's taken away a huge burden of responsibility from my shoulders and brought us to this new shiny home, with all your previous content (hopefully) still intact! Please peruse and feed back. There is still plenty to do, like changing the colour scheme, adding the banner graphic, tweaking the odd setting here and there so I have added a new thread in the 'Technical Issues, Bugs and Feature Requests' forum for you to add any issues you find, any missing settings or just anything you'd like to see added/removed from the feature set that Xenforo offers. We will get to everything over the coming weeks so please be patient, but add anything at all to the thread I mention above and we promise to get to them over the next few days/weeks/months. In the meantime, please enjoy!

Mike's ext'n & renovation (solar panels)

One out of clamps, and one into clamps:

DsIIlge.png

x2KrvC0.png

It's hard to see precisely what is going on with the second one, but it is a cupboard with a drawer over, albeit the cupboard door will look like drawer fronts.
 
Very impressive Mike.

Dr.Al":3043bz3g said:
Mike G":3043bz3g said:
That's a good idea, Andy. The only downside I can see to that is that I am going constantly from marking to sawing to shooting, so the glove would be going on and off all the time.

Get yourself some of these. I wear them when it's cold in the workshop and they're so comfortable (and breathable enough that my hands don't get sweaty) that I forget I'm wearing them after not very long.

I am not sure Mike would ever consider spending that much on some gloves unless they were wicketkeeping ones :D
 
BucksDad":1f53i3x9 said:
Very impressive Mike.

Dr.Al":1f53i3x9 said:
Mike G":1f53i3x9 said:
That's a good idea, Andy. The only downside I can see to that is that I am going constantly from marking to sawing to shooting, so the glove would be going on and off all the time.

Get yourself some of these. I wear them when it's cold in the workshop and they're so comfortable (and breathable enough that my hands don't get sweaty) that I forget I'm wearing them after not very long.

I am not sure Mike would ever consider spending that much on some gloves unless they were wicketkeeping ones :D

To be fair, that price (£24) was for the pack of 6 pairs, so they're only £4 a pair (if ordering 6 pairs). I'm sure you can buy them in smaller packs for less money elsewhere - that was just what came up in a google search for the brand / model.
 
Right, where were we? It seems that I had just glued up the frames of the smaller units. Let's carry on from there.....

I brought the frames in so that I could mark up the side panels against the wonky wall and floor:

Xm2fOmg.png

Cutting them out didn't warrant a photo, but using a hole-cutter does, I think. Firstly, I sharpened it, because it was burning in the wood. Then, after drilling a pilot hole and cutting in from both sides in the normal way, I had an almighty fight trying to get the waste out of the cutter. That led me to try this:

GpwxsRC.png

...and it worked a charm. The bits dropped out of the cutter without me trying. These holes are ventilation holes in the side of the computer cupboard:


9r9PEen.png

Cohf6Bv.png

There'll be a socket near my knees:

hJEPv0n.png

TQbQrwm.png

I brought the boxes back in again, and spent ages squaring things up and levelling. This was all happening in the odd hour or two in the evening during the week:

lm95Din.png

I also finished carving roses:

lrlm8fp.png

.......and did some more reeding:

hxGty4n.png

I glued a piece onto two of them, the purpose of which you'll see in a minute:

Q17CdUl.png

The weekend. I can now put some hours in. Whilst the carcases were in and everything squared up, I made a pattern for the desk-top:


vsqtrxA.png

annqgEU.png

LGUpG7l.png

I used this to mark up the top and then cut it out:

IeJerIO.png

It fits, but it's a pain getting in and out of position:

oT5S9qN.png

I took the desk top and the smaller pedestals back to the workshop. First job was to glue the corner pieces on (here's why I glued some pieces on to a couple of them), and the other facing piece:


txclIWV.png

MCYxs0N.png

sDpX4ko.png

At this point (Saturday lunchtime), my wife went out for the afternoon, which was a perfect opportunity to turn the power off and do some work on the electrics (and phone). Here's the sockets etc when I started:

LmlHYJy.png

And this is what it was like 5 hours later:

AMQVzoK.png

I have since plastered the holes in the wall where the back boxes were removed (using 2 year-old plaster, slowed down by mixing with some cement). I've left some cables slack and un-clipped because until everything is in from the workshop I can't be certain of where they will need to run.

Sunday saw a welcome return to woodwork. I started with the skirting around the pedestals:

Lots of sawing and planing (shooting):

J0slMQv.png

Just a comment on sawing. I know a lot of people cut mitres on chop saws, but I do it by hand, with a cheap tenon saw I bought from the local hardware shop in Leicester in the late 70s. It really isn't hard to be very accurate with a tenon saw:

KfEM43F.png

Coping. I'm going to do a little tutorial, which you might want to skip over if you know how to do it.

I have two places where I can't mitre skirting to skirting, but have to cope one to the other. This is at the junction between the big carcase and the small carcase each side, because it is impossible to know precisely where they will sit in relation to each other until they are fixed to the wall. I start coping by cutting a mitre:

v3RFMPL.png

The line where the mitre meets the face is the line you need to cut out. Grasping this principle is the key to coping. Have a think about it if you haven't come across this concept before. Then it is just a case of cutting and filing:

LkwGzZH.png

The cut in the photo above is more interesting than you might think. You will get no chance to clean it up, or tweak it, so you have to get it right off the saw. As with the entire coped joint, everything is undercut (backwards):

MLQu43J.png

The coping saw removes the curved stuff at the top, and then you just clean up carefully with a file, and a chisel:


X4oO83R.png

JWLwXAN.png

x1GaNSv.png

I glued the skirting in place, and then set to work on the moulding under the desktop. Firstly, I had to prepare the underside of the top, which is complicated by the edge trim being wider than the veneered MDF. I glued and pinned some bits in place to bring everything level with the bottom edge of the trim:

cg0yS1r.png

I was assured the other day on here that parcel tape has zero thickness. :lol: :lol: So, I taped up the places where the quadrant-like moulding will be:

BpDbi0r.png

....and got on with the fitting of it. Here's a dry fit, with the carcase upside down in position on the underside of the desk-top:

yaPe0Cu.png

Then glued and pinned:

ZnfaKW8.png

I then scratched the edge detail into the desktop front edge:

L6VpA5q.png

nP2I4nH.png

This evening I separated everything, and you can see the weirdness this junction between carcase and desk-top causes:

j5pxAUn.png

But I'm happy with the look:

FfDs9ub.png

I slapped on some woodstain, and wiped off the surplus:

RkvKQE7.png

8UfYRAl.png

Tomorrow morning I'll get the first coat of thinned oil-varnish mix on, and this lot can come in by the end of the week.
 
Last time, if you're following along, I had made all the bits for the desk and did a dry fit in the workshop:

FfDs9ub.png

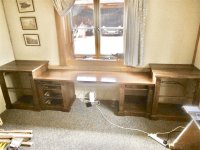
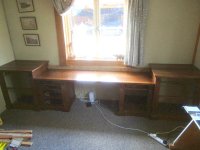
Then, it was a week of staining and finishing. The desk-top got 4 layers of my mix. When I got back from a short trip abroad, I brought everything in and did the final sizing and adjusting. This is a dry fit:

gF8aemG.png

It's always going to be difficult taking decent pictures of this with a south-facing window right in the middle of the shot, so bear with me.

I made this quickly in pine:

wQ95Tmw.png

Then fitted it here:

wO8KxKk.png

Essentially it is the batten supporting the desk top across the knee hole, but with a cable shelf attached. In hindsight, a couple more of the little verticals, a little bit longer (taller), would have been ideal. It took a day and a half to put everything together. There are brackets, battens and little plastic connecting blocks everywhere:

zhECl5i.png

The cable shelf worked pretty well, so I won't trip over cables any longer:

n3TIltt.png

This is how I was working before I built this desk. I just couldn't tolerate it any longer, hence this project when I really have other things needing my attention:

lpdrd2H.png

I don't think I've worked with veneered MDF before. I had expected that it would stay flat (it was well stored), but it didn't. I had to weight it down into place a couple of times:

w4amExg.png

If we look back at my original drawing, you'll see that the computer monitor is raised well above the desk top. It looks as though it is standing on the window ledge, but of course that is too narrow:

AMIEVi1.png

So, the next job is to hold the monitor where it needs to be. The desktop is low (about 640 above floor level), and I like to have the monitor level with my eyes. I picked out a couple of likely scraps of oak, and started work:

FZFVSue.png

jkpuyNl.png

7MKuh2R.png

T7FVz9N.png

A quick check to see that it was going to be about right:

Sb47Fo0.png

You can see it's other major function here:

cJUmf2B.png

......and whilst I was in doing that I made a template from a Special K packet:

pvQrOTS.png

Stopped rebates are a little awkward with hand-tools, and I couldn't be bothered getting the router out, so I just cracked on the old-fashioned way:

9UlU1HY.png

mRwRk3G.png

Through-rebates, though, are easy. Note my work-holding. It really is time for a new bench.

c9MU4fH.png

I want to fit my USB hub into this stand:

OBNL7pU.png

It hasn't exactly helped me by not having a single flat surface or right angle:

v7DNQEb.png

After a bit of thought I worked out that I would have to hide one of the ports, of which there is an excess anyway. I carefully marked out and chopped away the outside face:

Obq2QQR.png

I then had to resort to the router to work from the rear, as the remnant face of wood I was leaving was going to be very thin (3mm or so). I couldn't risk bashing this with a mallet and chisel. Look how much trouble the curved surfaces have caused!:

UCs3rBT.png

With a couple of odd-shaped clamps to hold it in place, the idea seems to have worked:

B3yKoUG.png

cgsjHD5.png

2kWg0w5.png

gHXiljN.png

I did have to take a file to the plastic, though (the white patch just above the end-piece):

qYHQm9E.png

After scratching a bead on the top piece, I glued everything up:

YCsIxYE.png

I don't have a photo, but I de-clamped this morning and the glue-up wasn't perfect. I had to run a saw through a join, and re-glue. I clearly didn't use quite enough cramps.

Back to yesterday. I ran a half-cove cut along the back of a few inches of my little round-over moulding, then cut it into tiny pieces and glued it together:

73t45QQ.png

They look OK this morning. You'll see their purpose in a day or two:

TQqti7S.png

I also scratched a bead on some decorative pieces to cover the corners (I had to do them in halves as I couldn't hold the work any other way):

sgN84Fy.png

A quick bit of cutting, shooting and gluing, then in for breakfast:

YG0lMJM.png
 
Mike, I'm impressed with your work, as ever, but a bit puzzled about how you will be fitting the drawers.

Will you dismantle the drawer boxes and take them back to the workshop?

Will you be going back and forth with drawer parts, fitting each one?

Will you set up shop temporarily, in your office?

Or do you have some cunning plan I've not thought of?
 
Thanks Andy. Yes, I was being a bit lazy. Here's a quick go in Gimp:

IMG_0008A.JPG

I forgot to say:

Number of secret compartments sneaked past the forumites: 1, so far.
 
AndyT":j712fsgu said:
Mike, I'm impressed with your work, as ever, but a bit puzzled about how you will be fitting the drawers.

Will you dismantle the drawer boxes and take them back to the workshop?

Will you be going back and forth with drawer parts, fitting each one?

Will you set up shop temporarily, in your office?

Or do you have some cunning plan I've not thought of?

Yes, that's going to be a pain. Essentially I will take measurements and make up the drawer fronts (plain, without cock beads), bring them all in along with a plane, and tweak their fit. Back out to the workshop to fit the cock beads, make the drawers, blind dovetailed to the fronts. Bring them all in along with a plane, and adjust as necessary. Back out to the workshop to stain and finish.
 
Ah. You have my sympathy.

But thanks for answering your earlier teaser about the number of parts per drawer front!
 
Ok. One for the front. Four bits of cock beading. That leaves 8. What comes in a set of 8 and could be carved as elaborate drawer pulls?

Seven deadly sins on a plinth?

Four Horsemen of the Apocalypse standing on the Four Corners of the World? ;)
 
No carving. And the key to the answer is something far more fundamental.
 
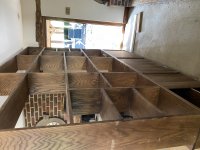
I did a couple of hours in the workshop this evening. Let me refer you back to the drawing. Note the bookshelves above the corner drawer units. Well, everything was sized to suit this bookshelf I made many years ago:

s4juxpr.png

wRBhicm.png

The shelf supports are called banjo shelf supports:

N8IqVG6.png

Luckily, either I couldn't count when I built the shelves, or there was a minimum order, as I've got a ton of them left:

fzd4Lrr.png

Time to get the saw out:

PfsFNkF.png

BB2SViI.png

I had to hunt for it, but finally I had a workshop job for the least used of my power tools:

k5ZPgyk.png

o8Q9aZT.png

As well as shortening a bookcase, I also did possibly the most fiddly glue up I have done in years. I always knew it was going to be awkward. I even tried hot-melt glue, but the glue-lines were so fat I gave up on that and peeled the plastic off. Eventually, I settled for using Araldite, for the first time I can ever remember on wood:

xANJc8r.png

Those are obviously destined for the bottom edge of the monitor stand. They went straight from the workshop into an airing cupboard to make sure they set properly and on time. I hung a note on the handle saying "no entry"! The upper edge under the top was simple stuff, just glued and pinned in the usual way:

tIRtWKY.png

n3NBG9y.png

It needs a clock, doesn't it.........
 
It's this, being dressed up a bit:

gHXiljN.png

Just a stand for my monitor, which hides the cable access to the desktop and includes a USB hub.
 
That stand is cool but should a monitor, or any other electrical equipment, be left in the middle of a south facing window? Or do you have some fancy heat reflecting glass?
 
It's a triple glazed window with two low emissivity coatings. It's an issue I hadn't thought of, but I think it should be OK, particularly as when it is hot the window will be open.
 
All these components for the drawer fronts Mike....

Using up rips and vertically laminating them with maybe a couple of breadboard ends for good measure.
Not forgetting the possibility of two wooden drawer pulls?

Cheers, Andy
 
No, not that Andy. In fact, I can say that I'll be using as few pieces of wood as possible.
 
Get your excuses in early... :lol: I had family here over the weekend, so workshop time was much reduced. Still, with an hour here and there through the week I have made a little progress. Last time, I was just starting to make a new bookcase out of an old one:

BB2SViI.png

The new ones are going to have facing pieces as per the drawer units, with a Tudor rose and some reeding. I brought the shelf in and stood it in place so that I could scribe the facing piece against the wall:

1HSz8Cf.png

Nearly touching at the bottom, but this far out at the top:

lms9Feb.png

pYw3Qlc.png

Having got the piece fitting to the wall, I did the carving, reeding and beading (I had to sharpen my scratch-stocks as they've done a bit of work):

l6p66CP.png

They then got stained, before being glued in place. I also made an arch for the head:

lms9Feb.png

MQ3zvUN.png

I sliced the front edges off all of the bookshelves, and scratched 2 beads:

WcwD0bp.png

Nothing is straight or level, so the skirting around the foot needed to be located in situ, rather than in the workshop. I did all the mitres, then lugged the case in and stood it in place. Note the bits of blue tape:

D1veU3C.png

I had to go and make some more skirting, and cut a new piece (with its mitre), because I made the previous one 5 mm short. The gap to the wall was much larger than I had noted. It will be covered by a cover strip when the bookcase is fitted:

Z5zr1Rm.png

This picture sort-of shows the purpose of the blue tape. I simply ran a knife along the top of the skirting, to mark precisely where they needed to be glued:

2AUmLAn.png

IPLek4v.png

egUFgoR.png

I got some 1:1:1 on everything:

wnicvWl.png

8BDqO5R.png

Interestingly, there didn't seem to be any sign of a finish on the old bookcase. Obviously I had stained them, but either I applied nothing at all, or, more likely, I used wax and it had simply worn off over the 20 or so years. Anyway, they got the oil/ varnish mix, and look a lot better already.

I think I was gluing this thing up last time:

dzEk957.png

cKZxDsk.png

Z189Jpy.png

And I said something along the lines of "it needs a clock".........

8TxKsEV.png

A few carefully aimed blows and a quarter inch chisel....

mpBf4y7.png

Then some chiseling behind:

PvDqSsZ.png

......and a drop of stain.....

lRV8eXa.png

I think that will be a subtle enough clock.
 
I have just removed a solid oak bookcase about 3m by 2m in that colour. It's quite well made with everything fitted with stopped rebates and even solid oak cupboard backs, but the numpty who fitted it thought that screwing 3 60mm screws through the back cupboards directly into a plastered wall with no plugs was sufficient. :shock:

I can barely lift one end, and with books in it is seriously heavy. Luckily it never fell over. It was on a concrete step.

972ffabc2bd8e9329b10fa43473edc6b.jpg


It's going to be painted. Possibly dark green matt.

And when I revamp the room it will magically be rotated to upright. 8-)
 

Attachments

  • IMG_4057 2.JPG
    IMG_4057 2.JPG
    360.4 KB · Views: 3,968
Painted oak! Really? It's pricey stuff these days. Why don't you store it and make something nice out of it, and just put in some softwood shelves if you want them painted.
 
Painted. Yes. If I knock it apart then I have to accept that I lose a lot of thickness with stopped rebates. I could sand it all back to light oak, but I don't know how deep the stain goes and there are dozens of awkward corners. Plus I need it painted and back in place pronto so I can get on with laying the stone. Time is of the essence as well. Also I still have some oak stocks.
 
Really enjoying this thread, but I really hate imgur :(

I don't know whether it's just me, just the woodhaven or more general, but I find I have to save links to the threads and come back to read them later when the images are working.

hate_imgur.jpg
 
Dr.Al":3qbh5i79 said:
Really enjoying this thread, but I really hate imgur :(

I don't know whether it's just me, just the woodhaven or more general, but I find I have to save links to the threads and come back to read them later when the images are working.

The forum software is old and crap but not the cause of this because I don’t see the same behaviour.
 
I've seen missing images like that sometimes. Not often though.
 
I get missing images frequently as well. Usually clears itself after a while. It's like the rotate thing which sometimes works for people and sometimes doesn't. Maybe some software incompatibility, but we also have very difficult internet.
 
The varnish mix is finished and dry, so I brought the case in this morning and fixed it in place:

6IrGRGq.png

It would have been better if I hadn't bashed the bottom corner when I was carrying it in.

The spacing of the shelves hasn't worked out perfectly, so I think I'll close up the gaps between holes for the Banjo fittings on the other side. Also, note that the bottom of this case doesn't have a shelf, to accomodate the rpinter. The other side will be different. I will do the cornice for both at the same time, so that I can match them. The ceiling is nowhere near flat or level.
 
Nice but I still want to see the mysterious drawers!
And the secret compartment for the honey :)
 
Back
Top