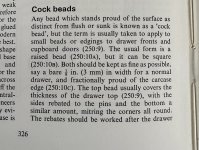
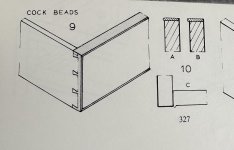
Attention turned to drawers. First, drawers fronts. This was a good opportunity to use up a heap of off-cuts. In the process of cutting bits up for the purpose, I developed a theory about cock beads. I've pulled it out of thin air with no reference to any historic literature or to anybody who knows anything about the subject, so treat it with a pinch of salt. I'll start with that, then bore you to tears with a long-winded drawer post.
Boards over say 7 or 8 inches wide I tend to cut to length with a hand saw on the saw horses, rather than with a tenon saw on bench hooks, which takes twice as long and costs twice as much energy. A panel saw produces a rough under-edge:


You then have the option of planing away enough of the surface to get rid of it (more energy and time), or you rebate the end and stick on a cock bead.
That's it. That's my theory: cock beads are as much about cleaning up a fluffy sawn edge as they are about the aesthetics of the finished piece.
Using up scrap takes a bit of thinking-time and chalk:


Right, having roughed out the fronts, I needed to make a heap of beads. My first instinct these days is to look for a suitable hand-tool, and I found a nice beading plane in amongst some woodies I picked up recently:

With a few minutes of rubbing with a thinned linseed oil it looked a bit better. It took seconds to sharpen and set up:

I cut out heaps of strips and thicknessed them in the PT, before putting one good face and edge on them with a hand plane. I found this set-up worked quite nicely when edge planing strips which were only 7mm thick:

I found chalking the edge helped tell me when I'd got to depth with the beading plane:

......and I soon had a heap of beads:

You'll notice 2 different widths. More on that later.
Then, lots of chopping out dovetails by hand. As is my wont, I marked no angles, and used no guide....because angles aren't important:


The critical, critical step in drawer making ios to make the fronts with their top-bead fit exactly in their allotted place (parcel tape has zero thickness, remember

):

With the desk being in the house, 30 or 40 metres from my workshop, I got my 40 year old Workmate out to do the fine adjustment on site, as it were:

Here are the drawer fronts after the rebate for the cock beads has been cut (on the router table, I'm afraid. I don't have a knicker on a rebate plane that I can trust):

I had a very good reason for cutting the rebates before assembling the drawers, but for the life of me I can't remember it now. It happens more often these days......
Notice that this rebate runs along the long under-edge of the drawer fronts, which may not be entirely orthodox. This gives one the opportunity of making the rebate half a hair taller than it woiuld be to bring everything flush, so that the spacing under the drawers is built in without planing the cock bead.
A typical rear corner joint (ply drawer bottoms, so the backs of the drawers are the same height as the sides.....which of course was to cause additional work later):

I dry fitted all the drawers to make sure the fit was OK, and here is one with the top bead held loosely in place so you can see the general idea of how these beads work:

Continuing on the theme of incredible faffing about, and doing things seemingly out of order, next I rough-cut the stopped mitres on the top bead strips:

They would be pared in situ. I had to do things in this order because the drawer front is stained, and I couldn't risk getting that anywhere near the pine of the drawer sides. This meant the fronts had to be stained before the glue-up. So, all the top strips were glued in place:

When they had all been stained, (and I did the loose beads too at the same time), I glued up the drawers:


Another critical step comes next, which is offering the drawers into place and tweaking the fit. But you've got all the references edges perfectly aligned and everything bob-on square, so there's no adjustment necessary, right?
Applying the beads was easier than planing the beads to the right width (depth, really). Paring the corner of the top bead was the hardest part:

You start with this:

.....and just plane.....offer up.......plane........offer up...... until they fit:
(this is where I'd post the "after" photo if I'd remembered to take it).
Anyway, here are the glued-up beads drying:


Tape and thinned oil/ varnish mix, times 3 coats:

It's a good idea not to leave them out on the patio table drying in the sun when the heavens are about to open. Tipping water out of nearly finished drawers would be so disappointing, wouldn't it.....

Hammering pins in for the drawer stops in a 70mm opening turned into something of a saga, as you might imagine. Leave it to me.......I'll make all the mistakes for you. Anyway, they're in:





That's all the orthodox drawers. The rest have planted-on fronts so should be a bit easier, but they'll have to wait. I've more important things to do.