-
Hi all and welcome to TheWoodHaven2 brought into the 21st Century, kicking and screaming! We all have Alasdair to thank for the vast bulk of the heavy lifting to get us here, no more so than me because he's taken away a huge burden of responsibility from my shoulders and brought us to this new shiny home, with all your previous content (hopefully) still intact! Please peruse and feed back. There is still plenty to do, like changing the colour scheme, adding the banner graphic, tweaking the odd setting here and there so I have added a new thread in the 'Technical Issues, Bugs and Feature Requests' forum for you to add any issues you find, any missing settings or just anything you'd like to see added/removed from the feature set that Xenforo offers. We will get to everything over the coming weeks so please be patient, but add anything at all to the thread I mention above and we promise to get to them over the next few days/weeks/months. In the meantime, please enjoy!
You are using an out of date browser. It may not display this or other websites correctly.
You should upgrade or use an alternative browser.
You should upgrade or use an alternative browser.
Now for the Chairs
- Thread starter PAC1
- Start date


Andy, that was this morning's work. Back in the office now.
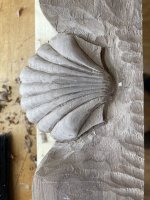
It actually feels like I am making progress. The carving will be the most difficult and I can see the backs being complete by the end of June.
The shell took less than an hour to carve and I will get quicker with six. What surprised me was how useful the scroll saw was for cutting accurately the shell shape. I will use the method on the crest rails.
What might slow me down (other than work) is that in order to finish the backs I need to glue it all together and carve it in final position (no room for mistakes). Also it makes it rather awkward to work on as I have to move to suit the cut rather than moving the wood around to suit me.
Mike G
Petrified Pine
......What might slow me down (other than work) is that in order to finish the backs I need to glue it all together and carve it in final position (no room for mistakes). Also it makes it rather awkward to work on as I have to move to suit the cut rather than moving the wood around to suit me.
I'm not sure that anyone who hasn't carved will grasp just how difficult this will be. I'm turning the wood constantly when I carve, and to have to turn a whole chair back is going to be really awkward. You're going to need a lot of space......and the big deal is what your set-up of stops will be, and how this will accommodate alternative positions. It's almost impossible to carve with something clamped down, particularly as it's curved (ie not flat) so I can't even begin to think how I would tackle this issue.
Last edited:
Blackswanwood
Old Oak
I agree. One way that I have seen curved items carved is to use a hessian/cloth sack filled with sand between the item and bench top and then secure with clamps.I'm not sure that anyone who hasn't carve will grasp just how difficult this will be. I'm turning the wood constantly when I carve, and to have to turn a whole chair back is going to be really awkward. You're going to need a lot of space......and the big deal is what your set-up of stops will be, and how this will accommodate alternative positions. It's almost impossible to carve with something clamped down, particularly as it's curved (ie not flat) so I can't even begin to think how I would tackle this issue.
That reminds me that I've seen a few setups where the work was held down by a leather strap, with the other end pressed down by the worker's foot. It holds the work firmly but releases instantly, so you never need to continue without shifting it into the best alignment.
Maybe some variant of that technique would be worthwhile here?
Maybe some variant of that technique would be worthwhile here?
I never understood why the worker did not end up with cramp. I have seen it done on wonderfully shaped pieces. But probably not part of the current plan.That reminds me that I've seen a few setups where the work was held down by a leather strap, with the other end pressed down by the worker's foot. It holds the work firmly but releases instantly, so you never need to continue without shifting it into the best alignment.
Maybe some variant of that technique would be worthwhile here?
It would need to be kiln dried sand in a plastic bag then wrapped in blankets.I agree. One way that I have seen curved items carved is to use a hessian/cloth sack filled with sand between the item and bench top and then secure with clamps.
I have a plan. Whether it works, I will find out soon. The current plan is a frame from 4x2 shaped to suit the curves and strategically placed one handed clamps. I can do some photos tomorrow.I'm not sure that anyone who hasn't carved will grasp just how difficult this will be. I'm turning the wood constantly when I carve, and to have to turn a whole chair back is going to be really awkward. You're going to need a lot of space......and the big deal is what your set-up of stops will be, and how this will accommodate alternative positions. It's almost impossible to carve with something clamped down, particularly as it's curved (ie not flat) so I can't even begin to think how I would tackle this issue.
I also think I will need to brace the crest rail but that really will get annoying.


Soooo. I am making them again. That will not take that long as until Thursday they were square. The mortises are simple and they should then fit on the tenons as the joint is based on being in the same plane. I am also going to make them taller because I think the proportions are a bit thin and it will give me more room for the carved shell. I should be back in the same place as this morning by tomorrow only bigger and thicker.
I did but not 100% so I just roughed out the shape from the side. I kept looking at my drawing and thinking that there was something not quite right but had not identified the problem. I also think looking at the (now) old crest rails that I had set the leg mortise to far back by 2-3mm and that has added to the position of the leg and pushed the crest rail forwardI can't remember whether or not you made a macquette, Peter. It's a shame to find this out now....
I am happier I identified it this morning as I was about to start carving.
The time I have lost is probably only a day. I had spare wood so it is no additional cost.
I re-cut the curves before finishing so almost back to where I was.
Having done so, without doubt one of the issues was that the crest rails/leg mortise was too far back. Probably by 3mm and I should have looked more carefully at the consequence of extending the curve of the leg onto the crest rail at the ends.
A wasted day but I could not have accepted the crest rail as they were.


It is and they are a pleasure to use on this sort of work. Also you do not get bits breaking off like you do when carving.This is surely the sort of work they were made for.
Apologies if you have already told us this, but now that you've got one back carved, which can serve as a pattern, how will you approach the other five?
I can see that you could just carve each one, completing all the work on one before starting on the next.
Or you could have some or all of them lined up, and make the first cut on each one, then all the second cuts, then the thirds, etc. This might be less fun, but I wonder if it would achieve more consistency?


Looks great.
I’m in awe of anyone who takes on such repetitive work, my own skills and patience have their limitations.
I’m in awe of anyone who takes on such repetitive work, my own skills and patience have their limitations.
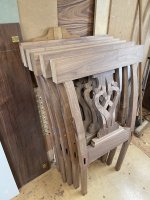
Progress has been slow and will remain slow for a while (the day job is demanding my attention). However I have been able to carve one crest rail at a time over the last week or so. It is amazing how much concentration is needed to carve. When I return to the chairs I will have a bit of sanding to do and then glue up the backs. That leaves a lot of work still to finish the backs but gluing them up will be a major milestone. Here are all six carved ready for sanding etc:

This thread really does bring home what a lot of work goes into a set of carved chairs. The chaps who made them by the hundred in the 18th century really knew their stuff.
It must be really satisfying for you, being able to do work like this. Will you want to carry on and make more after these are finished?
It must be really satisfying for you, being able to do work like this. Will you want to carry on and make more after these are finished?
I was having the same thought a few days ago. I think in those shops people were assigned tasks and just did that one task over and over.This thread really does bring home what a lot of work goes into a set of carved chairs. The chaps who made them by the hundred in the 18th century really knew their stuff.
It must be really satisfying for you, being able to do work like this. Will you want to carry on and make more after these are finished?
I was also wondering how they managed to get their gouges as sharp as mine without diamond plates or in my case a Tormek and autosol.
I have no plans for any more chairs. Lots of other things to do.
One day I would like to make a Morris chair but that is not carved.
fiveeyes
Sapling
Most impressive

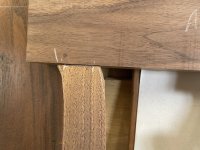
There is a lot I cannot do until it is assembled. Many of the curves are about fairing one to another rather than being a perfect arc so I needed to allow material for fairing.
There is no chance at all of making the crest rail flush to the front of the back leg or splat so again I leave them rough to allow them to flow into each other.
The clamping lugs on the splat are a further complication. I am now wondering why I bothered as the joint was fine without those clamps.
It is the price you pay for curves rather than straight components.
I chose (not sure if I chose wisely) to finish the scrolls on the crest rails last. It would have been possible to progress them more before glue up.
If any of you are interested in the process, here is a video made by true masters making chairs similar to the ones I am making.
There is also a Part II to follow along with the front legs
I have watched both multiple times and still learning from them.
I have watched both multiple times and still learning from them.
Steve Maskery
Old Oak
This is not my style of furniture, not at all. But I am in awe at the quality of your work, Peter, it's just amazing. I have made 3 sets of dining chairs in my time, as well as a few one-offs and I know how challenging and time-consuming they are, but this is on another level. I wouldn't know where to start.
Just fantastic.
S
Just fantastic.
S
Mike G
Petrified Pine
If any of you are interested in the process, here is a video made by true masters......
They're brilliant. When I get tired of people saying how wonderful X, Y, or Z "maker" is on Youtube, I suggest they go and watch a Doucette and Wolfe video before commenting any further.
johnward
Sapling
Your work Peter is absolutely amazing, both skill and patience are off the scale.