• Hi all and welcome to TheWoodHaven2 brought into the 21st Century, kicking and screaming! We all have Alasdair to thank for the vast bulk of the heavy lifting to get us here, no more so than me because he's taken away a huge burden of responsibility from my shoulders and brought us to this new shiny home, with all your previous content (hopefully) still intact! Please peruse and feed back. There is still plenty to do, like changing the colour scheme, adding the banner graphic, tweaking the odd setting here and there so I have added a new thread in the 'Technical Issues, Bugs and Feature Requests' forum for you to add any issues you find, any missing settings or just anything you'd like to see added/removed from the feature set that Xenforo offers. We will get to everything over the coming weeks so please be patient, but add anything at all to the thread I mention above and we promise to get to them over the next few days/weeks/months. In the meantime, please enjoy!

Ornamental lathe restoration

To get a better finish I stuck the bit in the lathe and used scotchbrite

fAbjZQl.png

This was very pitted so used my little surface grinder

zxfgXEi.png

NYSFzzY.png

I finally get to use the little spanners 4mm that have been in the drawer for 15years

ggNbQ80.png

2I896UB.png

0XUd8sw.png

I'm not sure what to do with this, maybe grind then re scribe

saiGvnC.png

I'm going to blacken some bits in oil

UvjFw1z.png
 
I'm not sure when this was made but the level of skill to make a screw 16th inch is mad.

gqIx5xe.png

3zPjAHH.png

To clean up the very pitted section I tilted it in a vice just so I could taper the bottom off on the surface grinder

uXPDjwX.png

I had a bit practice of curling which is a finish done on ornamental lathes, its used in clockmaking I think also. It wasn't very pretty.

eASQaAy.png

Tried it on a bit brass bar which went better

vthJUuI.png

ZmBOZbc.png

It looks better in real life because as you move the part it refracts the light differently, so it sort of sparkles

kDVD1cQ.png

LU9PP9i.png

NWR4ImW.png

QNLFLwW.png

z6EZ5Oc.png

mU7cKl5.png

Next bits out of the box

B7OSKFy.png

lLrRMuH.png

YFeNyzs.png
 
There's a lot more to this restoration lark than some YT videos suggest - thanks for letting us share your rebuilding instruction book.

And I hope that grub screw is in a really safe place!
 
After surface grinding all the bits which took about 6hrs, I seriously thought about how nice a hydraulic grinder would be instead of turning a wheel backwards and forwards with one hand while moving another wheel with the other hundreds of times.
I cleaned up the ends on my lovely little lorch lathe, built the year I was born 73.

8MXsjQC.png

H3gUMXI.png

HOSzQru.png

sVgO8WL.png

P9VoiCV.png

pu7tjX3.png

Getting there slowly

jMjiiZP.png

The ornamental turning shed is taking shape. With lots a junk I.ve accumulated that isnt aloud on display in the house, some of it was my father inlaws who was a prolific collector of bits and bobs

nrQWBdK.png
 
Before the summer has gone I thought I'd get the bed and legs painted. The bed has a moulding affect in the casting that I wanted to define a bit better. Purchased a selection of cheap end mills, suspecting I will snap a few.

DltDSs8.png

I had one half decent cutter which I crashed within about 10min of use, I need arrows on the handwheels.

QtttAcs.png

It wasnt too bad once you got passed the crusty shell of the casting. And the poor little tom senior did a sterling job

22ClPNM.png

I did learn a valuable lesson, dont use compressed air to clear the cut, especially when you dont have covers on your ways, instead use the old dyson.

wLyabpN.png

I'm in two minds whether I should get the bed ground

BBZOXRD.png
 
They do look worn!
I'm new to the world of ornamental lathes so not sure what affect a worn bed could have, if it were purely a wood lathe it wouldnt bother me much.

Not being a metal man it’s all a mystery, but fascinating, I’m in awe of how much time and energy you must be putting in to make each little bit look like new again.
I think I spent about 7hrs on this bit over a week. I find it quite relaxing.
 
Wallace, what do you use on all the nice brass bits to keep the shiny look?
In the past I would just polish and allow to age/patina. But with this I'd like to try and maintain the shine, like they would 100 years ago. Back then they used shellac which lasts really well. There is a product called Nikolas laquer which is used by clock guys for the faces. You can even get gold tinted version which looks really good. Alas I've searched every where over here for it but it is unobtainium, probably because it cant be shipped across the pond easily. I did try a car clear lacquer but after discussing it with people who know more than me I should of hit it with a heat gun straight after spraying, this stops any air bubbles being trapped.
I did find another gold tint lacquer which was pricey at £30 for a normal sized spray can, I've yet to try it. Maybe you could try the Nikolas stuff, should be easy to get hold of.

Whilst I decide and look around for surface grinding places I started stripping the legs. I was always a bit dubious as to whether I was doing the right thing by stripping paint off. The paint looked really old and was even crackled. After stripping the legs it was obvious this was not an original paint from 100years ago. It had grey primer underneath.

IV4izAl.png

Unfortunately it has lost the bottom of its legs, maybe a lady or a dwarf used it.

XVNlnPs.png

I've had this spanner for donkeys years and never come across a 50mm nut, hoarding crap does come in handy

VsIH4lR.png

I cant decide what colour to do stuff so whilst I think I've grabbed another lump to start cleaning.


U1J6y5A.png

0bxtqGN.png

aGpkzNe.png

A little bit of brass sheet to take up some ware.

rsKoCLi.png

A3aODNt.png

Quite an impressive casting considering its age

2oxh3Zn.png

My go to filler is this stuff, its harder to sand but you dont get pin holes and have to do multiple coats

3HJfwS9.png

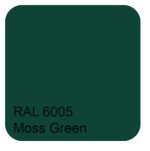
With regard to colour I'm not sure if to go down the usual black route for this type of machine like a holtzapffel or pimp it up abit, Nothing wacky, but a burgundy or dark green with a bit line work similar to the old portable steam engines. I've seen an old Maudsley lathe which the science museum has in its collection which is a duck egg type colour and looks quite nice.
 
I have been pondering about color and these float my boat. The green might look a bit christmassy with all of the brass. I had an MGB that color when I was a kid

Screenshot 2025-07-30 172639.jpg

Screenshot 2025-07-30 172950.jpg

Screenshot 2025-07-30 173222.jpg
 
I like the blue, but the burgundy would look very classy and old school.
 
As far as I know, they were originally just black. I can't find my own photos of it, but this link is for an example near us in Bristol. It's in the same house where it's always been, Tyntesfield, and I don't think it's been repainted.

https://www.bristolmodelengineers.co.uk/2017/antony-gibbs-holtzapffel-lathe/

But if you don't want black, I'd vote for burgundy as the darkest colour. But I'm sure it will look splendid whichever colour you choose.

 
A bit finished, I dont even know where this bit goes.

80mqcoT.png

9GzgtHQ.png

Another bit from the box

DgPbEkk.png

Stripped cleaned and blued nuts

egBAjQF.png

A bit fettling action,

2Eznnmp.png

More unknown bits, this bit is brass and has been nickel plated

RVocz7H.png

Thats one way to make a gear

gMl8Hjf.png
 
What are you going to do with the worn teeth?
 
What are you going to do with the worn teeth?
Probably suck it and see and cross that bridge when I get there. It looks like its meant to move a carriage/cross slide but I've never seen it together so cant be sure.
 
This is a facinating thread, great to watch this old machine being brought back to life. Not being an expert on these things could you let us know what the original purpose for such a well crafted piece of machinery was?
 
This is a facinating thread, great to watch this old machine being brought back to life. Not being an expert on these things could you let us know what the original purpose for such a well crafted piece of machinery was?


This is work done by plumiere in america. Ornamental turning was a big pastime for gentry in the victorian era. Some of the stuff they did in ivory just boggles the mind. I suppose it is like a spirograph on steroids.
Screenshot 2025-08-06 123603.jpg
 
I suppose this is an early adjustable chuck

9LOzua7.png

p7rf09W.png

3FkTiLU.png

I used a spray filler, which is literally car bodge you can spray. Followed by a mist of black

6oNDdNl.png

26Oc2Zn.png

Started stripping the carriage whilst waiting for the filler to set

zTESxPO.png

This screw moves the top slide via a ratchet lever,

7mOTagh.png
 
I suppose this is an early adjustable chuck
It's a "cat's paw". Yes, it's a chuck, but I think the nickname came from either the appearance, or, the frequency with which it could remove flesh from the unwary. I've only ever seen diagrams (presented as curiosiities); never seen one in captivity. I reckon that reflects the antiquity of your lathe Mark, peeps soon moved on to what is now "conventional" three- and four- jawed chucks.
S.
 
It's a "cat's paw". Yes, it's a chuck, but I think the nickname came from either the appearance, or, the frequency with which it could remove flesh from the unwary. I've only ever seen diagrams (presented as curiosiities); never seen one in captivity. I reckon that reflects the antiquity of your lathe Mark, peeps soon moved on to what is now "conventional" three- and four- jawed chucks.
S.
Thanks Sam, there are a few of varying sizes. Some being made from brass. They have seen a fair bit of action judging by the rounded ends and swarf inside. I get the impression this lathe has been very well used.
 
First bit of final spraying done, I was a bit dissapointed by the finish. Considering the amount of prep and then it started raining so I had to spray inside the shed.

Qf6UXJ1.png

6mrtvd9.png

Not very 19thC, I think I will make something more appropriate

UHZhFeE.png
 
I changed the type of paint I use on this, I have always used quick dry machinery enamel from my local motor factors. It uses synthetic thinners and is dry the day after and can be handled. For this I used a tekaloid coach enamel which is thinned with white spirit and is more durable I think but takes alot longer to dry properly. The weather has started to turn around here so I gave the bits a bit brooding lamp action. I use this during the winter for my hands.

zl6adF7.png

The carriage cleaned up nicely

qC6Puux.png

LwCHydg.png

yBabLfj.png

A couple more bits from the box, not sure what the round thing is for. A steady maybe?

Kytlo4e.png

61owbC5.png
 
not sure what the round thing is for. A steady maybe?
Have a look in Holtzapffel Vol 4, Hand or Simple Turning. Here's an answer I sent to Andy @toolsntat who has at least one of those things:

Holtzapffel shows something similar in Fig 22, p 22, which is copied from Bergeron's earlier work. There's more about it on pp 128-30, figs 128-30, which are "boring collars". The disc is supported vertically, pivoting on its central hole. Whichever big hole is at the top will line up with the axis of the headstock and tailstock. Normally, if used for boring, the work would be something suc
h as a tool handle, rotating in the hole in the disc, with a boring bit being inserted through the big hole.

That carriage is looking marvellous!
 
Last edited:
I think I would have been rather proud of that paint finish! Amazing work as ever on display here.
 
Back
Top