• Hi all and welcome to TheWoodHaven2 brought into the 21st Century, kicking and screaming! We all have Alasdair to thank for the vast bulk of the heavy lifting to get us here, no more so than me because he's taken away a huge burden of responsibility from my shoulders and brought us to this new shiny home, with all your previous content (hopefully) still intact! Please peruse and feed back. There is still plenty to do, like changing the colour scheme, adding the banner graphic, tweaking the odd setting here and there so I have added a new thread in the 'Technical Issues, Bugs and Feature Requests' forum for you to add any issues you find, any missing settings or just anything you'd like to see added/removed from the feature set that Xenforo offers. We will get to everything over the coming weeks so please be patient, but add anything at all to the thread I mention above and we promise to get to them over the next few days/weeks/months. In the meantime, please enjoy!

Post a photo of the last thing you made...

Craig Salisbury":3tnfr7p2 said:
I do have a question though, whats the best way to secure the lining? double-sided tape or glue? they fit pretty tight but one side bends out a tad in the middle

I always use a smidge of ds tape with a bit of green baize for the lining wrapped around some cardboard from a cereal box - Rob
 
Woodbloke":2lrapdex said:
Craig Salisbury":2lrapdex said:
I do have a question though, whats the best way to secure the lining? double-sided tape or glue? they fit pretty tight but one side bends out a tad in the middle

I always use a smidge of ds tape with a bit of green baize for the lining wrapped around some cardboard from a cereal box - Rob

Yebbut Craig is talking about a wooden lining 4 mm thick one piece of which has a bow.

Bob
 
Phil":121ch9pw said:
Nice! 8-)

Malc, finish?

How did you cut it?


Thanks, Phil.

CNC Router. No finish. Thought about it. The wood speaks for itself, the photo doesn't do it justice, but also there's so much end grain showing around the profile, it would absorb more finish than the faces.
 
9fingers":lkxje6fs said:
Yebbut Craig is talking about a wooden lining 4 mm thick one piece of which has a bow.

Bob
Easy peasy then Bob; scribe and mitre the corners until it just slides in - Rob
 
Woodbloke":1rybf6eh said:
9fingers":1rybf6eh said:
Yebbut Craig is talking about a wooden lining 4 mm thick one piece of which has a bow.

Bob
Easy peasy then Bob; scribe and mitre the corners until it just slides in - Rob

Maybe you are missing the point today mate? :lol:
I think Craig has done all that but still has a bow to fix betwixt box and lining. Mitres wont fix that.
Bob
 
9fingers":1gvrf0dw said:
Woodbloke":1gvrf0dw said:
9fingers":1gvrf0dw said:
Yebbut Craig is talking about a wooden lining 4 mm thick one piece of which has a bow.

Bob
Easy peasy then Bob; scribe and mitre the corners until it just slides in - Rob

Maybe you are missing the point today mate? :lol:
I think Craig has done all that but still has a bow to fix betwixt box and lining. Mitres wont fix that.
Bob
Junk the bit with the bow then and find a new unbendy bit. Box linings have to be true and level or you're on a hiding to nothing (been there, got most of the T shirts :lol: ) Rob
 
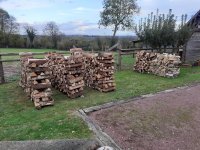
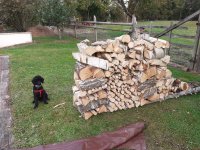
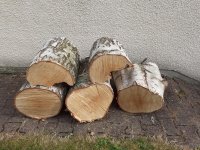
A wood pile, silver birch.
Everything less 8” diam sawn by hand. All split by hand with maul and splitting wedge. The large rounds will have to dry a bit more before I split them as the wood is so wet at the moment the wedge just gets stuck as if in a sponge.

20231011_143626.jpeg

20231011_143420.jpeg
 
Andyp":gidv8tgv said:
A wood pile, silver birch.
Everything less 8” diam sawn by hand. All split by hand with maul and splitting wedge. The large rounds will have to dry a bit more before I split them as the wood is so wet at the moment the wedge just gets stuck as if in a sponge.

View attachment 1
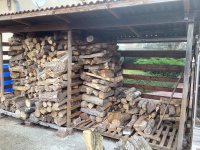

Satisfying haul, Andy. I kniw what you mean about those wedges. I ended up having three stuck in the same block of wood. Left them there for three years until finally the wood split enough to get them out. :lol:
 
A lot of hard work Andy but satisfying and that should keep you going for a couple of months.
Now if you just happened to have a couple of close- ish trees you could do what I’ve seen done in France a lot, which is to pile all the logs between them, but I’ve never known why they cut them about 3ft long.
 
Thanks Ian,
All mine are cut to 50cm. I’ve another 8 steres (approx 8 cubic meters) due for delivery soon.
If I were to burn only that birch on cold cloudy days I think it would last at most a week.
That birch burns very quickly when dry and only really suitable IMHO for getting the fire going. Oak and beech will be the bulk of the delivered stuff which will burn all night if I regulate the fire well enough.

BTW 17°c here this morning. Middle of October and not had to light the fire is a real bonus especially as my stock of ready to burn seasoned wood will not see us through a typical winter.
 
So much depends on the weather Ian. With a south facing house we gain a lot of heat from the sun in the main living and bedrooms.
Even at -6°c if the sun is out and the stove is lit the living room will easily reach 30°c with the windows open.
A large wood burner in the main living room heats the living room and downstairs bedroom directly and the upstairs bathroom and two main bedrooms and in time most of the concrete upper floor.

We do have electric radiators everywhere but only use them to take the chill off the kitchen in the morning and a couple of the bedrooms if required.

This holds about 12m3 and in a cold sunless winter we will burn the lot. I also have about 3 or 4 days worth in the garage. Due to an administrative error that is all we have for the whole of this winter.
IMG_2802.jpeg

Perhaps a week for that new pile of siliver birch is an exaggeration but if I were to light up at 8am and keep the stove alight till 10pm it will disappear more than twice as fast as oak logs would.
 
I've been making piles.
I find stacking wood quite satisfying and of course the smell of fresh cut oak, beech, cheery, chestnut, birch etc quite pleasing too.
8 steres there.
20231106_163648_resized.jpeg

If it wasn't for the 7 steps I had to carry them up I would not feel quite as cream crackered as I do now.
I’ve learnt a lot, by experience, over the 15 years I have been doing this annually. One useful tip I will pass on in case anyone is foolish enough to do this is not stack the row only from one side. It done this way it will invariably develop a lean to one side as it gets higher.
 
Andyp":3frko8de said:
I've been making piles.
I find stacking wood quite satisfying and of course the smell of fresh cut oak, beech, cheery, chestnut, birch etc quite pleasing too.
8 steres there.


If it wasn't for the 7 steps I had to carry them up I would not feel quite as cream crackered as I do now.
I’ve learnt a lot, by experience, over the 15 years I have been doing this annually. One useful tip I will pass on in case anyone is foolish enough to do this is not stack the row only from one side. It done this way it will invariably develop a lean to one side as it gets higher.

Do you cover them, Andy ?
 
Cabinetman":o46bl2y4 said:
Looks to be a lovely bit of Maple, what is the darker wood?

american black walnut, yes it's really nice to work with, got some beautiful offcuts as well from it.
 
RogerS":1k06iaq8 said:
Andyp":1k06iaq8 said:
I've been making piles.
I find stacking wood quite satisfying and of course the smell of fresh cut oak, beech, cheery, chestnut, birch etc quite pleasing too.
8 steres there.


If it wasn't for the 7 steps I had to carry them up I would not feel quite as cream crackered as I do now.
I’ve learnt a lot, by experience, over the 15 years I have been doing this annually. One useful tip I will pass on in case anyone is foolish enough to do this is not stack the row only from one side. It done this way it will invariably develop a lean to one side as it gets higher.

Do you cover them, Andy ?

The one of the right is now covered. The other will stay as is and will be moved into the covered wood shed as space becomes available. I work on theory that drying needs maximum exposure to sun and airflow and I hate the sight and sound of flapping plastic. I have toyed with the idea, but never got around to it, of cutting down some corrugated roofing sheets and tying down to the top of each row. Logs that I have just bought in from the covered store I have just measured at 12% and 15% moisture content.
 
thetyreman":24j7ysjb said:
Cabinetman":24j7ysjb said:
Looks to be a lovely bit of Maple, what is the darker wood?

american black walnut, yes it's really nice to work with, got some beautiful offcuts as well from it.

I always think working Maple is a lot like planing or chiselling Nylon, it’s extremely satisfying.
 
Cabinetman":1czttqnw said:
thetyreman":1czttqnw said:
Cabinetman":1czttqnw said:
Looks to be a lovely bit of Maple, what is the darker wood?

american black walnut, yes it's really nice to work with, got some beautiful offcuts as well from it.

I always think working Maple is a lot like planing or chiselling Nylon, it’s extremely satisfying.

yes it's really nice to work with, most of my woodworking has been with pine, so it's a very nice change, I got the wood laminations for the neck from david dyke so it's absolutely top class quality.
 
Andyp":knbiaqd8 said:
RogerS":knbiaqd8 said:
Andyp":knbiaqd8 said:
I've been making piles.
I find stacking wood quite satisfying and of course the smell of fresh cut oak, beech, cheery, chestnut, birch etc quite pleasing too.
8 steres there.


If it wasn't for the 7 steps I had to carry them up I would not feel quite as cream crackered as I do now.
I’ve learnt a lot, by experience, over the 15 years I have been doing this annually. One useful tip I will pass on in case anyone is foolish enough to do this is not stack the row only from one side. It done this way it will invariably develop a lean to one side as it gets higher.

Do you cover them, Andy ?

The one of the right is now covered. The other will stay as is and will be moved into the covered wood shed as space becomes available. I work on theory that drying needs maximum exposure to sun and airflow and I hate the sight and sound of flapping plastic. I have toyed with the idea, but never got around to it, of cutting down some corrugated roofing sheets and tying down to the top of each row. Logs that I have just bought in from the covered store I have just measured at 12% and 15% moisture content.

Ahh..the luxury of living in a decent climate where it doesn't rain every other Effing day....or more frequently. I've got some logs ..felled two years but as for firewood....hopeless as they've all got moss growing and are sopping wet.

I really can't wait to get out of this 'Cleverley'.
 
RogerS":2saw58jg said:
......Ahh..the luxury of living in a decent climate where it doesn't rain every other Effing day....or more frequently. I've got some logs ..felled two years but as for firewood....hopeless as they've all got moss growing and are sopping wet.....

My neck of the woods gets less rain than Johannesburg or Jerusalem.....500 to 550 mm per year. That brings with it a different set of problems.
 
About 800mm per annum here.
Location of those log piles is relevant to how well they dry out. They run east west so the prevailing winds blows along the exposed log ends. No over hanging tress so when it shines they are in the sun all day.
 
Happened upon this a while back, round log piles.
https://www.norfolklife.co.uk/how-to-bu ... olzhausen/
It is a not an uncommon method but I am surprised at it's effectiveness. the technique requires the logs on the outside to be slightly angled inwards, supposedly to stop the sides bulging out. To me that would just encourage any rainwater that hits those outer logs to run down and collect in the middle where it would be harder to dry out.
 
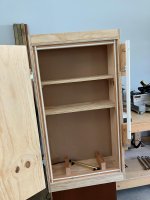
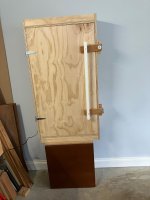
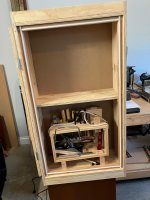
This doesn’t deserve being called a tool cabinet, I might make something better when I have more time, so it’s a tool cupboard, and simply knocked together from ply, with winter coming here and the expectation that tools left out will go rusty, particularly with me not here to rescue them I’ve built this to be fairly airtight with a heater in it. The back is bonded in place with a builders type adhesive.
D strip rubber with a door that half squashes it all the way round, the problem was to latch the door in more than one place to squash the seal. The solution is fairly simple as in the photo, the horizontal parts are eased at the back to pull the door inwards as they move down.
The heater is designed to be used in a gun cabinet, very low wattage, it gets hot but touchable. I have it on a time clock 2 x 2 hours a day.
Ian

8BBBE17C-88B9-40DF-B9B1-C567D489BBB7.jpeg

998B94ED-A7FA-4502-A274-E613C997D243.jpeg

F82D35CE-ADF8-47E2-871C-F3E72214FA49.jpeg
 
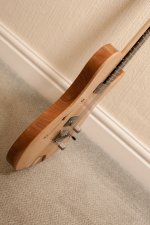
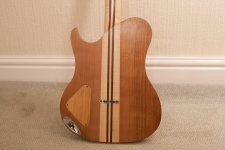
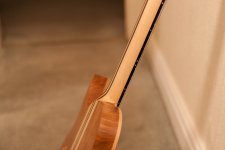
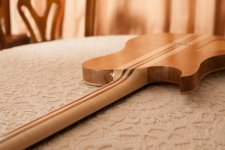
completed my first ever scratch build guitar, a 12 string through neck telecaster thinline style guitar. :D

tyremanguitars_scratch2023_final10photos_completedbuild (1 of 10).jpgtyremanguitars_scratch2023_final10photos_completedbuild (2 of 10).jpgtyremanguitars_scratch2023_final10photos_completedbuild (3 of 10).jpg
tyremanguitars_scratch2023_final10photos_completedbuild (4 of 10).jpg
tyremanguitars_scratch2023_final10photos_completedbuild (5 of 10).jpg
tyremanguitars_scratch2023_final10photos_completedbuild (6 of 10).jpg
tyremanguitars_scratch2023_final10photos_completedbuild (7 of 10).jpg
tyremanguitars_scratch2023_final10photos_completedbuild (8 of 10).jpg
tyremanguitars_scratch2023_final10photos_completedbuild (9 of 10).jpg
tyremanguitars_scratch2023_final10photos_completedbuild (10 of 10).jpg
 
Cabinetman":aly1i23j said:
This doesn’t deserve being called a tool cabinet, I might make something better when I have more time, so it’s a tool cupboard, and simply knocked together from ply, with winter coming here and the expectation that tools left out will go rusty, particularly with me not here to rescue them I’ve built this to be fairly airtight with a heater in it. The back is bonded in place with a builders type adhesive.
D strip rubber with a door that half squashes it all the way round, the problem was to latch the door in more than one place to squash the seal. The solution is fairly simple as in the photo, the horizontal parts are eased at the back to pull the door inwards as they move down.
The heater is designed to be used in a gun cabinet, very low wattage, it gets hot but touchable. I have it on a time clock 2 x 2 hours a day.
Ian


View attachment 1

View attachment 2

Will definitely do the job.
I've been building one as well and gradually filling it.
Like yours, mine is put together from ply. It's already a consistent thickness and nice and flat so why go to the bother of using real wood?
I'm interested in your heater. Could you point me to where I could get one? The main reason for the cabinet is that all my tools have become rusty through lack of use and poor storage so I am trying to sort out the storage before I start on the rust. The space behind the plane till would be an ideal spot for it (I think).
 
You know when you wish you hadn't started something....
I cut out a little person/dog thingy for my granddaughter who lovwes her yellow Labrador, wifey saw it and said "I want one", daughter wants one as well and daughter in law would have to have something so as not to be left out.
Not my designs, I saw some on the internet and they were simple to draw and cut out with the scrollsaw now packed into a cupboard where it belongs not to be used for a while. Figures are beech. dogs and seat mahogany and the yellow dog is pine. around 28mm thick and 150mm high.

Worth a few brownie points though which are always needed.
 

Attachments

  • IMG_1795.JPG
    IMG_1795.JPG
    141.2 KB · Views: 187,050
  • IMG_1796.JPG
    IMG_1796.JPG
    129.5 KB · Views: 187,050
Now, take them to the bandsaw, and slice them in half (in the depth). Sand up the two cut faces, and you've got a few little christmas presents..... :D
 
Back
Top