
-
Hi all and welcome to TheWoodHaven2 brought into the 21st Century, kicking and screaming! We all have Alasdair to thank for the vast bulk of the heavy lifting to get us here, no more so than me because he's taken away a huge burden of responsibility from my shoulders and brought us to this new shiny home, with all your previous content (hopefully) still intact! Please peruse and feed back. There is still plenty to do, like changing the colour scheme, adding the banner graphic, tweaking the odd setting here and there so I have added a new thread in the 'Technical Issues, Bugs and Feature Requests' forum for you to add any issues you find, any missing settings or just anything you'd like to see added/removed from the feature set that Xenforo offers. We will get to everything over the coming weeks so please be patient, but add anything at all to the thread I mention above and we promise to get to them over the next few days/weeks/months. In the meantime, please enjoy!
You are using an out of date browser. It may not display this or other websites correctly.
You should upgrade or use an alternative browser.
You should upgrade or use an alternative browser.
Post a photo of the last thing you made...
- Thread starter TrimTheKing
- Start date

Trevanion
Old Oak
I made a stool, without making a stool this time.





Overall happy with it, there are a few flaws here and there. In particular, the seat has quite a few checks in it that were only visible after dishing, which isn't uncommon with kiln-dried timber.
Overall happy with it, there are a few flaws here and there. In particular, the seat has quite a few checks in it that were only visible after dishing, which isn't uncommon with kiln-dried timber.
Cabinetman
Sequoia
- Joined
- Oct 11, 2020
- Messages
- 5,830
- Reaction score
- 1,470
- Location
- Lincolnshire Wolds + Massachusetts
- Name
- Ian
Nice. Simple lines, which I can imagine needed thinking about to make it look right. Difficult to tell from the photo, is the underside of the seat curved to match the top face?
Ian
Ian


Pete Maddex
Old Oak
Very nice stool.
Pete
Pete
Trevanion
Old Oak
Cabinetman":vkx6lh3o said:Difficult to tell from the photo, is the underside of the seat curved to match the top face?
Yes, the seat is curved on top and bottom, the bottom is easy enough but the top took a bit of effort with a No. 05 plane with a radiused blade, gradually projecting the blade more and more until I got a satisfactory dish.


thetyreman
Nordic Pine
lovely stool, I saw this on instagram and liked it

Nice stool.
I see this as the first stage in making a chair. Did you taper the legs while they were square then planed down to get to the octagonal?
I see this as the first stage in making a chair. Did you taper the legs while they were square then planed down to get to the octagonal?
Trevanion
Old Oak
Andyp":204wzhy2 said:I see this as the first stage in making a chair. Did you taper the legs while they were square then planed down to get to the octagonal?
Essentially yes, cut them roughly to a taper on the bandsaw and plane the rest, using a sash clamp in a bench vice to hold them during planing.


AJB Temple
Sequoia
- Joined
- Apr 15, 2019
- Messages
- 7,848
- Reaction score
- 1,312
Quality Dan.
Trevanion":2hzowbie said:Andyp":2hzowbie said:I see this as the first stage in making a chair. Did you taper the legs while they were square then planed down to get to the octagonal?
Essentially yes, cut them roughly to a taper on the bandsaw and plane the rest, using a sash clamp in a bench vice to hold them during planing.

Thank you. I might just have to give this a go. :eusa-think:
AJB Temple
Sequoia
- Joined
- Apr 15, 2019
- Messages
- 7,848
- Reaction score
- 1,312
I like that stool. Nice wedged dowels too. When I did mine I just curved the top of the seat, not the bottom.
You clearly applied a finish, which was very wise. I delayed as I was waiting until I needed to oil the nine cabinet shelves I finally made yesterday (some have fiddly cut outs so I put it off in usual prevaricator fashion) and now the stool top has gone a bit blue from me sitting on it wearing jeans. I shall have to sand and oxy it. I have a predilection for raw looking wood.
You clearly applied a finish, which was very wise. I delayed as I was waiting until I needed to oil the nine cabinet shelves I finally made yesterday (some have fiddly cut outs so I put it off in usual prevaricator fashion) and now the stool top has gone a bit blue from me sitting on it wearing jeans. I shall have to sand and oxy it. I have a predilection for raw looking wood.
Trevanion
Old Oak
AJB Temple":2n9wx0fg said:I like that stool. Nice wedged dowels too. When I did mine I just curved the top of the seat, not the bottom.
I thought I'd seen the form before! It was obviously seeing your stool a few weeks ago that subconsciously inspired this seat shape. I was tempted to leave the bottom flat, but when the stool was dry assembled it just didn't look quite right, possibly as it's only about 3/8" of a dish.

Doug
Old Oak
Nice steady week this week, sorted out a gate way basically replacing what was already there
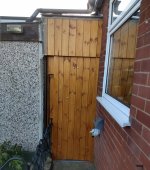
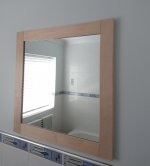
All pine & Sikkens, finally got the last coat of oil on the maple mirror & hung it.
Got a little time at the lathe & turned an Olive Ash bowl.
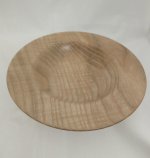
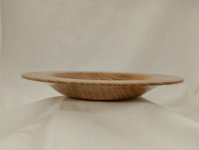
Simply finished with cellulose sanding sealer & microcrystalline wax, some lovely rippling
Also had chance to make new guides for my bandsaw insert, previously they’d been a ptfe type material but I wanted to try Lignum Vitae so I planed up a small piece & cut slots on the pillar drill
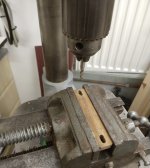
Countersunk for the screws & cut to length
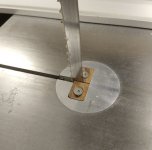
Time will tell how good they are.
Tomorrow I’ve been offered the chance to try my hand at sharpening tct circular saw blades which as I have so many in need of sharpening I jumped at, hopefully save a pretty penny to boot.
All pine & Sikkens, finally got the last coat of oil on the maple mirror & hung it.
Got a little time at the lathe & turned an Olive Ash bowl.
Simply finished with cellulose sanding sealer & microcrystalline wax, some lovely rippling
Also had chance to make new guides for my bandsaw insert, previously they’d been a ptfe type material but I wanted to try Lignum Vitae so I planed up a small piece & cut slots on the pillar drill
Countersunk for the screws & cut to length
Time will tell how good they are.
Tomorrow I’ve been offered the chance to try my hand at sharpening tct circular saw blades which as I have so many in need of sharpening I jumped at, hopefully save a pretty penny to boot.
Cabinetman
Sequoia
- Joined
- Oct 11, 2020
- Messages
- 5,830
- Reaction score
- 1,470
- Location
- Lincolnshire Wolds + Massachusetts
- Name
- Ian
You’ve had a bust week Doug, like the way you’ve done the relieves on the joints on the mirror frame, and saves a ton of work!
Edit busy not bust.
Edit busy not bust.

Lons
Old Oak
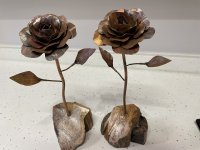
My normal considered response to request to make anything is an instant refusal but sustained, subtle pressure from my daughter and DiL with the odd nudge from my wife has resulted in the usual capitulation and the appearance of another couple of copper roses.
So I give up and I've decided to add soft touch to my middle names. :?
So I give up and I've decided to add soft touch to my middle names. :?
Attachments
Lons
Old Oak
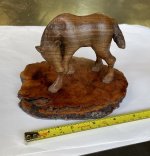
This is to be a gift for my granddaughter. It's been on the go for a long time among many other part finished carvings and my oldest unfinished project a marquetry picture of my two when they were kids, I started that almost exactly 35 years ago, (must finish it  ).
).
I was never particularly happy with this carving and kept nibbling away at it, still not happy but you have to stop somewhere and I know a little, nearly 10 year old will adore it.
The foal is out of walnut and the base is a thin slice of burr elm, it's had a thin coat of acrylic sanding sealer cut back and several coats of microcrystalline wax. The photos make it look glossy but it's a satin finish.
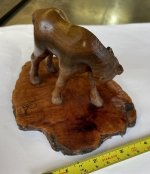
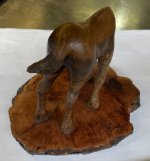
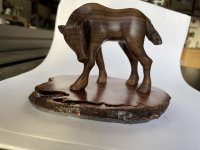
).I was never particularly happy with this carving and kept nibbling away at it, still not happy but you have to stop somewhere and I know a little, nearly 10 year old will adore it.
The foal is out of walnut and the base is a thin slice of burr elm, it's had a thin coat of acrylic sanding sealer cut back and several coats of microcrystalline wax. The photos make it look glossy but it's a satin finish.
We do not see much carving around here Bob, that is excellent.
I’ve edited and turned the last image.
Images on posts look so much nicer if you use the Place in Line button, it removes the awful white border you can see in your copper roses post.
I’ve edited and turned the last image.
Images on posts look so much nicer if you use the Place in Line button, it removes the awful white border you can see in your copper roses post.
Lons
Old Oak
Thanks Andy, I'll try to remember that.
Cabinetman
Sequoia
- Joined
- Oct 11, 2020
- Messages
- 5,830
- Reaction score
- 1,470
- Location
- Lincolnshire Wolds + Massachusetts
- Name
- Ian
You are seriously artistic Lons! Couldn’t do that to save my life.
Lons
Old Oak
Thanks Ian
I read that as autistic and thought cheeky sod, :lol: must get some new reading specs, :eusa-doh:
I read that as autistic and thought cheeky sod, :lol: must get some new reading specs, :eusa-doh:
HOJ
Sapling
Workshop clock:
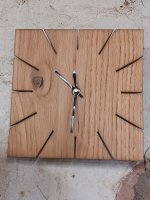
Oh that IS clever.
HOJ
Sapling
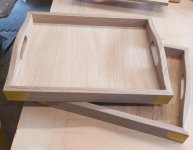
Couple of Oak tea/drinks trays, just need gluing up:
Cabinetman
Sequoia
- Joined
- Oct 11, 2020
- Messages
- 5,830
- Reaction score
- 1,470
- Location
- Lincolnshire Wolds + Massachusetts
- Name
- Ian
Good and useful, nicely made,I could do with one so may steal it! Is the base veneered mdf?
D_W
Seedling
I made a couple of plane irons last evening, but they're not that interesting - they look like....plane irons.
A couple of weeks ago, a guy here in the states (well, I got to it a couple of weeks ago) asked if I could make a chisel like one that was in a FWW article. The article had "bill pavlak's favorite chisel" which is something I've not seen in the wild. it just looked to me like a paring length but much heavier chisel and in a style of something they'd have at williamsburg here (late 18th century).
I expressed my doubts that it would be useful, but I'd make a pair because if I'm going to make something pointless, I want to have one for me to make sure it's actually pointless.
I ended up making four. The first two in a steel called 80crv2 that I think may be what's in a lot of european tools (carving tools, etc). It just wasn't quite hard enough compared to an older good english chisel.

the second pair is W2 steel, which is kind of like 1095, or more plain than something like O1 steel. It has an added trace element to make it better for knives and chisels than 1095 would be (it's a little better than O1).

here's a picture of the W2 pair next to a tyzack bench chisel because it's not immediately obvious how big these chisels are.
there is some precedent for the size, but not quite the weight - I have a 2" wide very shallow sweep incannel gouge that I got from england, of course, and 19th century style. it's the kind of thing that you use to trim stock for fine work later - or put the butt of the handle at your shoulder and lean on it.
the length (about 15") makes it just about right for that.
it makes sense only in the context of working by hand, which illustrates why the cabinetmaker at williamsburg likes having it. I was wrong about it being useless, but right in the sense that if I ever do make chisels for pay later in life, this isn't the kind of thing most people would have a need for.
A couple of weeks ago, a guy here in the states (well, I got to it a couple of weeks ago) asked if I could make a chisel like one that was in a FWW article. The article had "bill pavlak's favorite chisel" which is something I've not seen in the wild. it just looked to me like a paring length but much heavier chisel and in a style of something they'd have at williamsburg here (late 18th century).
I expressed my doubts that it would be useful, but I'd make a pair because if I'm going to make something pointless, I want to have one for me to make sure it's actually pointless.
I ended up making four. The first two in a steel called 80crv2 that I think may be what's in a lot of european tools (carving tools, etc). It just wasn't quite hard enough compared to an older good english chisel.
the second pair is W2 steel, which is kind of like 1095, or more plain than something like O1 steel. It has an added trace element to make it better for knives and chisels than 1095 would be (it's a little better than O1).
here's a picture of the W2 pair next to a tyzack bench chisel because it's not immediately obvious how big these chisels are.
there is some precedent for the size, but not quite the weight - I have a 2" wide very shallow sweep incannel gouge that I got from england, of course, and 19th century style. it's the kind of thing that you use to trim stock for fine work later - or put the butt of the handle at your shoulder and lean on it.
the length (about 15") makes it just about right for that.
it makes sense only in the context of working by hand, which illustrates why the cabinetmaker at williamsburg likes having it. I was wrong about it being useless, but right in the sense that if I ever do make chisels for pay later in life, this isn't the kind of thing most people would have a need for.
Cabinetman
Sequoia
- Joined
- Oct 11, 2020
- Messages
- 5,830
- Reaction score
- 1,470
- Location
- Lincolnshire Wolds + Massachusetts
- Name
- Ian
Crikey, they are big! Would they be for framing? Suspect they may split without ferrules? But you will know a lot better than me David
D_W
Seedling
Cabinetman":1l24lbui said:Crikey, they are big! Would they be for framing? Suspect they may split without ferrules? But you will know a lot better than me David
they won't split soon, but it's possible over time they could be driven to split.
the bolster is large on these, though - I think handles of this type would be DOA in any type of wood that splits easily.
I would guess the intent at the time was that you'd choose a good wood for the handles, and breaking, though infrequent, would be easy to address. You just get a blank, square the end of it, install it on the chisel and then trim it.
I prefer the 19th century style with the bolster, though. If I come up short on a forge weld, or something breaks the weld later, there's a good strong band of brass preventing the handle from creeping very far down the tapered tang.
As for use, I'm guessing this is kind of a refined hatchet for an all hand worker. Like trimming corners off of something that will be round (legs, etc) or whatever else. I've never seen something like it before the FWW article except for gouges - it's impractically wide as a striking chisel, but surprisingly good if stuck in the shoulder and leaned on to trim. I'm curious, but not curious enough to look further - to find out if the williamsburg blacksmith just made it up more or less.
the seaton chest shows pretty large firmers with big bolsters and tangs, but they aren't paring or push length like these. These look like giant sledge hit chisels, but excel instead at paring and being heavier than the typical paring chisel (I like to make those, too) that have some spring.
Your question is an interesting one, though - aside from me having some pucker factor about such a big forge weld of hard tool steel standing on its own, I wonder if discretion in use made these hold up well. Of all of the chisels in the book, some are broken on the bit end, but none on the handle end. What i don't know without actually reading the book
is if any were remade. ----------
In terms of proportion, I just had another look - the seaton book has chisels the width and with a handle and bolster similar to these, but they're around 3" shorter - which would make them awkward to lean on, and not awkward to mallet. I mallet tested these to see if the edges are as good as I'd hoped (the first two not, thus making two more), and they are really awkward to mallet (shoulder strain after not that long).
there are folks much better about the history of the tools than me, though. I just needed some proportions to look at so they wouldn't look like they're made by an amateur.

Weekend_Woodworker
Sapling
- Joined
- Apr 3, 2021
- Messages
- 309
- Reaction score
- 86
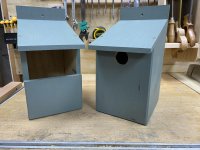
I made a couple of bird boxes for different sorts of birds to nest in. Nothing special about them, but a bit of nice time using the tools.

Woodbloke
Sequoia
Whist MMM's finish is taking it's own sweet time to cure and harden off, I've been busy with another small Krenovish project, which is a bookshelf he made in the early sixties; the original in Pear can be seen here https://www.thekrenovfoundation.org/kre ... wall-shelf
My interpretation in English slash sawn Oak veneers, qs oak ends, with a Paduk drawer front and back panel in the same. Small turned 'capstan' drawer pull in Greengage, courtesy of Bob9, Lacewood drawer bottom. Finished with two coats of Polyvine matt wax acrylic with a healthy slathering of decent wax over the top:
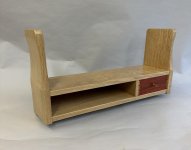
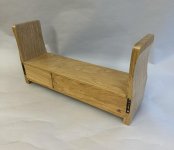
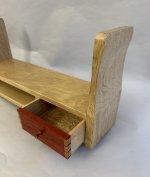
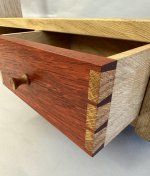
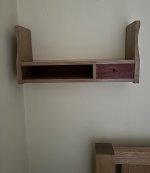
JK made many of these during his career and this is the third one I've made but when I asked SWIMBO if she wanted it, the not unexpected result was that it was immediately snaffled, so it looks like I'll have to do another for the place I originally intended for it - Rob
- Rob
My interpretation in English slash sawn Oak veneers, qs oak ends, with a Paduk drawer front and back panel in the same. Small turned 'capstan' drawer pull in Greengage, courtesy of Bob9, Lacewood drawer bottom. Finished with two coats of Polyvine matt wax acrylic with a healthy slathering of decent wax over the top:
JK made many of these during his career and this is the third one I've made but when I asked SWIMBO if she wanted it, the not unexpected result was that it was immediately snaffled, so it looks like I'll have to do another for the place I originally intended for it
- Rob
Mike G
Petrified Pine
Woodbloke":3dgi9p8v said:.........Small turned 'capstan' drawer pull in Greengage......
I've had a ton of the stuff. If you want any of what's remaining, let me know otherwise it's going to be keeping me warm next week.
Woodbloke
Sequoia
Thanks Mike, but Bob9f put me onto a lady close by to him who was taking one down; I zoomed over in the motor last year (I think) and collected a boot full. Beautiful stuff to turn! - RobMike G":31xcfj2f said:Woodbloke":31xcfj2f said:.........Small turned 'capstan' drawer pull in Greengage......
I've had a ton of the stuff. If you want any of what's remaining, let me know otherwise it's going to be keeping me warm next week.
Mike G
Petrified Pine
I've turned a few handles out of it, but easy as it is to turn, it doesn't (or mine doesn't, at least) look anywhere near as attractive as one expects. It never fails to disappoint me!
Anyway, as always.....lovely work, but not my style.
Anyway, as always.....lovely work, but not my style.
Lovely Rob.
I am ashamed to say that when I first glimpsed the image I thought you had made a garden kneeler
I am ashamed to say that when I first glimpsed the image I thought you had made a garden kneeler
Doug
Old Oak
A few things from the last week or so
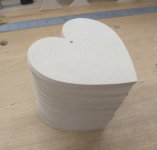
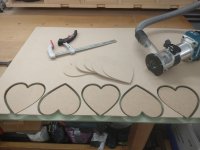
32 4mm thick MDF hearts simply routed out via a template & bearing guided router bit in my trim router.
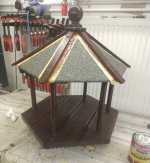
Next a bird table with sentimental attachment the base of which had rotted & was replaced with off cuts of decking & given 3 coats of Ronseal.
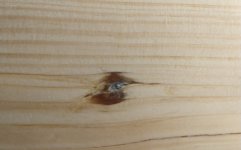
A bit of a surprise when planing up some pine for pergola posts a lead shot.
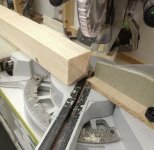
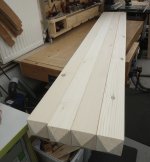
The tops of these were chamfered at the chop saw
These were then given a good sand 4 at a time.
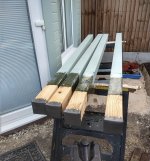
Post savers sealed on, painted with Sadolin superdec, ends stood in creacote over night & finally the ends protected with flash band :shock:
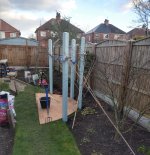
A plywood template was cut from 3/4” ply & used to help position the posts in a circle
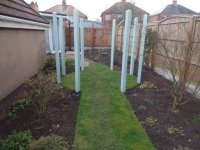
Pine henge :lol:
Next up will be laminated curved pine rails attached to the posts near the top hopefully this week but that will depend on the weather but there’s still stuff to finish in the garden room.
32 4mm thick MDF hearts simply routed out via a template & bearing guided router bit in my trim router.
Next a bird table with sentimental attachment the base of which had rotted & was replaced with off cuts of decking & given 3 coats of Ronseal.
A bit of a surprise when planing up some pine for pergola posts a lead shot.
The tops of these were chamfered at the chop saw
These were then given a good sand 4 at a time.
Post savers sealed on, painted with Sadolin superdec, ends stood in creacote over night & finally the ends protected with flash band :shock:
A plywood template was cut from 3/4” ply & used to help position the posts in a circle
Pine henge :lol:
Next up will be laminated curved pine rails attached to the posts near the top hopefully this week but that will depend on the weather but there’s still stuff to finish in the garden room.