
-
Hi all and welcome to TheWoodHaven2 brought into the 21st Century, kicking and screaming! We all have Alasdair to thank for the vast bulk of the heavy lifting to get us here, no more so than me because he's taken away a huge burden of responsibility from my shoulders and brought us to this new shiny home, with all your previous content (hopefully) still intact! Please peruse and feed back. There is still plenty to do, like changing the colour scheme, adding the banner graphic, tweaking the odd setting here and there so I have added a new thread in the 'Technical Issues, Bugs and Feature Requests' forum for you to add any issues you find, any missing settings or just anything you'd like to see added/removed from the feature set that Xenforo offers. We will get to everything over the coming weeks so please be patient, but add anything at all to the thread I mention above and we promise to get to them over the next few days/weeks/months. In the meantime, please enjoy!
You are using an out of date browser. It may not display this or other websites correctly.
You should upgrade or use an alternative browser.
You should upgrade or use an alternative browser.
Post a photo of the last thing you made...
- Thread starter TrimTheKing
- Start date


Dr.Al
Old Oak
A gentle post-covid-recovery introduction to workshoppery: I thought I'd do one of my "must get round to that some time" jobs and make a new screw for a router plane:
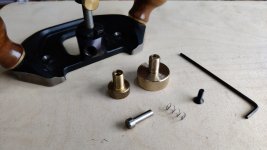
I didn't remake the plunger thing (although I was sorely tempted as it would have meant I could stick a more sensible screw in it and not have to get the imperial allen keys out). I'm not sure that the spring and plunger adds much really: the Stanley one works fine without that feature.
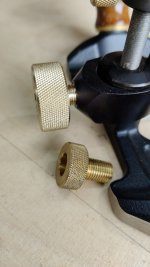
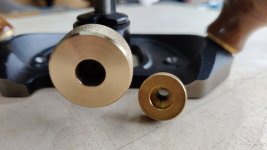
Anyway, the original is 19 mm diameter and 8 mm thick, the new one is 30 mm diameter and 12 mm thick, so that should give me a lot more to get hold of when tightening it and hopefully it won't be as prone to slipping as it was before.
A couple of extra photos to show the size difference:
If it still slips with that modification, I'll make a new one without the sprung plunger, although I'm hoping that won't be necessary as it's a bit of a pain having to convert the lathe to imperial threading mode (I don't have a 3/8" UNF die).
I didn't remake the plunger thing (although I was sorely tempted as it would have meant I could stick a more sensible screw in it and not have to get the imperial allen keys out). I'm not sure that the spring and plunger adds much really: the Stanley one works fine without that feature.
Anyway, the original is 19 mm diameter and 8 mm thick, the new one is 30 mm diameter and 12 mm thick, so that should give me a lot more to get hold of when tightening it and hopefully it won't be as prone to slipping as it was before.
A couple of extra photos to show the size difference:
If it still slips with that modification, I'll make a new one without the sprung plunger, although I'm hoping that won't be necessary as it's a bit of a pain having to convert the lathe to imperial threading mode (I don't have a 3/8" UNF die).

Dr.Al
Old Oak
AndyT":1jojwh4c said:My only concern though...does the router now lean backwards under the weight of all that brass?
:text-lol:

Trevanion
Old Oak
Not so much a thing I made but more something I've bodged. Some might remember me talking about wanting to make a new set of entrance gates and widening the access to the house a while ago but an unrelated, unresolved neighbour dispute has put a spanner in the works for now. The current gate is on its last legs and looks horrendous so I've repaired the most rotten section with the intention of it lasting one or two years until I can get around to making new ones.





- Joined
- Jul 21, 2014
- Messages
- 10,414
- Reaction score
- 165
A really tidy job Dan :eusa-clap: :eusa-clap:
Is there a reason for the asymmetric radius on the post? just looks wrong to my eye but maybe it is to match another design feature?
Bob
Is there a reason for the asymmetric radius on the post? just looks wrong to my eye but maybe it is to match another design feature?
Bob
Trevanion
Old Oak
9fingers":byrv6zoi said:Is there a reason for the asymmetric radius on the post? just looks wrong to my eye but maybe it is to match another design feature?
I think the photo distorts it somewhat, it doesn’t look quite that wonky in person! It is to match the post at the other end, the original rotten post was 75mm square and this new one is 75mm x 120mm which is the same as the other end, which gives me a bit more mortice depth to take advantage of less rotten timber for the tenons.
Trevanion
Old Oak
Upon closer inspection, the top is a bit wonky though not as wonky as the picture makes out, I obviously got a bit carried away with the belt sander, we’ll call it character 

I too cannot see a bodge there, far from it.

kirkpoore1
Old Oak
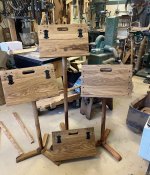
Music stands. These are actually from February, and I've got other stuff in the pipeline, but those aren't done yet.
Kirk
Kirk
Dr.Al
Old Oak
A quick bit of aluminium welding and a longer bit of grinding away the evidence of my shabby aluminium welding resulted in four of these (three plus one spare):
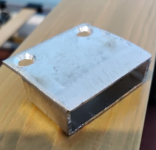
To replace three weak plastic brackets that had broken on our sofa bed:
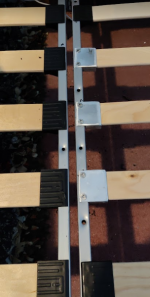
Fairly simple, but seems to have worked...
To replace three weak plastic brackets that had broken on our sofa bed:
Fairly simple, but seems to have worked...
kirkpoore1
Old Oak
Dr.Al":2u19loq4 said:Fairly simple, but seems to have worked...
it's good to have skills...
Kirk

Weekend_Woodworker
Sapling
- Joined
- Apr 3, 2021
- Messages
- 310
- Reaction score
- 88
I have finally finished upgrading my router table. The previous one had been okay, but I relied on the table saw fence which had just too much play in the far end of the fence. I got an offset of Valcromat from what was Avon Ply for £10 which I used to make it all out of. I have built it with a couple of adjustable end stops that go beyond the length of the fence, which I think could be handy. I have also made a fine adjust for the fence using M6 thread so each rotation is 1mm.
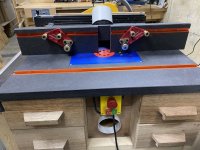
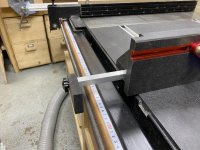
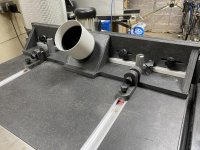
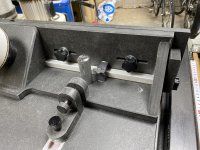
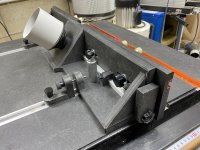
P.S. I think the forum is great and appreciate everyone's efforts in keeping it running, but I do get frustrated by my incompetence at posting pictures. This is my third attempt to get it to work. Maybe one of these days I'll get good at it!
P.S. I think the forum is great and appreciate everyone's efforts in keeping it running, but I do get frustrated by my incompetence at posting pictures. This is my third attempt to get it to work. Maybe one of these days I'll get good at it!
Cabinetman
Sequoia
- Joined
- Oct 11, 2020
- Messages
- 5,836
- Reaction score
- 1,475
- Location
- Lincolnshire Wolds + Massachusetts
- Name
- Ian
That’s a most impressive professional looking jig. It’s the sort of thing I enjoy making, pencil and paper sketch coupled with searching around for all the bits to make it work, then coming up with a design and a successful outcome (hopefully).
johnward
Sapling
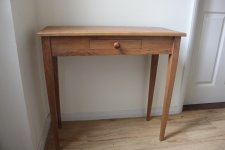 . Poor photo, wide angle causing leaning legs!
Made from an old Oak door off ebay. The frame was 110 x 45 which I used for the legs and the infill boards were 130 x 20 which were used for the top and aprons.
Cabinetman
Sequoia
- Joined
- Oct 11, 2020
- Messages
- 5,836
- Reaction score
- 1,475
- Location
- Lincolnshire Wolds + Massachusetts
- Name
- Ian
Nice proportions John, the solid Oak door was a good find!
Weekend_Woodworker
Sapling
- Joined
- Apr 3, 2021
- Messages
- 310
- Reaction score
- 88
That is a very nice table you have made, and even better from a recycled door.
johnward
Sapling
Forgot to add this photo of table components.
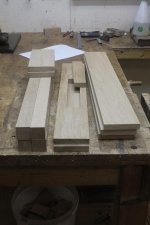
Image rotated for you John.
Nothing can be more satisfying than taking scrap wood (the door) and turning it into something useful.
Nothing can be more satisfying than taking scrap wood (the door) and turning it into something useful.

RogerM
Nordic Pine
johnward":11e4hidt said:. Poor photo, wide angle causing leaning legs!
Made from an old Oak door off ebay. The frame was 110 x 45 which I used for the legs and the infill boards were 130 x 20 which were used for the top and aprons.
I like that. Pleasing dimensions and the taper on the legs takes away any hint of heaviness.
johnward
Sapling
Thanks Andy for rotating the photo, and thanks guys for kind comments.
- Joined
- Jul 21, 2014
- Messages
- 10,414
- Reaction score
- 165
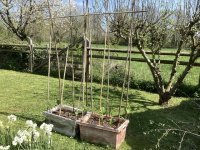
Not cabinet grade work but I've just completed a pair of these using pressure treated 25x50 softwwod.
Quite a few halving joints all cut on the table saw and naturally no hand tools involved other than a pencil :lol:
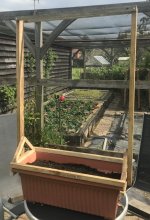
They are designed to slide onto a 900 x 300 plastic trough and support 3 tomato plants each.
This brace make then quite rigid.
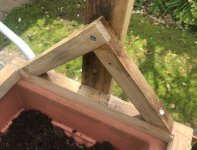
An extra piece fitted below the trough rim stops the frame tipping and allows it to be carefully lifted into place as one unit.
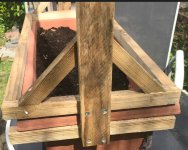
I built this design last about 20 years ago and the timber finally failed over the winter.
Big question is will I have to make any more or will they seem out? :lol:
Bob
Quite a few halving joints all cut on the table saw and naturally no hand tools involved other than a pencil :lol:
They are designed to slide onto a 900 x 300 plastic trough and support 3 tomato plants each.
This brace make then quite rigid.
An extra piece fitted below the trough rim stops the frame tipping and allows it to be carefully lifted into place as one unit.
I built this design last about 20 years ago and the timber finally failed over the winter.
Big question is will I have to make any more or will they seem out? :lol:
Bob
Neat idea Bob which could also be used for my runner beans and climbing peas. Far nicer than the bamboo structure I construct in the old removal crates I use every year.
- Joined
- Jul 21, 2014
- Messages
- 10,414
- Reaction score
- 165
Andyp":iznq26ya said:Neat idea Bob which could also be used for my runner beans and climbing peas. Far nicer than the bamboo structure I construct in the old removal crates I use every year.
Thanks Andy, The only thing to check for runner beans is the height and windage of fully grown plants at 6' or so high is matched to the weight of the trough and soil. A couple of bricks under the soil should help.
My toms are against a south facing wall with no significant wind exposure.
Bob
My crates are pretty heavy Bob and not had one blown over yet.

Woodbloke
Sequoia
I'll be doing somat very similar this year for runner beanz using a big plastic container; may try some 'taters in a very large round plastic pot that once contained a Japanese Maple wot's now planted out in a nice shady spot - RobAndyp":2xi20hsy said:My crates are pretty heavy Bob and not had one blown over yet.
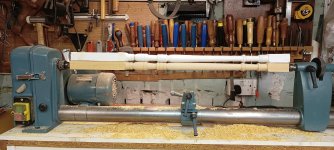
I'm more of an "occasional lathe user" than an actual turner, but when a friend asked if I fancied making a replacement baluster to match one that had broken, I accepted the challenge.
It's the first time I've made something this long and thin - I had to improvise a steady in the middle.
The final shapes owe as much to sandpaper as they do to gouges, but I think it will do, if painted nice and thick.
It's the first time I've made something this long and thin - I had to improvise a steady in the middle.
The final shapes owe as much to sandpaper as they do to gouges, but I think it will do, if painted nice and thick.
Cabinetman
Sequoia
- Joined
- Oct 11, 2020
- Messages
- 5,836
- Reaction score
- 1,475
- Location
- Lincolnshire Wolds + Massachusetts
- Name
- Ian
My level of skill and lathe usage is about the same Andy, that looks pretty damn good to me, not easy copying something like that, my last bunch were 20 small finials but they were going to be 20 odd feet up so not so noticeable.
Ian
Ian
Lurker
Old Oak
I think copying something on the lathe is the hardest thing about turning, but that looks like a good job.
HOJ
Sapling
Nicely done Andy, I'm in the same boat, not a regular rotator of wood, terrified of the skew chisel, I scrape rather than cut but it works for me.
Your lathe looks the same as mine, a NU Tool one that I bought in 1997, in green though, has served me well.
Your lathe looks the same as mine, a NU Tool one that I bought in 1997, in green though, has served me well.
Thanks all for the kind comments.
The client collected the bits today - apparently there was also a problem with an extra big gap where a cupboard had been built in. He can now put the repaired one back where it was and use the new one to make the gap safe again. A pleasing outcome.
The client collected the bits today - apparently there was also a problem with an extra big gap where a cupboard had been built in. He can now put the repaired one back where it was and use the new one to make the gap safe again. A pleasing outcome.

Lons
Old Oak
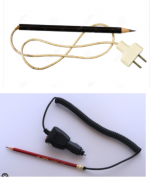
9fingers":2xak89gg said:naturally no hand tools involved other than a pencil :lol: Bob
You need one of these Bob plus a UK adapter and maybe the travel version. Sadly a cordless might be too heavy.
Attachments
- Joined
- Jul 21, 2014
- Messages
- 10,414
- Reaction score
- 165
Very Good Bob :lol: :lol:
In fact I do almost no marking out. Maybe a pencil mark to rough cut the stock 25 x 50 x 3600 to make the first piece a bit over 700mm. Use that to cut all the other 700mm pieces so thats 1 pencil line for 6 pieces then a dust cut of one end of each piece on the table saw to square them off.
Mitre saw against a stop to cut all to final length. For a job like this I did not really care what the final length was - 699 or 701 no matter provided they all the same.
Marking and measuring are all sources of error. Setting stops mean errors cant creep in.
Bob
In fact I do almost no marking out. Maybe a pencil mark to rough cut the stock 25 x 50 x 3600 to make the first piece a bit over 700mm. Use that to cut all the other 700mm pieces so thats 1 pencil line for 6 pieces then a dust cut of one end of each piece on the table saw to square them off.
Mitre saw against a stop to cut all to final length. For a job like this I did not really care what the final length was - 699 or 701 no matter provided they all the same.
Marking and measuring are all sources of error. Setting stops mean errors cant creep in.
Bob
Lurker":y43tepzc said:I think copying something on the lathe is the hardest thing about turning, but that looks like a good job.
I agree. Which is why I try to avoid making pairs of anything. I have never tried turning anything as long as that baluster which looks excellent to me.
HOJ
Sapling
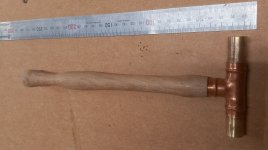
I'm sure I I saw something like this on here, it did stick in my mind so made one:
HOJ":1immpnzr said:I'm sure I I saw something like this on here, it did stick in my mind so made one:
It was that talented Mr RXH - http://thewoodhaven2.co.uk/viewtopic.ph ... 9&p=141085 - such a good idea!

thetyreman
Nordic Pine
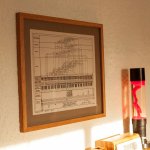
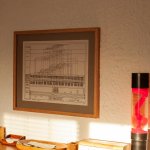
finally made a frame for this chart, I've had it for over a decade, it's a musical pitch relation chart, you can see all the frequencies for mastering audio related to the pitch and also the entire range of an orchestra, very useful and practical, composers audio engineers and musicians would find this very useful, cutting the mountboard was challenging but I got there in the end! I used re-cycled glass from a bigger frame I found in a charity shop and it's the only thing on my wall, I have a few art prints I'd also like to frame but want to use pear and walnut for those, maybe try adding in a shape instead of a box frame.
Attachments


Doug
Old Oak
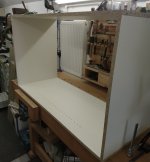
I was asked a few weeks ago about making some wardrobes around a bulkhead in a bedroom, not my usual work but still work so why not, the young lady wanted adjustable shelves so the first thing to make was a pin hole jig.
The easiest way I could think of making the jig was on my mates miller as it was just a case of drilling a 17mm hole winding the bed 32mm & drilling another hole, continuing like that until the board was full.
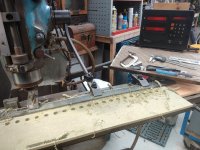
After cutting out the necessary panels from a couple of sheets of Alabaster MFC this morning I got to try out the jig, my guide bush is just under 17mm so the fit was nice & snug.
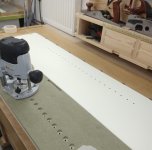
The holes produced were certainly crisp

Quite a bit more do do on these but at least it’s a good start.
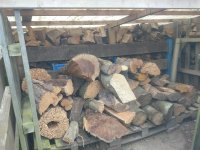
I’ve also made a start on converting the wood I’ve been storing for years at a mates into blanks, this is no small job as I’ve been collecting for over 15 years. All I’ve tended to do is cut a trunk to length, split down the pith with an axe, seal the ends with PVA & shavings then store anywhere I can find that is undercover.
The problem with this is I’ve forgotten how much I’ve got this was the first load rounded up

& this was the first lot to be processed.
It’s a slow process doing it in my spare time but so far I’ve managed this.
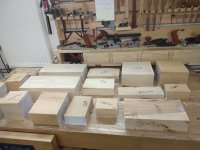
There’s a lot to go at but storing it when it’s squared up will take up way less space & if the wood store at home gets finished this year :eusa-pray: it will all be in one place.
The easiest way I could think of making the jig was on my mates miller as it was just a case of drilling a 17mm hole winding the bed 32mm & drilling another hole, continuing like that until the board was full.
After cutting out the necessary panels from a couple of sheets of Alabaster MFC this morning I got to try out the jig, my guide bush is just under 17mm so the fit was nice & snug.
The holes produced were certainly crisp
Quite a bit more do do on these but at least it’s a good start.
I’ve also made a start on converting the wood I’ve been storing for years at a mates into blanks, this is no small job as I’ve been collecting for over 15 years. All I’ve tended to do is cut a trunk to length, split down the pith with an axe, seal the ends with PVA & shavings then store anywhere I can find that is undercover.
The problem with this is I’ve forgotten how much I’ve got
this was the first load rounded up& this was the first lot to be processed.
It’s a slow process doing it in my spare time but so far I’ve managed this.
There’s a lot to go at but storing it when it’s squared up will take up way less space & if the wood store at home gets finished this year :eusa-pray: it will all be in one place.
