• Hi all and welcome to TheWoodHaven2 brought into the 21st Century, kicking and screaming! We all have Alasdair to thank for the vast bulk of the heavy lifting to get us here, no more so than me because he's taken away a huge burden of responsibility from my shoulders and brought us to this new shiny home, with all your previous content (hopefully) still intact! Please peruse and feed back. There is still plenty to do, like changing the colour scheme, adding the banner graphic, tweaking the odd setting here and there so I have added a new thread in the 'Technical Issues, Bugs and Feature Requests' forum for you to add any issues you find, any missing settings or just anything you'd like to see added/removed from the feature set that Xenforo offers. We will get to everything over the coming weeks so please be patient, but add anything at all to the thread I mention above and we promise to get to them over the next few days/weeks/months. In the meantime, please enjoy!

Fixing a Chipped Japanese Chisel Blade

Woodbloke

Sequoia
Joined
Jul 22, 2014
Messages
7,373
Reaction score
1,345
Location
Salisbury, UK
Not so much a sharpening thread as a 'fixing' one. Last week when chopping out the rear panel rebate corners, my 12mm Japanese chisel stopped behaving as a proper chisel and started cut weirdly. When I took it out of the cut, it soon became evident as to the reason:
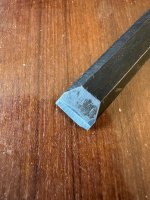
IMG_7809.jpeg

Being a 'silly billy' I'd forgotten that I needed to treat these things with a bit more decorum and civility than my Western 'Richter' ones. A Japanese chisel takes an incredible edge but it's so easy to chip it with the slightest lack of due care and attention. I decided this morning then, to do a 'fix', so stuffed it into the Veritas MkII Honing Guide with the chisel attachment:
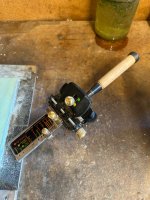
IMG_7813.jpeg

.... to hone a single bevel at 30deg on a 1000g water stone.

Half an hour later I was still at it with little sign of the chip retreating. Having purchased an Ax 'Ultimate Edge' I wondered if the Japanese chisel would fit into the plane/chisel jig, but surprisingly it did:
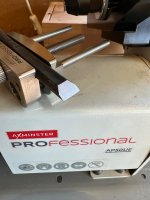
IMG_7810.jpeg

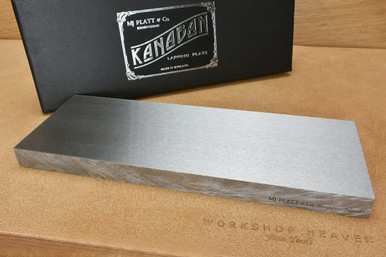
With a new 120g belt installed it was only a couple of light passes (with some cold water dunking inc) to remove the last of the chip. I thought I might have to do some work with the 'Kanaban' lapping plate and some coarse valve grinding paste (!!) to shift the 'ura' (the depression in the back) down a smidge but didn't really need to:
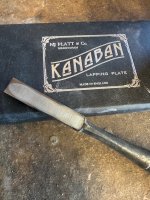
IMG_7811.jpeg

...as there was still about a mm between the edge and ura.

Then onto the waterstones and strop to remove the grinding marks and finish the single bevel at 30deg:
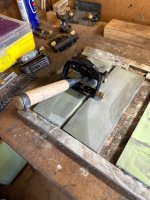
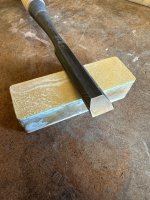
IMG_7814.jpeg

IMG_7815.jpeg

Japanese chisels can quite easily be 'fixed' (with care!) but I'd suggest that attempting the repair freehand is fraught with difficulty. Apologies also if the sight of waterstones and sharpening gear make you splutter on your coffee and cause the dunker to break off and disappear to the bottom of your mug:ROFLMAO: - Rob
 
Last edited:
Never had the need for a jap chisel but often wondered what happens when you sharpen back to the ura, do you have to reduce the thickness of the chisel to bottom depth of the ura?

I remember reading somewhere that the laminated construction means that you can (carefully) hit near the tip with a hammer & the softer backing metal will bend slightly and expose more of hardened cutting edge, so there's not as much work needed to flatten it (i.e. you don't have to flatten the entire back of the chisel again).

However that might just be plane blades or it might be me misremembering or misunderstanding: I've never really explored Japanese laminated blades.

I'm sure someone will be along shortly to explain why what I've written there is nonsense!
 
Never had the need for a jap chisel but often wondered what happens when you sharpen back to the ura, do you have to reduce the thickness of the chisel to bottom depth of the ura?
Nope, you just need to pass the back over a coarse/fine stone of some sort to 'shrink' it a bit; doesn't need to be very much, just enough to give some clearance between the depression and the edge. They're very good indeed when set up correctly (that takes some time!) but can be an 'acquired taste'...but they're capable of a sublime cutting edge - Rob

I remember reading somewhere that the laminated construction means that you can (carefully) hit near the tip with a hammer & the softer backing metal will bend slightly and expose more of hardened cutting edge, so there's not as much work needed to flatten it (i.e. you don't have to flatten the entire back of the chisel again).

However that might just be plane blades or it might be me misremembering or misunderstanding: I've never really explored Japanese laminated blades.

I'm sure someone will be along shortly to explain why what I've written there is nonsense!
You can do it that way Dr.Al, but I think you really have to know what you're doing; not something I've ever attempted - Rob
 
Good thread. I love my Japanese chisels and much prefer them over my LN and Blue Spruce for fine work. I've only every chipped one and to this day don't quite know what I did. I have the Sorby Grinder (Ax is better but I can't justify a swap) and find I can regrind with a home made jig and ice bath.
 
I have a couple of Japanese "Smoothcut" plane irons (for Nos. 5 and 5 1/2), which are brilliant.

All I usually do with them is scary sharp normally. They don't take excessively long to do, but they take a wicked edge and they last around 50% longer than the "stock" irons I have (Record 'crucible cast' and more recent Stanley ones). If I make the effort to strop/hone whenever I take a break, they last really well. Very much my first choice with difficult grain, too.

If I really make the effort with polishing, you can see the lamination on the bevel.

The frustrating thing is that I haven't been able to find them in the UK any more (both mine came from Axminster years ago).
 
I have a couple of Japanese "Smoothcut" plane irons (for Nos. 5 and 5 1/2), which are brilliant.

All I usually do with them is scary sharp normally. They don't take excessively long to do, but they take a wicked edge and they last around 50% longer than the "stock" irons I have (Record 'crucible cast' and more recent Stanley ones). If I make the effort to strop/hone whenever I take a break, they last really well. Very much my first choice with difficult grain, too.

If I really make the effort with polishing, you can see the lamination on the bevel.

The frustrating thing is that I haven't been able to find them in the UK any more (both mine came from Axminster years ago).
Workshop Heaven used to stock replacement 'blue steel' Japanese plane blades for Western planes and Classic Hand Tools have started to do the same but when you see the price, you need to take a very deep breath before you hit 'submit' - Rob

Edit - having just checked Workshop Heaven still stock them
 
£50 and worth it.
That's about what I paid for the second one - I think the original one was a bit cheaper on offer.

I'm inclined to agree that they're worth it - you can work for longer, and/or get a better finish with difficult woods.

That said, I have a couple of planes - an apron plane and a spokeshave - both of which use one of the modern steels for the irons (A2 or O1: they're the same but I can't remember which). Those also take and hold an excellent edge.

The great thing about having the Japanese irons is process: If I have a big planing task, I'll sharpen/hone all the irons I have in that size, and then swap them out as they go dull, having 'robbed' from my other planes. I can keep going for longer before needing to break rhythm completely, and the Japanese irons really help this.
 
Workshop Heaven used to stock replacement 'blue steel' Japanese plane blades for Western planes and Classic Hand Tools have started to do the same but when you see the price, you need to take a very deep breath before you hit 'submit' - Rob

Edit - having just checked Workshop Heaven still stock them
The ones I have look the same as the ones Workshop Heaven sell, apart from the brand name.
 
The great thing about having the Japanese irons is process: If I have a big planing task, I'll sharpen/hone all the irons I have in that size, and then swap them out as they go dull, having 'robbed' from my other planes. I can keep going for longer before needing to break rhythm completely, and the Japanese irons really help this.
This is what the late and very great Alan Peters used to do. Apparently he used a No.7 as a smoother(!!) and had a number of sharp blades to hand. As the one in use became blunt, it was immediately replaced by a new honed blade and so on until he'd used up all his sharp blades and was left with a pile of blunt ones for the 'young apprentice' to sharpen:ROFLMAO: - Rob
 
The great thing about having the Japanese irons is process: If I have a big planing task, I'll sharpen/hone all the irons I have in that size, and then swap them out as they go dull, having 'robbed' from my other planes. I can keep going for longer before needing to break rhythm completely, and the Japanese irons really help this.
I find this really interesting and it makes me think I need to work on my plane set-up technique. It generally takes me about a minute to do the actual sharpening of a plane blade (including putting it in a honing guide) but 2-3 minutes to get the blade out, put it back in and get it nicely adjusted. If I'm taking a blade out of a plane I generally feel I might as well sharpen it as that's the quick bit of the job. I guess that equation changes if you're more efficient at setting the plane up than I am.
 
Takes me ages to set a plane up as well Al. I'm fussy. I think the system above is more about not interrupting rhythm than speed. I quite like hand planing and sharpening, so time is not of the essence for me. Anyway, there is only one plane that I have more than one blade for.
 
Takes me ages to set a plane up as well Al. I'm fussy. I think the system above is more about not interrupting rhythm than speed. I quite like hand planing and sharpening, so time is not of the essence for me. Anyway, there is only one plane that I have more than one blade for.
Same here. I can take quite a long time to get the plane to take off the right thickness of shaving. I use the Charlesworthian trick of running a thin offcut against different parts of the blade to see if it's cutting evenly; it's surprising how long it takes to do with minute lateral and doc adjustments before you get it 'right' - Rob
 
Never had the need for a jap chisel but often wondered what happens when you sharpen back to the ura, do you have to reduce the thickness of the chisel to bottom depth of the ura?
During one of my course with David Charlesworth, I asked him the same question. Although he had every chisel LN made, I noticed he used the Japanese chisels more often. He held up one of Japanese chisels that still had a lot of flat area between the cutting edge and the hollow and said something like "I don't know. I've had this chisel for nearly 20 years and don't expect I'll live long enough to worry about it."
 
During one of my course with David Charlesworth, I asked him the same question. Although he had every chisel LN made, I noticed he used the Japanese chisels more often. He held up one of Japanese chisels that still had a lot of flat area between the cutting edge and the hollow and said something like "I don't know. I've had this chisel for nearly 20 years and don't expect I'll live long enough to worry about it."
Yep, that's what happens in the normal course of events. As you continually polish the back:

IMG_7831.jpeg

...the 'ura' starts to shrink back from the edge, as shown on one of my paring chisels (single bevel of 25deg) which I've had for about the same time as St.Dave. What's also a very good idea is to get hold of a Dremel and small grinding wheel so that you can grind a small flat just behind the polished back:

IMG_7832.jpeg

...which is very slightly lower, as shown above. The reason for this is that the black part of the blade starts to taper towards the handle, so that as you're polishing said back, it may make contact with the edge of your expensive waterstones, crunching into them with a very unhappy outcome! If you grind away a barely noticeable, flat depression, it won't happen and you can merrily polish away the whole back knowing that your waterstones aren't going to get munched. I've yet to do this on my new acquisitions but will get a round tuit when this bit of warm weather's passed; currently the 'shop is 'off limits' as it's about 29degC in there.

I think, but can't be sure, that it was one of St. David of Charlesworth's little tricks - Rob
 
I like my record staysharp blades very quick to sharpen, then drop the end bit and spend hours looking for it.

Pete
 
I had a message from a chap on the MIG-welding forum saying:

I have a couple of old chisels that desperately need sharpening, I used them in anger almost every day at one time and the got an edge by any means available. Now they need some kindness and careful attention.

Would you be prepared to do this for me? I don't want "free" I am happy to pay for your efforts, I don't expect anything for nothing.

The chap in question is a someone I've had quite a lot of interaction with over the years and he's also sent me a couple of his old tools to add to my collection. While sharpening isn't one of my favourite things, it felt like the least I could do to sharpen a couple of chisels for him, so I agreed (I won't be charging him, but I haven't told him that yet).

A few days later, they arrived:

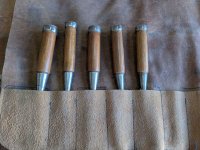
two-chisels.jpg

They appear to be Japanese chisels (which I have no experience of), which reminded me of this thread. I haven't had a lot of time in the workshop to do much with them yet, but I've started flattening the backs. In my experience, this can be the most time consuming part of dealing with used chisels.

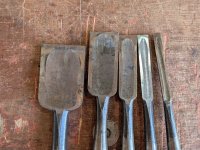
This is what the backs looked like:

chisel-backs.jpg

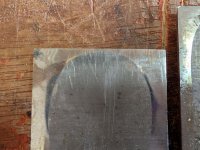
I started with the largest one on the premise that there's more material and hence the job gets easier as I work towards the smaller ones. Here's a close-up:

close-up-of-widest-one.jpg

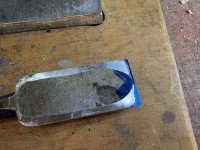
My usual process when doing the initial back preparation of a chisel (something I'm eternally grateful generally only needs to be done once for a given chisel) is to coat the back in either marker pen or Dykem and then start rubbing the back on abrasive stones until the marker at the tip has gone. On a brand-new chisel this is usually quite quick. On a used one, not so much. This is what the wide one looked like after a little bit of rubbing:

started-flattening.jpg

I think that implies that it has been sharpened by lifting the handle up slightly when it's on the stone so that the tip is sharpened without the rest staying coplanar. That's probably fine for some applications but for chisels I've always gone for a flat back so I thought I'd do the same on these.

If I'm honest, I've never found what I would consider a good (for which read "quick") way to flatten chisel backs. For a new chisel, a few rubs on a coarse diamond stone shows abrasion at the tip and you can quickly work up to finer grits. For something like this I tend to start there then get bored and switch to 80 grit wet-and-dry paper on a flat surface (either a piece of glass or just one of the diamond stones). I've tried using the side of a coarse diamond wheel in the Tormek but that seems just as slow as doing it manually. I've never had the guts to try to do it on the side of the CBN wheel in the relatively fast spinning medium speed bench grinder.

Eventually it's clear that the tip has been fully abraded and then I can go up through the grits, still keeping the back flat on the stone, but only worrying about whether the coarser scratches have been removed in the area near the tip. After the coarse diamond stone (320 grit I think) I use a fine diamond stone (1000 grit I think) and then an 8000 grit waterstone (which has the advantage compared to coarser waterstones of not needing to be pre-soaked; it can easily be flattened by rubbing with the coarse diamond stone). Of course there are plenty of other equally good options out there and arguably the waterstone is unnecessary given that stropping will happen later.

Eventually you get to the point that the area near the tip is shiny and difficult to photograph (that's my excuse, anyway) and, with these Japanese chisels, the recessed area has got a lot smaller:

shiny-tip.jpg

I've done two of the backs so far (the circa 35 mm one and the circa 24 mm one). I'll do the backs of the remaining three and then I'll sort the bevels out, which should be far quicker.
 
If, as you suspect, the back(s) was raised during the sharpening process, it/they are now convex which is very difficult to bring back to dead flat and on a Japanese chisel you'd still be flattening them at Christmas...and I know that from past experience.

If the backs are flat, or need flattening for the first time, a 'Kanaban' lapping plate is your definite No.1 best pal:

IMG_8055.jpeg

...as it will improve/flatten a new back in super quick time with coarse valve grinding paste. What it won't do is to take a convex back to flat but it will take a concave one to flat ( I had a long chat on the dog n'bone with Matt Platt at WH)

A very useful trick which I believe can be attributed to St. Dave of Charlesworth is to grind a small section away at the rear of the back (arrowed):

IMG_8054.jpeg

...which is slightly lower than the back, This prevents the edge of the sharpening medium (waterstones) being mangled as the back is worked, which is possibly why the owner of the chisels raised the handle during sharpening. You can see on my new one I've yet to grind the flat - Rob

Edit- put a 150mm rule across the back and you'll be able to see if they're concave, flat or convex
 
Last edited:
Unfortunately, they're definitely convex. Concave ones are easy with wet-and-dry on glass or with the diamond stone. Convex is, in my experience, a chore.

The bit near the handle has already been ground away (not by me) on these ones.
 
Unfortunately, they're definitely convex. Concave ones are easy with wet-and-dry on glass or with the diamond stone. Convex is, in my experience, a chore.

The bit near the handle has already been ground away (not by me) on these ones.
Was it like someone used the infamous "ruler trick"? or is it bent? I hate trying to fix the ruler trick ones.
 
Was it like someone used the infamous "ruler trick"? or is it bent? I hate trying to fix the ruler trick ones.
Hard to say for sure, but they aren't bent. Whether it was the ruler trick (which I use on plane blades, but never chisels) or just lifting up the handle a bit I don't think there's anyway to tell.
 
For the 15 mm one, which was demonstrating an impressive level of cussedness, I decided to be brave (not my chisels, after all 😉 )

I turned on the medium (1450 rpm) speed bench grinder and then turned it straight back off again :). The 200 mm wheels and the high quality bearings means it'll keep running for a few minutes after turning off (gradually getting slower and slower), so that meant I could be slightly more cautious than using it under power.

Then, as the speed gradually reduced, I offered the chisel up to the 180 grit CBN wheel like this (photo taking with the wheel stationary for obvious reasons):

1784741233755.png

Note that the tip is hanging over the inner radius of the flat bit of the wheel. I then pushed it further towards the centre, so that it abraded a large area behind the tip but left the tip well alone.

I then took it back to the bench stones and had another go. That seemed to go much better, with the unabraded bit near the tip getting much smaller as I'd reduced the bulk area of the back a little. I've still got a little way to go (and I'll probably stick to the stones now) but as a way to make a bit of progress quickly I was quite pleased with that as a little bit of a time saver. I could probably have gone much further on the bench grinder but as it was something I'd never tried before I felt it better to err on the side of caution.
 
Hard to say for sure, but they aren't bent. Whether it was the ruler trick (which I use on plane blades, but never chisels) or just lifting up the handle a bit I don't think there's anyway to tell.
Gotcha, could be as Woodbloke mentioned, where the ferrule(kuchigane) gets in the way. I never use the ruler trick on chisels since it makes them hard to pare with. I don't use the ruler trick ( or secondary bevels) on Japanese planes for fear of the ancient spirits striking me down.
 
Unfortunately, they're definitely convex. Concave ones are easy with wet-and-dry on glass or with the diamond stone. Convex is, in my experience, a chore.
In the words of the prophet, they're fubar'd:ROFLMAO: for useful woodmangling chisels. I know you're doing them for a mate, but I personally wouldn't touch them. The 'Kanaban' lapping plate with coarse paste removes steel very quickly; I was really surprised how fast with only the light pressure and I was contemplating all sorts of stones etc to flatten the backs on these new chisels; the lapping plate is the 'bees nees' - Rob
 
Quite a lot of years ago (long before I started woodwork) I had some knives that needed quite a bit of attention to get them sharp. In an attempt to sort them out, I bought a set of three waterstones (plus a Nagura stone, which is used for getting a slurry going on the 8000 grit one).

I use the 8000 grit one all the time, although I rarely bother with the Nagura stone as (for my plane blades and chisels) the stone does fine just with a quick spritz of water and nothing else.

I haven't used the other stones in years (perhaps even a decade). They're a lot more hassle as you have to soak them in water for quite a long time before using them (but leaving them in water long term is inadvisable if they live in an unheated garage). As such, if you want to use them, you need to plan ahead (never my forte :LOL: ).

coarser-waterstones.jpg

The eagle-eyed among you can probably work out the grit of the right-hand stone; the left-hand one is 240 grit. I thought I'd give them ago seeing as they're from the same country as these chisels and hence might be deemed appropriate.

After leaving them soaking for a couple of hours while I had dinner, I decided to give them a go and I have to say I was impressed by how fast the 240 grit one removed the material from the back of the chisel. It loses material fast, so has to be flattened more regularly than any other stone I've ever used, but that's quite quick to do with the coarse diamond stone.

After rubbing the 15 mm one on the 240 grit for a while, I moved to the 800 grit and then the 8000 grit (rubbed with the Nagura stone as it did seem to help a lot with the hard steel of the Japanese chisel):

shiny-15.jpg

Ooh, shiny!

I still don't think they'll form part of my regularly sharpening armoury: the diamond stones and 8000 grit one do me just fine. I'll generally stop planing/chiselling when I think I need to sharpen the blade and I don't really want to have to wait half an hour or more while the stones soak.

Thankfully, I'm generally not removing that much material in a normal sharpening session so the 240 grit one isn't really needed.

While I was sharpening the chisel, the ferrule fell off, so I guess I'll have to figure out what to do about that at some point:

ferrule.jpg
 
Back
Top