• Hi all and welcome to TheWoodHaven2 brought into the 21st Century, kicking and screaming! We all have Alasdair to thank for the vast bulk of the heavy lifting to get us here, no more so than me because he's taken away a huge burden of responsibility from my shoulders and brought us to this new shiny home, with all your previous content (hopefully) still intact! Please peruse and feed back. There is still plenty to do, like changing the colour scheme, adding the banner graphic, tweaking the odd setting here and there so I have added a new thread in the 'Technical Issues, Bugs and Feature Requests' forum for you to add any issues you find, any missing settings or just anything you'd like to see added/removed from the feature set that Xenforo offers. We will get to everything over the coming weeks so please be patient, but add anything at all to the thread I mention above and we promise to get to them over the next few days/weeks/months. In the meantime, please enjoy!

Holiday Toolchest

Dr.Al

Old Oak
Joined
Dec 31, 2020
Messages
2,134
Reaction score
119
Location
Dursley, Gloucestershire
Name
Al
Sorry: long post with no pictures yet...

After reading one of Tom Fidgen's books, I've decided I'd like to make a tool chest. The tool chest is going to spend something like 50 weeks in the average year empty and stored somewhere away from the workshop (I don't have space in the workshop for another tool chest and I'd rather have the tools wall-mounted for easy access).

The main reasons for making the tool chest are (in rough order of priority):

  1. I think I'll enjoy the project;
  2. I think the joinery will be challenging and I'll hopefully get better at hand toolery in the process (the design already has dovetails, half-blind dovetails and wedged tenons; I've never cut a half-blind dovetail or a wedged tenon in my life, so this is possibly biting off more than I can chew again!);
  3. The last few relatively big project ideas I've had (e.g. TV stand, 3D printer enclosure) have stumbled at the drawing stage as I couldn't get my head round what I wanted them to look like: a tool chest fits into the category of functionality over form so is probably more within my comfort zone design-wise;
  4. I'd like to be able to take some tools on holiday and use them while I'm there!

As a general rule, we'll usually have at least one holiday a year where we'll travel by car somewhere or other in the middle of nowhere and stay in a self-catering cottage. We used to gravitate towards mountainous areas and spend every day walking the hills, but since my other half's health deteriorated, hill walking isn't really on, so the holidays tend to be more sedentary (apart from when I go for walks on my own). Carolyn always has lots of knitting & crochet type projects that are quite portable and follow us on holiday but there are only so many books I can read and jigsaws/crosswords I can do before I start to go stir crazy. I've explored various other weird and wonderful hobby ideas, but nothing has really grabbed me like wood & metalwork do. My artistry skills are seriously lacking so things like whittling and carving aren't ideal for me.

What I'd love to be able to do is to take a simple-ish tool kit on holiday, along with some pre-thicknessed boards and find some space somewhere to potter at small boxes and maybe other similar size things (e.g. kumiko or whatever). Tom Fidgen's "Made by Hand" book includes a design for a tool chest that, when clamped down to a convenient table, doubles as a small workbench. I thought that was a great idea. I'm not going to follow the design in the book as I'd rather be in control of the design and besides, I think I'd like to make something a bit bigger than his version. Even if I never end up using it, I think it'll be a really good project to work on.

I've started scheming out a design and it'll take me a while to get that finished (and get through some of the other projects that are on the list above this one), but in the meantime I'd be interested to know what the Wood Haven would recommend for the wood for this? My thoughts so far are that it needs to be light (it's going to have a lot of tools in it and I'd like to be able to lift it into the car when it's loaded!) but also relatively tough (it's going to serve as a workbench as well as a tool chest). Having said that it needs to be tough, it's only likely to be used when I'm on holiday, so very infrequently - I'm not sure what difference that makes really. The wood also needs to be relatively easy to get hold of (probably something that Wentwood or Williams British Hardwoods stock), so maybe Poplar, Sweet Chestnut or Sycamore? I'm very open to suggestions of alternatives...

I guess multiple woods is also a possibility: there will be a main frame (doubling as a workbench), but also a set of drawers and a "tote" for the bigger stuff. The top of the workbench bit could also be a harder wood than the rest of the frame if that's not going to cause problems with different rates of expansion.

What wood would you use?
 
Interesting project, I have a tool rack with all my day to day hand tools on it, it gets locked away each day after use. The number of times I need a tool that isn’t on the rack is quite small, so I’m thinking it may be a good exercise to whittle down the toolkit to what you are going to need - how long since you last used that particular tool. And what you are going to need means you probably need to refine your ideas on the things you want to make. Ian
 
Cabinetman":2ozv74pp said:
Interesting project, I have a tool rack with all my day to day hand tools on it, it gets locked away each day after use. The number of times I need a tool that isn’t on the rack is quite small, so I’m thinking it may be a good exercise to whittle down the toolkit to what you are going to need - how long since you last used that particular tool. And what you are going to need means you probably need to refine your ideas on the things you want to make. Ian
An aside but related, the Schwarz in his epic tome 'The Anarchit's Toolchest' mentioned that you can make almost any furniture with around 50 or so hand tools which I guess you could store relatively easily in a toolchest. I also seem to recollect there are plans to make one in the book :D - Rob
 
What a brilliant idea for a project! And I do like your no 1 reason.

As for wood, I'd think poplar would be excellent especially if you want to paint it, but sweet chestnut is remarkable for its strength to weight ratio - strength is comparable to oak or ash but weight feels more like spruce.

I'll be watching with interest.
 
Cabinetman":1iyaqzk3 said:
Interesting project, I have a tool rack with all my day to day hand tools on it, it gets locked away each day after use. The number of times I need a tool that isn’t on the rack is quite small, so I’m thinking it may be a good exercise to whittle down the toolkit to what you are going to need - how long since you last used that particular tool. And what you are going to need means you probably need to refine your ideas on the things you want to make. Ian

That's a good thought. I've got a bit of a plan with this, although I'm not sure how well it'll work. I'm going on holiday fairly soon (much sooner than I'll be able to even start the chest project), so I'm going to take my (just about liftable!) portable workbench along with my best guess of a hand tool subset (carried in whatever I can find; probably makita boxes) and some pre-thicknessed wood.

Hopefully that will tell me (a) whether it's practical to make small boxes etc while on holiday and (b) what tools I used & which tools I wished I had.

Woodbloke":1iyaqzk3 said:
An aside but related, the Schwarz in his epic tome 'The Anarchit's Toolchest' mentioned that you can make almost any furniture with around 50 or so hand tools which I guess you could store relatively easily in a toolchest. I also seem to recollect there are plans to make one in the book :D - Rob

I've got that book & I think I'll consider the project a failure if the chest ends up as big as his :lol: (his has a 1 metre by 600 mm footprint!)

AndyT":1iyaqzk3 said:
What a brilliant idea for a project! And I do like your no 1 reason.

As for wood, I'd think poplar would be excellent especially if you want to paint it, but sweet chestnut is remarkable for its strength to weight ratio - strength is comparable to oak or ash but weight feels more like spruce.

Thanks Andy, that's useful. Sweet Chestnut sounds like a good option from that. I'm hopefully going to go to Wentwood on Saturday (never been there before, so it should be interesting), so I might pick up a bit to get a feel for what it's like before making a decision. I might get some poplar too: I've never done anything with either of them, so it'll be interesting regardless.

AndyT":1iyaqzk3 said:
I'll be watching with interest.

I hope you're patient, this might well make your Ash bed look like a formula 1 race :lol:
 
What's the floor space of your car boot?
Whats the largest tool you'd like to take?
I ask, because I once built a tool "chest" to fit exactly the footprint of a friends car boot that was 4" internal height (4.5" external). In it we housed a fairly extensive set of tools along with a nice table top bench. He was a jewellery maker and sculpture so he's tools were mainly hammers and chisels but I'd would say it was more than big enough for a few planes and saws.
It was wood side and bottom with a metal top. You lifted it out like a big skinny suitcase. I reckon we could have reduced the storage space and fitted legs to it to make a decent size table.
 
novocaine":2rhbgkst said:
What's the floor space of your car boot?
I don't know exactly, but quite big: it's a Passat Estate (obviously that could change in the future). Of course there will be lots of other things in there with the tool chest (clothes, self catering odds & sods, all the weird and wonderful things Carolyn takes everywhere...)

novocaine":2rhbgkst said:
Whats the largest tool you'd like to take?

The biggest overall is probably a (low-angle) jack plane. In case anyone is interested, the current tool list is visible at this link.

novocaine":2rhbgkst said:
I ask, because I once built a tool "chest" to fit exactly the footprint of a friends car boot that was 4" internal height (4.5" external). In it we housed a fairly extensive set of tools along with a nice table top bench. He was a jewellery maker and sculpture so he's tools were mainly hammers and chisels but I'd would say it was more than big enough for a few planes and saws.
It was wood side and bottom with a metal top. You lifted it out like a big skinny suitcase. I reckon we could have reduced the storage space and fitted legs to it to make a decent size table.

That's really interesting & a clever idea. I'm not sure it's right for what I want to make right now as I'd like something a bit more robust (that'll cope with me bashing out dovetails for boxes) and taller (to raise the height of the table it sits on). I guess fitting temporary legs would solve the taller issue, but they'd have to be quite substantial for it to be robust enough I think.

The design as it is so far has a footprint of about 540 × 315 mm; the height is still a bit uncertain, but probably about 450 mm at a guess. I might make something that size out of cardboard first so I can get a better sense of what it feels like/looks like. I'm planning to have drawers in the bottom bit (about 260 total height for all the drawers) and then a tool tote type thing in the top for the bigger stuff (planes, saws, etc). The tool tote thing will come off the top, leaving a 300 mm high base that will act as the workbench. That 300 mm height should be quite good for me as most work surfaces / tables etc are too low for my 1.98 metre (6'6") frame.

That's all very much subject to change.
 
Having said all that, I wonder if it's practical to have something in the way of removable legs? If I happen to go somewhere without much in the way of a robust table / work surface, having something I could attach to the bottom of the chest would be quite nice. If I want to work outside (easier clean-up!) then it's quite likely that any outdoor tables will be relatively flimsy.

I'm not sure how I'd do it in a way that was robust but also easily flat-packable though. :eusa-think:
 
My main "tool" when planing is my rock steady bench and work holding devices. How are you going to replicate those?
The Americans are very fond of pipe clamps for site work. I have seen several designs where the clamp doubles as a tote handle.
Your list omits a bench hook. An extra large one could enable you to utilise the dining table .
You might explore the Japanese idea of sitting on the floor with a very low work surface.

I assume that you are familiar with Japanese tool box designs?
I have made several of different sizes all are glue and dowel , no screws or nails.
One is rough for a travel kit, I use it as a hop up and a saw horse even though it's only 300mm heigh.
 
This sounds like a really fun project! I'll follow with interest.

(Although I like the idea, I'm not sure my wife would be very impressed if I started wood working on holidays as well as all of the rest of the time!!)
 
Lurker":9c0ieo2q said:
My main "tool" when planing is my rock steady bench and work holding devices. How are you going to replicate those?

My aim is to integrate as much of this as possible into the chest. "Rock steady" definitely sounds optimistic for something portable, but then I'm not planning on doing anything very large scale when travelling. I'm hoping that for light planing of boxes and such-like, the chest will be robust enough. I'll get wood down to a sensible thickness before going away.

Lurker":9c0ieo2q said:
The Americans are very fond of pipe clamps for site work. I have seen several designs where the clamp doubles as a tote handle.

That's an interesting idea, thanks.

Lurker":9c0ieo2q said:
Your list omits a bench hook. An extra large one could enable you to utilise the dining table .

Again I'm planning on this being built into the chest in some way.

Lurker":9c0ieo2q said:
You might explore the Japanese idea of sitting on the floor with a very low work surface.

It might have to come to that if there are no decent work surfaces, but I suspect I'd get very uncomfortable very quickly!

Lurker":9c0ieo2q said:
I assume that you are familiar with Japanese tool box designs?
I have made several of different sizes all are glue and dowel , no screws or nails.
One is rough for a travel kit, I use it as a hop up and a saw horse even though it's only 300mm height.

I've seen some of them I think, but I'll have a bit more of a dig now. Thanks for the suggestion.
 
NickM":2u3poauv said:
This sounds like a really fun project! I'll follow with interest.

(Although I like the idea, I'm not sure my wife would be very impressed if I started wood working on holidays as well as all of the rest of the time!!)

:text-lol:
 
One of the things I really like about your projects is a lot of the time you make interesting things just for the pleasure of design and learning. You don't really need the toolbox, but what the hell :lol:

Pretty much everything I make is purposed for the house - and that practical aspect at times makes it a trial. I look forward to seeing the design.

(Anarchist's tool chest was an interesting read btw I thought. I also enjoyed his book on workbenches. )
 
AJB Temple":jc1d0nu5 said:
One of the things I really like about your projects is a lot of the time you make interesting things just for the pleasure of design and learning. You don't really need the toolbox, but what the hell :lol:

Yep, that pretty much sums it up!

AJB Temple":jc1d0nu5 said:
Pretty much everything I make is purposed for the house - and that practical aspect at times makes it a trial. I look forward to seeing the design.

There are lots of reasons for the things I make, but part of it is lack of space in the house for anything I make. I'm also not very confident in design aesthetics and when I'm making tools and suchlike it doesn't really matter what it looks like. I'm fairly new to woodworking (I only started in the first lockdown) and as such I like projects that help me get better at the basics without ending up with some shoddily joined bit of furniture around the house!

AJB Temple":jc1d0nu5 said:
(Anarchist's tool chest was an interesting read btw I thought. I also enjoyed his book on workbenches. )

I'm only part way the the tool chest book (doing my normal thing of reading about 8 books at the same time and as a result not making much headway through any of them!) I'll keep an eye out for the workbench one though.
 
I wasn't going to post any pictures so early in the design thinking, but as I've been asked about work holding, I thought I'd share my ideas so far. All subject to change etc etc...

This is what I'm calling the "chest base":

chest_base_closed.jpg

There will be another part that sits on top of that (and is attached for transit) that contains the bigger tools like my LA jack plane and saws. I haven't started designing that really, but it's likely to be a tool tote that sits on top with a (removable) hinged lid that closes over the tote to cover it all up.

The front cover gets removed and it'll look like this:

chest_base_front.jpg

The gaps either side of the vertical dividing wall thing will be filled with drawers. To get a sense of scale, that's 540 mm wide, 315 mm deep and 300 mm high at the moment. The top and sides are 20 mm thick (in an attempt to make it reasonably sturdy as a "bench"). The divider is there to give a bit of extra strength in the middle; it's set over to one side so that my chisels will fit (oriented with the handles on the left or right) in the left-hand side.

The divider (and the drawers) are set back from the front face to give room for the front cover (more on that later) and to give a clear area at the front of the base that can be clamped down to a table.

The back looks like this:

chest_base_rear.jpg

I'm hoping that this construction (dovetails on the corners and narrower tenoned planks on the back) will be okay with wood expansion etc. The bits in between the tenoned planks are thin pieces sitting loosely in grooves. I was concerned that having a full-width back would cause problems.

All those holes are there to give me options for holding stuff. I've got various 3D printed cam clamps for holding stuff on the top with a free top surface (for surface planing) and I can also use other types of clamps through the 20 mm dog holes (either guide rail clamps or if I'm feeling flush I might buy one of the Veritas Surface clamps or an equivalent). I'll probably just live with the fact that the top drawers will get filled with sawdust etc!

The holes on the back are there to allow me to clamp boards vertically to work on the ends (e.g. when sawing dovetails or edge planing). My original plan had been to just put the chest on it's side/front, but I'd prefer not to have to empty it every time I want to do something like that.

Back in the first picture, I showed the front cover that hides the drawers (and keeps them closed in transit). That cover is quite deep and serves another purpose:

shooting_board.jpg

Obviously that shooting board doesn't have a cleat or anything (as it would stick out the front of the chest), so it'll get used either with clamps or by plonking it on the top of the chest and taking advantage of the fact that the handles for locking it in front of the drawers just happen to be in the right place to drop into a couple of the dog holes.

I haven't quite worked out the details yet, but I'd probably use the non-shooting side of the shooting board as a bench hook.

I suspect this bit is optimistic, but the slots in the shooting board are intended to allow insertion of a flat-packable mitre thing:

shooting_board_mitre_mode.jpg

As I've said many times, this is all very much a work-in-progress but I thought I'd share some of the ideas I've had so far.
 
Interesting project, a couple of thoughts, would it be possible to use the boot of the car as a stable base instead of legs? Or do you have a tow bar to connect to for stability?
Depending on how you would pick the box up has a bearing on which way round you do the dovetails.
What you’re thinking of doing is feasible by the way I once worked on one of my 18 inch high step ups (which looks a bit like a low trestle but has an 8 inch wide top) for three days alterng some internal shutters. Ian
 
Cabinetman":p87zpca5 said:
Interesting project, a couple of thoughts, would it be possible to use the boot of the car as a stable base instead of legs? Or do you have a tow bar to connect to for stability?
That's an interesting thought. I don't have a tow bar, but the boot might be an option. I guess it might restrict where I can work (e.g. if the only place to park a car is a little way from the nicer parts of the property), but otherwise I like the thought.

Cabinetman":p87zpca5 said:
Depending on how you would pick the box up has a bearing on which way round you do the dovetails.

That's a good point: it'd probably make a lot more sense to have them the other way round as I'll probably have handles of some sort on the sides and I don't want the bottom to fall off! I hadn't thought of that aspect at all: I'd just drawn them fairly arbitrarily. Thanks.

In practice I suspect it won't matter much (the drawers will be attached to the sides rather than the bottom so the bottom isn't really holding anything in). I need to try to get my head round what the forces would be when planing something attached to the top. At the moment I can't see how it would force anything apart (regardless of tail/pin orientation), but I might not have thought it through enough.

Cabinetman":p87zpca5 said:
What you’re thinking of doing is feasible by the way I once worked on one of my 18 inch high step ups (which looks a bit like a low trestle but has an 8 inch wide top) for three days alterng some internal shutters. Ian

That's good to know, thank you
 
BucksDad":xsuctjjb said:
Extend your project and make a small knockdown workbench as well? (Mini Moravian? :))

What an intriguing idea - I'd never heard of Moravian workbenches. I think I might leave that for another day - it looks like a very ambitious project for my skills and it would have to be a lot smaller to be suitable to put in a car (and to be liftable: according to the article I read on line, the top on its own weighs 47 kg!). A lot of design thought would be needed to get it to be a lot smaller when packed down but still tall enough to be comfortable for me to use.

Food for thought though...
 
Since I've already started sharing pictures, this is what I'm currently thinking a drawer (in this case for chisels, in alternating directions as the handles are 35 mm diameter) will look like (with daunting half-blind dovetails included!):

chisel_drawer.jpg

Here it is in context (I've only modelled one of the drawers in detail; the others are just there to give the general idea of size):

chest_base_with_drawers.jpg

Bottom drawer is 57 mm high (that's the total; the internal storage height is about 9 mm less than than); top drawer is 47 mm high. In between drawers are in between sizes!

chest_base_with_drawers_front_view.jpg
 
That's a drawer for 7 chisels. Hmmm. I think you are presently designing a box for stuff you've got rather than what you need for a portable set. I doubt you actually need more than two chisels, unless you plan to do carving (in which case the tool set needs to be flexible to accommodate different project needs).

Design has to follow function.
You can't establish function unless you're clear what you are likely to make. Eg fancy boxes.
Different tools may be needed depending on that.
Your plan is to take pre-dimensioned wood, rather than buy locally and convert it?
You could consider embracing Japanese tools. They lend themselves to a radically different approach.
Things like saws are lighter and smaller and require less workbench stability.
Bench stability is often achieved by sitting on it - basically a plank with feet. Could be incorporated into a fold up design.
 
AJB Temple":1c3gkdt5 said:
That's a drawer for 7 chisels. Hmmm. I think you are presently designing a box for stuff you've got rather than what you need for a portable set. I doubt you actually need more than two chisels, unless you plan to do carving (in which case the tool set needs to be flexible to accommodate different project needs).

There's a bit of a history (what, already?!) behind the drawer for 7 chisels. My list of which chisels to take started as 4 definite and another 2 maybe. The four sizes were 3 mm, 6 mm, 12 mm and 18 mm. I'm sure I could get away with fewer, but those seemed a sensible minimum. The extra two would be two more small ones (e.g. 4 mm and either 8 mm or 10 mm) as it's at the smaller sizes that I find the extra "resolution" handy.

I then looked at the shape and size of the working surface I wanted (the top) and, after mucking around with the design a bit, I ended up with a drawer depth that happened to be pretty much perfect for 6 chisels (based on the 35 mm diameter handles). Then, as I was modelling the drawer, it occurred to me that the space would be more efficiently used if I alternated the orientation, which resulted in 7 spaces. I don't necessarily have to fill the drawer with chisels, even if there are 7 spaces.

This is what I think I need for the projects I'm aiming to do. I think it's a fairly minimal set, but you're welcome to point out where I'm being ridiculous!

I'd rather make the box too big and have lots of empty drawers than make it too small and end up carrying a bag of extra tools.

AJB Temple":1c3gkdt5 said:
]
Design has to follow function.
You can't establish function unless you're clear what you are likely to make. Eg fancy boxes.
Different tools may be needed depending on that.
Your plan is to take pre-dimensioned wood, rather than buy locally and convert it?

Yes. Being able to buy locally depends on where we're staying and whether there's a local supplier. Converting it while on holiday will produce a lot more mess than just cutting dovetails or whatever and may (if I want to resaw it) require more robust clamping options than will be available with this chest. It feels like it'll make more sense to do that in the vice at home.

As for what I'm making, I'd like to keep it flexible but it'll be small things. Most likely boxes (I'm not sure about the "fancy" bit yet :lol: ), but I'll also probably play with other ideas on a similar scale. I'll probably also do a fair bit of practice joinery: for example on my next holiday (which will come before I make this box), I might try making some half-blind dovetails.

AJB Temple":1c3gkdt5 said:
]
You could consider embracing Japanese tools. They lend themselves to a radically different approach.
Things like saws are lighter and smaller and require less workbench stability.
Bench stability is often achieved by sitting on it - basically a plank with feet. Could be incorporated into a fold up design.

I use Japanese saws already and find they generally suit me better than the Western ones. I'm not convinced my back would like a lot of the sitting positions that Japanese woodworkers use, but it might be something to think about.

Thanks for the thoughts: much to ponder on.
 
a 1/2" (lets call it 12mm) dovetail can be carved with a 1/4" (lets call it 6mm) chisel, in fact I'd suggest you might be better off. if you've got the room for a 12mm mortise, you've probably got the room for an 18mm mortise. or plan ahead, take either or and change out the tool depending on the planned task.

so thats 1 less chisel. I'd also consider not bothering with the 3mm for the most part unless you are planning a very small box, in which case swap it out for the larger one.

keep the 3/4", it's just about big enough for paring a small tenon.

2 chisel, changed out depending on your plan for whilst you are away.
 
novocaine":1vawvo6d said:
a 1/2" (lets call it 12mm) dovetail can be carved with a 1/4" (lets call it 6mm) chisel, in fact I'd suggest you might be better off. if you've got the room for a 12mm mortise, you've probably got the room for an 18mm mortise. or plan ahead, take either or and change out the tool depending on the planned task.

so that's 1 less chisel. I'd also consider not bothering with the 3mm for the most part unless you are planning a very small box, in which case swap it out for the larger one.

keep the 3/4", it's just about big enough for paring a small tenon.

2 chisel, changed out depending on your plan for whilst you are away.

I completely understand that I can cut down the number of chisels, but do I need to? The chest size is partly dictated by having a decent work surface on the top. It'll go in the car so weight is arguably academic (as long as I can lift it and I doubt a couple of chisels will be the last straw in that case).

The 3 mm chisel (call it 1/8" if you want, but it's a Narex metric sized chisel) is really useful so I wouldn't want to get rid of it. I'm not planning to take any form of grooving tool (e.g. Stanley #45), so cutting a groove for a box base would probably be done with chisels and router plane. If it's a blind groove (in a dovetailed box), then the 3 mm chisel will be really useful for that.

Having an extra chisel can save a bit of back and forth as well - rough chop the dovetails with one chisel and then swap to a different one for the final cuts; then sharpen both at the same time rather than sharpening part way through.

If I were trying to come up with a kit that I can carry up to the top of Blencathra I'd be much more worried about each individual tool, but for what I'm planning I don't think it's that critical. If I start talking about packing a #7 and a #55 (or a 1/2" power router for that matter) then I'll be more worried!
 
AJB Temple":2y8bq1rr said:
You could consider embracing Japanese tools. They lend themselves to a radically different approach.
Things like saws are lighter and smaller and require less workbench stability.
I'd agree on that except for chisels. There's much 'hype' on t'interweb about them and I've used them extensively for years, but they were booted well into the long grass once I got hold of a set of Narex 'Richter' jobbies. My most recent acquisition is a sumitsumbo but I haven't worked out how to use it yet :lol: - Rob
 
Woodbloke":3cg0tmss said:
AJB Temple":3cg0tmss said:
You could consider embracing Japanese tools. They lend themselves to a radically different approach.
Things like saws are lighter and smaller and require less workbench stability.
I'd agree on that except for chisels. There's much 'hype' on t'interweb about them and I've used them extensively for years, but they were booted well into the long grass once I got hold of a set of Narex 'Richter' jobbies. My most recent acquisition is a sumitsumbo but I haven't worked out how to use it yet :lol: - Rob

:text-lol:

I've periodically looked at the Japanese planes, but the amount of work to set them up before you can use them the first time has put me off. I watched the video series ("How to tune up a kanna") by Sumokun but the fact it's an hour and half of video on what you have to do on a brand new plane before it's ready for use was a bit daunting!

My other half would probably suggest that I already have enough planes anyway :eusa-naughty: :? :lol:

I'd never even heard of a sumitsumbo...
 
Dr.Al":1aahiwe1 said:
I've periodically looked at the Japanese planes, but the amount of work to set them up before you can use them the first time has put me off. I watched the video series ("How to tune up a kanna") by Sumokun but the fact it's an hour and half of video on what you have to do on a brand new plane before it's ready for use was a bit daunting!

My other half would probably suggest that I already have enough planes anyway :eusa-naughty: :? :lol:

I'd never even heard of a sumitsumbo...

Unless you know exactly what you're doing, I'd advise staying well away from Japanese planes. Using them is fine, but setting the little bar stewards up is a 'black art'. Mike Huntley (ex ed. of F&C) uses them extensively and once showed me how it's done; it ain't easy - Rob

Edit- Workshop Heaven is your friend
 
Just picking up on the bench-free, low-down working methods, you might find some of the recent YouTube videos by Rex Krueger worth a look. He's often demonstrating the use of a minimal tool kit alongside bench and vice-free working. For instance, he shows a pair of little Japanese style saw horses and how to shoot ends just by holding the timber vertically.

I know you already have your brilliant mini-bench/clamp to use and will probably favour something more jigged than freehand, and I am also sure that your own inventiveness will show through. So I am not saying 'look at this guy and copy him' but 'watch him and see if his methods suggest anything to you.'

I also understand we all have our own strong preferences as to which YouTubers are watchable, but I do think that Rex is one of the better ones, especially for beginners or those on a tight budget. He has a teaching background and I think that shows.
 
AndyT":1sng4uwj said:
Just picking up on the bench-free, low-down working methods, you might find some of the recent YouTube videos by Rex Krueger worth a look. He's often demonstrating the use of a minimal tool kit alongside bench and vice-free working. For instance, he shows a pair of little Japanese style saw horses and how to shoot ends just by holding the timber vertically.

I know you already have your brilliant mini-bench/clamp to use and will probably favour something more jigged than freehand, and I am also sure that your own inventiveness will show through. So I am not saying 'look at this guy and copy him' but 'watch him and see if his methods suggest anything to you.'

I also understand we all have our own strong preferences as to which YouTubers are watchable, but I do think that Rex is one of the better ones, especially for beginners or those on a tight budget. He has a teaching background and I think that shows.

Thanks Andy, that's really useful. There are only a few youtubers I rate; I haven't watched any of Rex Krueger's videos so I'll have a look.
 
Re tools. I looked but have now forgotten if you had all of these....

150mm rule is insufficient. Also a tape measure is very handy if you are buying wood locally.
Small combination square may be enough but I would tend to have a bigger square and probably some kind of marking gauge (the rotary wheel ones are small and good).
You want tape - look up blue tape method for doing dovetails (bearing in mind you are gaining experience)
Some sort of sanding block and riffle or rasp is often handy with fine work
Pair of dividers is super useful for fine work and taking dimensions off rods
Small hand drill is quite essential and a few drills / bits (eg for countersinks, plugs, dowelling)
Did you have a small wooden mallet (or brass head carving mallet) in there? Edit - yes.
Sheet of wet and dry as fall back for touching the chisels up.
Bottle of animal glue or whatever. (Reversible if you use animal or fish glue)
Can't remember if I saw any clamp or holdfast in your list. At the very least, holdfast and wedge. Edit - yes
 
AJB Temple":pdljnkcp said:
Re tools. I looked but have now forgotten if you had all of these....
Thank you! Always nice to get a second opinion
AJB Temple":pdljnkcp said:
150mm rule is insufficient. Also a tape measure is very handy if you are buying wood locally.

Yes, you're probably right. I had a 300 mm one on the probably list, but I've moved it to the definites. It's not like it takes a lot of space. I won't be buying wood locally, so I don't think a tape measure is needed. I keep one in the car all the time anyway, so if I did need one I'd have one available.

AJB Temple":pdljnkcp said:
Small combination square may be enough but I would tend to have a bigger square and probably some kind of marking gauge (the rotary wheel ones are small and good).

Marking gauge is already on the list but I've added a bigger square too.

AJB Temple":pdljnkcp said:
You want tape - look up blue tape method for doing dovetails (bearing in mind you are gaining experience)

That's already on the list (under Consumables). I've used the blue tape thing on all my recent dovetail attempts.

AJB Temple":pdljnkcp said:
Some sort of sanding block and riffle or rasp is often handy with fine work

Interesting - I hadn't thought about that. I'll add it to the list although I'll leave it on the maybes until I've thought about it a bit more. It's probably a good idea if space allows and I can visualise what I'd use it for.

AJB Temple":pdljnkcp said:
Pair of dividers is super useful for fine work and taking dimensions off rods

That's already on the list; I've added a pocket-sized vernier caliper as well as that can be very useful and takes very little space.

AJB Temple":pdljnkcp said:
Small hand drill is quite essential and a few drills / bits (eg for countersinks, plugs, dowelling)

This is on the list but in a not-very-decided way. I don't have anything you'd call a "small hand drill". My options here are either a brace (which isn't small) or my little 12 V Bosch Flexclick drill (which is small but isn't a hand drill). The batteries on the flexclick drill last for ages and I have two, so I wouldn't need to bother with a charger.

AJB Temple":pdljnkcp said:
Did you have a small wooden mallet (or brass head carving mallet) in there? Edit - yes.

Yes. If it fits I'll probably just take my soft-faced Thor thing, but I have other alternatives).

AJB Temple":pdljnkcp said:
Sheet of wet and dry as fall back for touching the chisels up.

I'm not sure what this adds really, but I also don't want this to turn into a sharpening thread and get locked so I'll leave it at that :lol: :? :lol: :lol: :lol:

AJB Temple":pdljnkcp said:
Bottle of animal glue or whatever. (Reversible if you use animal or fish glue)

I'll have to try that out before I go on holiday: I've never used it before :? :eusa-think:

AJB Temple":pdljnkcp said:
Can't remember if I saw any clamp or holdfast in your list. At the very least, holdfast and wedge. Edit - yes

It's in the list, but I'm not really sure what type. I'll need something to clamp the workbench/tool chest down to whatever there is I can clamp it down to and I'll need various things to hold stuff to the bench. I'm quite tempted by a Veritas Surface clamp (or making something similar). Alternatively, guide rail clamps could work and they're fairly small. Holdfasts would require taking all the drawers out, which isn't ideal (guide rails clamps would need at least the top drawers out).

I've also got a load of cam clamps & wedges (a bit like this set but 3D printed and in lots of different thicknesses), which are quite good for holding stuff with full access to the top surface. They're not as robust as a proper clamp though.
 
AndyT":33bpfm9s said:
Just picking up on the bench-free, low-down working methods, you might find some of the recent YouTube videos by Rex Krueger worth a look. He's often demonstrating the use of a minimal tool kit alongside bench and vice-free working. For instance, he shows a pair of little Japanese style saw horses and how to shoot ends just by holding the timber vertically.

I know you already have your brilliant mini-bench/clamp to use and will probably favour something more jigged than freehand, and I am also sure that your own inventiveness will show through. So I am not saying 'look at this guy and copy him' but 'watch him and see if his methods suggest anything to you.'

I also understand we all have our own strong preferences as to which YouTubers are watchable, but I do think that Rex is one of the better ones, especially for beginners or those on a tight budget. He has a teaching background and I think that shows.

I've watched one of his videos (about the low sit-on bench and the Japanese saw horses) and it was definitely interesting, so thanks for the recommendation. I've added a few more to my "Watch Later" list, so I'll work through them gradually. The idea of shooting the ends of boards accurately while holding them vertically seems extremely daunting so I think I'll stick with a shooting board for now!

I do like his little saw bench though. I don't think I'd make it exactly the same: for a start I like the idea (from @BucksDad further up this thread) of a knock-down bench, so it'd be interesting if I could combine the two ideas. I also wonder if I could make something that I could attach my tool chest to the top of such that when I sit on it to provide rigidity to the sat-on bit it also adds rigidity to the workbench-on-toolchest bit. Very interesting ideas...

His little saw horses look like an idea to try out too. They should be trivial to make and then I can see how much my back aches when I use them :eek: :)

Thanks (yet) again!
 
Watching with interest.

Having made a wheel from scratch in a field with reproduction 10C tools, have you thought about a roman style workbench https://www.popularwoodworking.com/chri ... workbench/

We find it very flexible for woodworking, holding bone and antler for comb making, basically anything that needs holding to work on it with sharp tools.
 
Stargazer":lcjocx37 said:
Watching with interest.

Having made a wheel from scratch in a field with reproduction 10C tools, have you thought about a roman style workbench https://www.popularwoodworking.com/chri ... workbench/

We find it very flexible for woodworking, holding bone and antler for comb making, basically anything that needs holding to work on it with sharp tools.

Blimey, I'm learning about all sorts of new types of workbench on this thread! Thanks for the pointer
 
This won’t solve your problem. Just exacerbate it.

I work in two locations. For a while I packed up tools every time, carried them out to the car, and brought them back. Even so there would always be a moment when one realised that the job one had in hand could be done more easily with a tool at the other location. Wildly frustrating. You are never going to win that game.

Take your minimum tool set, and work around it. You’ll never anticipate everything. And you can always make any tools you don’t have – you’re only doing it for fun after all.

Oh, and try this for a brace. I’ve got one. It’s very good, and small.

bohrwinde-kuri-kuri-312200.jpg
 
I love the stripped-back simplicity of that brace.
 
I am not sure if the following pictures answer your questions, but they may inspire some ideas.

These storage items were inspired by, firstly, a need to consolidate hand tools into a cabinet under my work bench. I am anticipating downsizing once I retire, and the cabinet aims to assist in determining which are the important tools to keep - after 30 years as a serious amateur furniture maker, I have accumulated enough for a few lifetimes! Many of these tools have sentimental value, and are difficult to sell or give away.

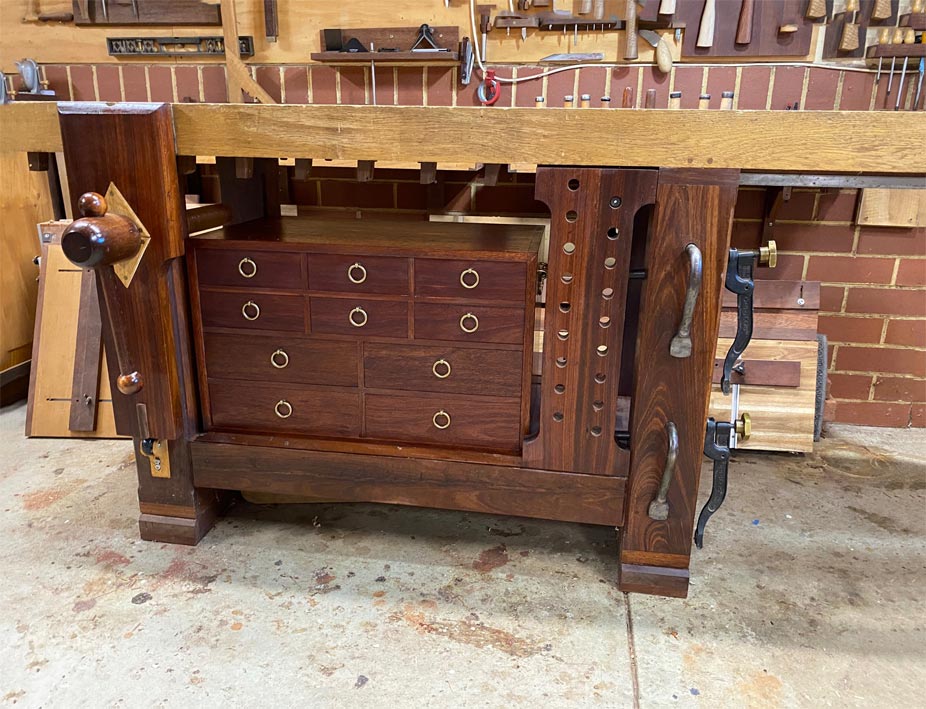
This is the chest under the bench ...

bench1.jpg


Each of the drawers has a sliding top panel, which means that there is double storage ...

3.jpg


Sliding back this panel ...

4.jpg


Just one more (there are 10 drawers!) ...

Kyohisa slicks ...

3.jpg


Slide back for Kyohisa oire nomi ...

4.jpg


I will not bore you with more drawers. This is just to convey the concept.

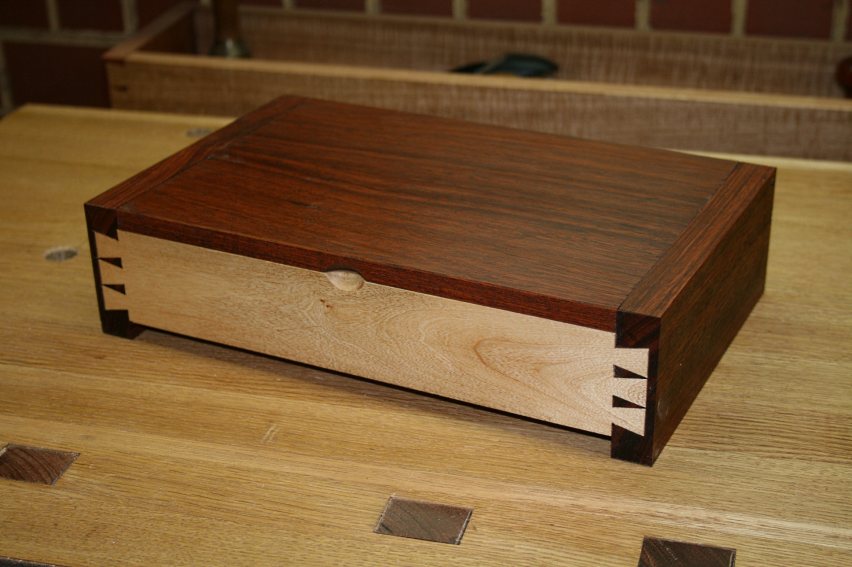
Now I still had tools over, and one of my needs was to create travel boxes for wood show presentations and teaching workshops. I came up with a set of 4 different boxes. These were (1) easier to fit into my car than a large chest, and (2) provide examples of joinery for the audience. Two are mitred through dovetails, one is half-blind dovetails, and a fourth is mitred and sized.

Chisels (range from 1/8" to 3/4", all of which are needed for dovetailing) ...

4.jpg


The chisels are held with rare earth magnets ...

8.jpg


Two dovetail saws, one can double as a tenon saw and the other as a fine crosscut saw ...

1.jpg


6.jpg


Just one more - marking tools ...

BoxesForTravellingTools_html_4a8b0.jpg


16.jpg


Hope this helps a little.

Regards from Perth

Derek
 
Thanks Derek, that is really quite awe-inspiring.

I like the ideas of the sliding tops for keeping multiple levels of thin-ish things in a single drawer: that's very neat.

I can say with some certainty that my tool chest (when it eventually appears) will look nowhere near as good as anything in your pictures :lol:
 
Derek, that is easily the best tool bench and tool case I have ever seen - better than my furniture! I've seen it before elsewhere, but I still admire it. The fitted drawers are superb. Interesting to see you favour the Veritas saws (I use them too - good value).
 
Back
Top