• Hi all and welcome to TheWoodHaven2 brought into the 21st Century, kicking and screaming! We all have Alasdair to thank for the vast bulk of the heavy lifting to get us here, no more so than me because he's taken away a huge burden of responsibility from my shoulders and brought us to this new shiny home, with all your previous content (hopefully) still intact! Please peruse and feed back. There is still plenty to do, like changing the colour scheme, adding the banner graphic, tweaking the odd setting here and there so I have added a new thread in the 'Technical Issues, Bugs and Feature Requests' forum for you to add any issues you find, any missing settings or just anything you'd like to see added/removed from the feature set that Xenforo offers. We will get to everything over the coming weeks so please be patient, but add anything at all to the thread I mention above and we promise to get to them over the next few days/weeks/months. In the meantime, please enjoy!

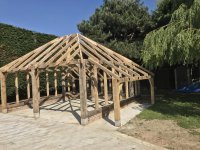
Mike's greenhouse and potting shed (finished)

It's looking great Mike. The brick wall will help provide some thermal mass.

Are you planning to grow anything in particular up the wall?
 
Yes, a grape vine. There is a hole in the end wall (near the hedge), so we'll plant the vine outside and train it through the hole in the brickwork and up the back wall. In a year or two it should provide most of the shading we need in the summer. There's also talk of a peach in a pot.
 
I do like a grapevine, a friend has one and like you planted it on the outside, unfortunately the hole is not now large enough and the brickwork has been pushed out of line all over the place. I would suggest making the hole much larger than you might think and pack around the young vine with some soft removable packaging. Ian
 
No, Jon. I will be sealing with a mastic in due course (after painting), but this is only a greenhouse, not a conservatory. Have you finished yours yet?
 
Hi Mike,
I'd like to say yes, the orangery is all done and dusted but I'd be lying. Although fingers crossed this weekend I'll reach a momentous occasion, the French doors will go in to finally make me a) watertight and b) secure which will allow me to knock through into the main house. That'll just leave ceiling, plastering and flooring so it feels like the home straight (although the same can't be said for the rest of the house).

The last year has been incredibly difficult, my workplace has furloughed something like 85% of it's staff, but that has meant an incredible workload for the 15% still on site of which I'm one. It was quite difficult last year to find time to work on the house, which ultimately resulted in another winter without heating and gaping holes to the outside which was tough mentally. Despite all that though, I thank my lucky stars all my family have come through unscathed.

I will get round to updating my thread soon, but there's no WIPS, all effort was put into just getting things completed.

Jon
 
Well, the roof is on. No photos because it got too dark, but I'll update tomorrow.
 
I think we'd left it about here:

T6XTYid.png

It got a quick slap of mist coat:

4VjENAz.png

Then I starting setting out the roof:

jWkv0uP.png

At the top of the posts on the walls I had cut a vertical prior to erection, knowing that this would be almost impossible to do once it was fixed to the wall:

QvbxdgY.png

This enabled me to make the top joint for the gable rafters relatively easily:

z2JtFWC.png

YFmrtnh.png

As soon as I had the height and angles of the roof, I could do the plate supporting the top end of the rafters. At 5.5-ish metres long, it was too long to do in one piece, so time for a scarf:

wDn3bRG.png

w79qgv6.png

Here it is just clamped at the ends, showing just how strong a decent wedged scarf is:

xNX30VB.png

The wall needed finishing. A brick on edge capping course, with the mortar raked back out of the bed joint to facilitate the leadwork:

x91IKua.png

And a quick cold frame whilst I had the mortar mixed up:

89lGO2k.png

Out of order, because I allowed a week for the mortar to harden up, but then the lead. I divided it up into 2m lengths, dressed it into shape, then fitted it, jammed in with the little clips in the 3rd photo:

iVRelCg.png

3aO6ZDy.png

JAcG8rF.png

iG270DZ.png

BUqK2q0.png

I made all the rafters from 120x45 Douglas Fir (cut out from the big planks weeks ago). Here is the top end:

KGwEzgI.png

And the bottom, where it meets the wall plate (it's upside down here):

lgQXlPV.png

QOBYMlT.png

First dry fit, before they were all taken down for painting:

1pbZeXy.png

Right, now for some windows. There are 9 in all, plus the rooflights. So I cut 18 stiles and 18 rails to length:

uCdBqvC.png

yfyquhW.png

I tried out various joints on some scrap. A double dovetail was just way too much work, and a mitre to the upstand behind the rebate took away a reference:

YVrVb6T.png

This is what I settled on:

SsPWjbj.png

Now, I know that windows aren't generally dovetailed, but I am not wanting to revisit this building in my lifetime, and with it being top hung those joints are going to be under a lot of strain. As I've said before, if I wasn't working on this I'd be working on something else, so it isn't an issue to take a little longer over something like this which I consider important.

Before starting on the joints, though, there were lots of rebates to cut on the router table:

eHIuIHP.png

This produced lots of great kindling:

f009pA6.png

Five arrises per 36 pieces of wood is more work than you'd imagine:

mDro7du.png

tzYKVjp.png

The actual production run of joint making was part hand-tool work, and partly on the bandsaw:

ugIcYwP.png

lojZrig.png

isdPVEE.png

35IejFp.png

aYuS2je.png

mAi3MZT.png

As the tails were cut individually, they each had to be offered up to the the rails so that each socket could be cut to fit, in much the same way you would making a drawer or a box except the pieces were too long to do across the bench, and had to be done along it instead:

AjoCCEL.png

nxSvxkN.png

rgG0EpD.png

I used a coarse (9 or 10 TPI) rip-filed tenon saw for the long-grain cuts:

SiVpLvc.png

F36ZbCC.png

NatxvpT.png

2e5yVv9.png

I took this one to show my standard marking out format. If the two letters aren't both on the same face then I've got something wrong:

Xz1CfEe.png

Dry fit, then glue up, then clean up:

uswDFpM.png

Pinch sticks to check the diagonals:

QfznzgD.png

3ar6UJ3.png

sHUhvmG.png

More later. It's lunchtime!
 
I missed this step earlier. These are little sockets in the side of some of the rafters to take a trimmer to form the roolight openings:

7HB8Oqf.png

There are a couple of awkward little joints on the gables. These are extremely difficult to mark accurately, so I simply cut them over-long, then pared back the shoulders until they allowed the gable rafter to sit down nicely into position:

oXmdop0.png

UjDkDzw.png

Time to do a little planing:

XqiW5hX.png

The woody is a scrub plane, with aggressive curve to the blade and an open throat. Here's what they did:

6mVLdDW.png

That's to allow the glass to bed nicely onto the wall plate, and overhang it. That was the final hurdle before fitting the bulk of the roof permanently in place:

wnQOrWU.png

3JyLvHS.png

You can see that the eastern gable rafter isn't done yet. I'm working on those two mullion joints later. When that's done, that will be the structure complete, and I'll move on to the secondary pieces (rooflight upstands, flashing support, doors, fitting the windows, then finally, glazing). In the meantime, there's lots of painting to do, which isn't my department.
 
The dividing line between carpentry and cabinet making is looking a little blurred these days!
 
Thanks Andy. Funnily enough I said much the same thing to my wife a day or two back........that this was more like a big piece of furniture than a small building.
 
Very nice quality work. You've done it properly and it will last a long time. Better quality job than I would have done I fear. It remains the case therefore that my wife shall not see these pictures, as she will get the idea that men can do this stuff.
 
AJB Temple":2gbnl7j3 said:
........ my wife shall not see these pictures........

Too late, I sent them dir.....oh hang on, I did that joke already. :D
 
MattS":1z3v4l53 said:
Amazing work as ever,

Thanks Matt.

quite an estate of handcrafted buildings you have now :text-bravo:
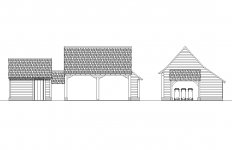
Work starts in a week or two on a new garage and bike shed. Here's a sneak preview:

Garage & bike shed elevs.jpg
 
Give me a buzz next time you plan to go past, Dave, and I can give your carving tools to you.
 
Interesting. You like simple roof shapes ;)

Interesting solid braces on the garage front posts.

I see you have the same bin issue that we do. It's out of hand now: 4 wheelie bins, food refuse bin, two boxes for cardboard and paper, little bin that I've forgotten what it's for. Bin bunker is the answer. Basically the council has relocated refuse storage to people's houses.
 
AJB Temple":cb3mcfzs said:
Interesting. You like simple roof shapes ;)

I drew this originally with a granny hip on one end, but it's such a small roof that it just looked like overkill, and it didn't really work with the catslide.

Interesting solid braces on the garage front posts.

My planning permission is for the normal arched braces, but the thing is, there are a million and one cartlodges like this around here, and they are all much of a muchness. I'm just fiddling about looking for some minor variations which make this one a little different.
 
Would be interesting to see the granny hip drawing Mike. I like interesting roof lines and prefer it when buildings are not too uniform. I like the little walkway to the bike shed. Adds interest.

When I did my first outbuilding at the present house I made the roof quite complicated for DIY. (Photo below). Looks nice when finished, but is difficult for DIY tiling as there are a lot of cuts and fiddly bits, so I got professional roofers in to tile it. I don't like heights so I will only tile over sheeting and with help, as I was born clumsy.

Although I had worked in oak before, I hadn't fitted compound mitre roof joints previously, and doing this on my own, using my little scaffold tower on the inside, especially getting accurate enough measurements, was a real challenge for me. A simple pitched roof is a great deal quicker (for me anyway - you are an architect so piece of cake for you :D )

This one has a catslide at the back obviously and and afterthought log store. The framing is not finished here - log store in particular was a temporary erection in this photo and I remade the rafter / plate joins and some other small mods. I should post a (past) WIP up really as I have the snaps including of my numerous mistakes. Just need a drag and drop forum 8-)

IMG_1039.jpeg

I shall follow your build with interest. If we were nearer I would offer to help.

Adrian
 
Apologies. This picture was the right way up when I uploaded it. Mods. please would you fix it - I have tried and it displays upside down still.
 
AJB Temple":2lphy22p said:
Apologies. This picture was the right way up when I uploaded it. Mods. please would you fix it - I have tried and it displays upside down still.

Done.

If you have this issue again what I do is download the pic, open in preview, rotate it all the way round to the correct orientation (even if, for you it already is), save it then upload.
 
That's really nice, Adrian. Our local vernacular doesn't have full hips very often, and full hips all round on this building, which is nearly square, would have produced a pyramidal roof, which I really, really dislike. What is at the feet of the posts?

Here's how I drew it with a granny hip:

g'ge & bike shed 2.jpg
 
Thanks Mike. I quite like the granny hip design.

At the foot of the posts are milled granite blocks. These have steel locating rods through the centre. I bought a job lot ages ago in two different sizes. Usually I prefer them to making brick plinths. That said, your bricklaying skills are better than mine.

Thanks mods for fixing the picture. (Mark, as I understand it, what you are saying is "just post it upside down" :) )
 
Garage looks good, and a separate bikeshed, very nice. Is the little adjoining roof purely for visual interest, I assume it won't have a second entrance into the bikeshed?
 
MattS":3a95gvjd said:
Garage looks good, and a separate bikeshed, very nice. Is the little adjoining roof purely for visual interest, I assume it won't have a second entrance into the bikeshed?

It's a little firewood store. It's there as a result of the grey area for building control ....the 30 square metre thing. Separating the bikeshed and the garage means both are under 30 sq. metres, and thus neither need building control's involvement. If I put a floor through under the wood store, then it may well be counted as one building, and the whole lot would need controlling. However, I am hopeful that the logstore roof won't have the same effect, and if it does, I'll simply take it down.
 
AJB Temple":wtw4lnso said:
.....At the foot of the posts are milled granite blocks. ....

I like them. You do see them on old buildings, but often with sloped slides. Around here, you see the same shape (sloped sides) replicated in concrete, even in centuries old buildings. It's the centre post I am thinking about.
 
Yes, I have some with sloping sides as well that I sourced in Kent somewhere. Possibly Roundwood of Mayfield - can't recall offhand. These are straight sided and pinned in both ends (or all through). I didn't give much for them. Very heavy.

I did another building nearby similar to this, except I changed the style of roof framing to make it easier to erect, and that one has the oak plates and side posts sat on a dwarf brick wall, and the centre posts sat on splayed stone staddles. The oak posts are bigger than the one pictured.
 
AJB Temple":2zflh65c said:
I understand it, what you are saying is "just post it upside down" :) )

No, I found you need to rotate the offending pic a full 360 degrees; when it's then posted it's in it's normal orientation.

I drag my pics to the 'Desktop', then click on them which is then the 'Preview' mode, rotate them 360 deg and then save back onto the 'Desktop' ready to upload to the relevant thread. It's a bit of a faff but seems to work - Rob
 
Sayin' nuffink.

Anyway, upside down pictures are very artistic and also hide the bodges.
 
Back to the greenhouse....

Having got the structure up and the window frames made, it was time to get on with the secondary joinery. Specifically, the rooflight linings (upstands), the rooflights, and the doors. I had wood set aside for the doors, and it had been carefully selected, but the rest was to be made from some pretty thin pickings from the left-over pile. I had to laminate up then resaw for some of the elements of the rooflight upstands:

Rv3uZNb.png

There are two of these. They re simple boxes which sit just inside the rafters to stick the rooflights up above the line of the rest of the roof. They feature quick-'n-dirty dovetails (ie no setting out or marking of the tails, just eyeball it and get sawing):

hwtRxhQ.png

I also did the door frame (it's more a lining than a frame). With long lengths of wood, dovetails are really awkward to mark out, so I built a shoulder in to enable a firm location of the tail board against the pin boards:

OHjDAaH.png

More quick-'n-dirty dovetails:

eAMuLpy.png

48IYCp1.png

Here are the rooflight upstands and the door lining together after gluing and cleaning up:

q3ncA41.png

Once the upstands had been made, the rooflights themselves could be mesured and made. I allowed a generous tolerance all round, and made the casements from 45 x 45 in much the same way as the window frames:

8IdBZZT.png

I then added a central mullion (these rooflights cross over a rafter):

EvUF8PV.png

I ballsed up one of the corner joints, and so had to splice a bit in:

QXBjuJn.png

Painting isn't my department:

8iR4W8V.png

On to the doors. This is the final piece of joinery in the building, and it's perfectly easy to stuff up a pair of doors so I approached with great caution. Firslty, I planed the stock to perfection:

5QN1uel.png

Then I ran rebates on the router table:

LeVjWrs.png

Then after carefully laying out dimensions on one of the stiles, I started to chop out my first mortise:

lkciNJq.png

C3JhWmj.png

zvLocpA.png

m3Pls3h.png

I cut those tenon cheeks on my bandsaw, but the trial fit of the joint showed up an issue. I had spend ages setting everything up (I don't normally do joints on the bandsaw), but the tenon cheeks came out slightly out of parallel with the faces. Turns out I had a slightly dished table, and so whilst the blade read as 90 degrees to the table, and the fence was also 90 degrees to the table, they weren't parallel with each other. I am so tired of this stupid machine.

I swapped over to another method for the rest of the tenon cheeks:

kRQQ0O5.png

I left a little upstand at the end of the board as a reference for my router (I was very grateful there was no snipe, otherwise this cunning plan, Baldrick, would have been useless:

YTxdfTC.png

Shoulders were cut by hand (the radial arm saw simply isn't accurate enough):

rUX97Bq.png

One door took a day. I've got the other one to do, which is already set out so there'll be no thinking-time. I'm aiming for about a 10mm rebate at the meeting stiles, but I'll know more when the second door is done:

QxHhJnh.png
 
Back
Top