-
Hi all and welcome to TheWoodHaven2 brought into the 21st Century, kicking and screaming! We all have Alasdair to thank for the vast bulk of the heavy lifting to get us here, no more so than me because he's taken away a huge burden of responsibility from my shoulders and brought us to this new shiny home, with all your previous content (hopefully) still intact! Please peruse and feed back. There is still plenty to do, like changing the colour scheme, adding the banner graphic, tweaking the odd setting here and there so I have added a new thread in the 'Technical Issues, Bugs and Feature Requests' forum for you to add any issues you find, any missing settings or just anything you'd like to see added/removed from the feature set that Xenforo offers. We will get to everything over the coming weeks so please be patient, but add anything at all to the thread I mention above and we promise to get to them over the next few days/weeks/months. In the meantime, please enjoy!
You are using an out of date browser. It may not display this or other websites correctly.
You should upgrade or use an alternative browser.
You should upgrade or use an alternative browser.
Post a photo of the last thing you made...
- Thread starter TrimTheKing
- Start date
thetyreman
Nordic Pine
can I ask where do you get the glass rob? I know it's not cheap, very nice job on the frames as well.
Woodbloke
Sequoia
I get it from a local picture framer in town; I've tried glaziers and they look at you with a sort of blank expression and say they've never heard of the stuff. You're right, it's not cheap but once you've done one picture in it you'll never go back to ordinary picture glass - Robcan I ask where do you get the glass rob? I know it's not cheap, very nice job on the frames as well.
thetyreman
Nordic Pine
AJB Temple
Sequoia
- Joined
- Apr 15, 2019
- Messages
- 7,720
- Reaction score
- 1,200
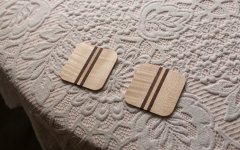
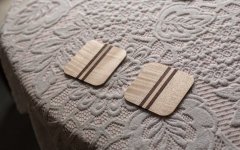
Nice. But doesn't beer and condensation off the glass destroy the French polish more or less instantly?beer mats made from a guitar project offcuts, flamed maple + walnut finished with french polish.
thetyreman
Nordic Pine
I am going to varnish them as well, but yes I agree it's not ideal.Nice. But doesn't beer and condensation off the glass destroy the French polish more or less instantly?
Blackswanwood
Old Oak

Bench hooks - I made two so one can be a support when sawing longer pieces.
Cabinetman
Sequoia
- Joined
- Oct 11, 2020
- Messages
- 5,528
- Reaction score
- 1,231
- Location
- Lincolnshire Wolds + Massachusetts
- Name
- Ian
Nice and practical, do you use pull saws at all? You could shorten the cross batten and turn the B/H round. Or with your end vice you could put another cross batten so that it dropped into the vice slot, then turn it over for pullsaws.
For longer pieces to be cut I have a piece of wood held on by magnets on the L/h side of my hook, always to hand then.
Blackswanwood
Old Oak
No, I only use “western” saws Ian.Nice and practical, do you use pull saws at all? You could shorten the cross batten and turn the B/H round. Or with your end vice you could put another cross batten so that it dropped into the vice slot, then turn it over for pullsaws.
For longer pieces to be cut I have a piece of wood held on by magnets on the L/h side of my hook, always to hand then.
That’s an excellent idea to keep a support piece to hand.
SamQ aka Ah! Q!
Old Oak
Pointed out by our resident oak frame specialist some years ago. Good hidear.
A little case for a Moore & Wright 1200 vernier caliper. I made it from some reclaimed mahogany, from an old piano. Stained with potassium permanganate, finished (roughly!) with shellac. Two pairs of tiny 3mm magnets hold the lid shut.


Dr.Al
Old Oak
That's lovely
duke
Old Oak
Nice, I have never heard of potassium permanganate. I need to look this up.
I used the same wood and the same finishes here:Nice, I have never heard of potassium permanganate. I need to look this up.
Thread 'Slow hand tools centre bit box wip - finished' https://www.thewoodhaven2.co.uk/threads/slow-hand-tools-centre-bit-box-wip-finished.5406/
duke
Old Oak
I'll give it a read tonight. Thanks
Cabinetman
Sequoia
- Joined
- Oct 11, 2020
- Messages
- 5,528
- Reaction score
- 1,231
- Location
- Lincolnshire Wolds + Massachusetts
- Name
- Ian
Really like that Andy, also the no nonsense mounting of the hinges
Mike G
Petrified Pine
Aw cute! You carved a little dog on the lid!A little case for a Moore & Wright 1200 vernier caliper. I made it from some reclaimed mahogany, from an old piano. Stained with potassium permanganate, finished (roughly!) with shellac. Two pairs of tiny 3mm magnets hold the lid shut.
View attachment 31888
View attachment 31889
")
I already had the tiny hinges, salvaged from somewhere, and this seemed the only option. It meant that I could use relatively long screws - 5/8" no 2 - going sideways into the wood. Also, they are stiff hinges, so the lid stays open until you push it shut.Really like that Andy, also the no nonsense mounting of the hinges
Blackswanwood
Old Oak

My first carving …
duke
Old Oak
Very good for your first carving.
Mike G
Petrified Pine
Well done Robert. Excellent. How big is it, and what's the wood?View attachment 31951
My first carving …
The stuff that people don't notice.....the flat bits........are the hardest, aren't they. There's an awful lot of flexibility/ forgiveness in the busy parts of a carving, but the lowered "fields" are tricky.
meccarroll
Nordic Pine
- Joined
- May 12, 2016
- Messages
- 815
- Reaction score
- 180
Once you have mastered the skill required to hand carve you can advance to pretty much anything in woodwork. Very well done.
Blackswanwood
Old Oak
Thanks Mike. I agree. The other challenge for me is knowing when to stop trying to improve it. I expect only practice can cure that.Well done Robert. Excellent. How big is it, and what's the wood?
The stuff that people don't notice.....the flat bits........are the hardest, aren't they. There's an awful lot of flexibility/ forgiveness in the busy parts of a carving, but the lowered "fields" are tricky.
Woodbloke
Sequoia
The Marriage of Prince Genji, a series of three original Japanese woodblock prints dating from around 1850, so late Edo period. They're all arranged in line under the museum quality, non-reflective glass together with a tiny fleck of Bubinga (arrowed):

...which is so small you can hardly see it. But it's there and has to be removed by taking the whole assembly apart and very carefully removing the fleck of dust before re-assembly. Each of the prints is held in place on the mounting board under the glass by a double layer of Japanese acid free, conservation grade tissue paper (£16 for an A1 sized sheet from this place, a stones throw from Victoria St) so that when it's compressed as the tabs are driven in, everything stays put. No tape, no glue.
Not the first time a minute speck of sawdust has meant that I've had to take a picture apart and it won't be the last. This one though, was very, very tricky to do - Rob
Woodbloke
Sequoia
Once you know it's there Andy you (or I) couldn't live with it...it would always, forever and a day just irritateRob, I can't sleep, I think there might be a pea under the bottom of our five feather mattresses... could you pop over and test it please?
Seriously though, hats off to your patience.

I've just been out to remove the brown tape on the reverse side as the longer that stuff's stuck in place, the harder it is to remove. Again, Japanese tape freely available on Amazon and really good stuff - Rob
Rob, I can't sleep, I think there might be a pea under the bottom of our five feather mattresses... could you pop over and test it please?
Seriously though, hats off to your patience.
Dr.Al
Old Oak
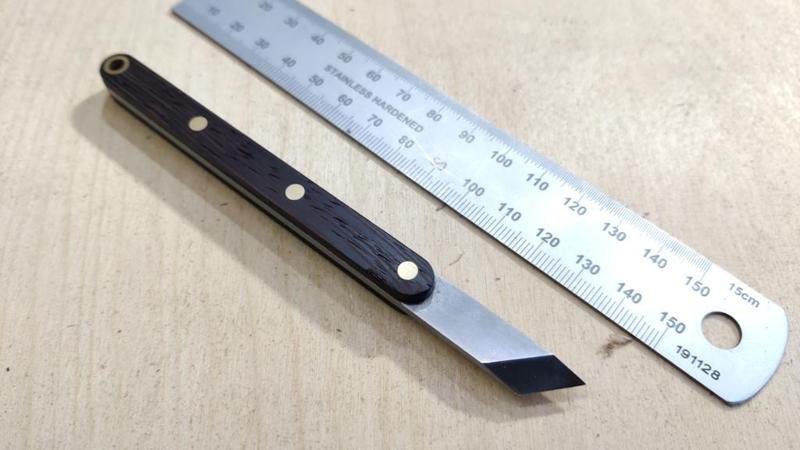
More info in the heat treatment oven thread...
duke
Old Oak
Nice marking knife Al.
NickM
Old Oak
As a break from making the chairs, I've just finished making this pair of candlesticks. (The colour is a bit off in the photos. They look a bit more orange than they are in reality.)

I bought the wood, a board of nicely figured French walnut, thinking I might make some Edward Barnsley style electric lamps but unfortunately the board wasn't quite thick enough. Instead, I made this modified, smaller version as candlesticks.
Other than using the metal lathe for the brass inserts and a pillar drill to drill the holes for them, this was a hand tools only project.
They'll be a 50th birthday present for a friend.
Last edited:
Very classy Nick
Dr.Al
Old Oak
They look really smart. Top job.
Cabinetman
Sequoia
- Joined
- Oct 11, 2020
- Messages
- 5,528
- Reaction score
- 1,231
- Location
- Lincolnshire Wolds + Massachusetts
- Name
- Ian
Very nicely made Nick, but creating those wide flats on the bases - don’t know how I’d do it but a spokeshave wasn’t leaping to mind!I think you've definitely got the hang of using a spokeshave! Very nice pair.
I remembered this thread...Very nicely made Nick, but creating those wide flats on the bases - don’t know how I’d do it but a spokeshave wasn’t leaping to mind!
Edward Barnsley Workshop
I haven't been posting on here much recently, but have still been woodworking. I've actually been doing a pupillage at Edward Barnsley for the past couple of months or so, which has been great fun and extremely educational. I've been woodworking for around 3 years now. I'm entirely self...
Mike G
Petrified Pine
Twenty years ago I wouldn't have known enough to know how difficult those would be to make. To keep the lines neat like this is a real test, and I'm very impressed.As a break from making the chairs, I've just finished making this pair of candlesticks. (The colour is a bit off in the photos. They look a bit more orange than they are in reality.)
View attachment 32104
I bought the wood, a board of nicely figured French walnut, thinking I might make some Edward Barnsley style electric lamps but unfortunately the board wasn't quite thick enough. Instead, I made this modified, smaller version as candlesticks.
Other than using the metal lathe for the brass inserts and a pillar drill to drill the holes for them, this was a hand tools only project.
They'll be a 50th birthday present for a friend.
Woodbloke
Sequoia
Those are exceptionally impressive but I can't help but feel that the effect of molten candle wax running down the stems isn't going to do them any good  - Rob
- Rob
Edit - Andy T's linkie to the EB 'shop is also an excellent read. I'd always wondered how those lamps were made...best not to try them in Paduk!!
- RobEdit - Andy T's linkie to the EB 'shop is also an excellent read. I'd always wondered how those lamps were made...best not to try them in Paduk!!
NickM
Old Oak
Those are exceptionally impressive but I can't help but feel that the effect of molten candle wax running down the stems isn't going to do them any good
I wondered about that, but I think the wax should come off easily enough.