• Hi all and welcome to TheWoodHaven2 brought into the 21st Century, kicking and screaming! We all have Alasdair to thank for the vast bulk of the heavy lifting to get us here, no more so than me because he's taken away a huge burden of responsibility from my shoulders and brought us to this new shiny home, with all your previous content (hopefully) still intact! Please peruse and feed back. There is still plenty to do, like changing the colour scheme, adding the banner graphic, tweaking the odd setting here and there so I have added a new thread in the 'Technical Issues, Bugs and Feature Requests' forum for you to add any issues you find, any missing settings or just anything you'd like to see added/removed from the feature set that Xenforo offers. We will get to everything over the coming weeks so please be patient, but add anything at all to the thread I mention above and we promise to get to them over the next few days/weeks/months. In the meantime, please enjoy!

Time for a new bench (dog holes)

Mike G

Petrified Pine
Joined
Jul 30, 2014
Messages
12,480
Reaction score
3,033
Location
Suffolk
Name
Mike
I got given this old thing by my father in law when I scored my first first class hundred. I'm guessing that puts it somewhere in the early 80s. It was an old schoolbench that his college was throwing out. I've hung on to it way, way too long:


FF4qmU3.png

3U4np4z.png

jtWN7tF.png

SoFNpXI.png

These last few years I have only hung on to it because all of my woodwork history happened on that bench, and I'm rather fond of the memories. It has all sorts of faults which I hope to correct in the new one. For a start, the top is packed up off the base by a couple of bits of 6x2 because it was schoolboy-height:

zZZBJ1W.png

The new bench will be a bit more solid in the undercarriage. It will also be taller, by a fairly substantial 65mm, longer, and with a tool well in a more appropriate location. I have always enjoyed having a shelf behind my bench:

akxv9Ru.png

........and that feature will be repeated and improved. I will have round dog holes so that I can use holdfasts (rather than screwing bits of offcut onto the bench top!). This is what it will look like:

wbv4Hyr.png

.....and this is how the structure works:

gd0MdHB.png

It will have a beech top and front apron (the only apron), but the rest will be made from an old conservatory a friend of mine took down a few years ago. It may be Meranti, but is on the heavy side to be certain of that. I've had it stored in the workshop for years, so it is properly acclimatised (it's the stuff at the top):

N7vZ6dK.png

It's all 125 x 42 actual size, so three of them glued together will give me legs 5" square. Unfortunately it isn't all perfect, so I spent some time sorting out the pile for straight stuff:


dGZ4Igp.png

yYaXBbH.png

Then it was time to pick up a saw:

ZNRKBfN.png

These are the stretchers and cross members supporting the top:

v6sNy6O.png

And these are the legs:

5BZTfXR.png

Then I got called in to sort out the fairy lights.........
 
I got a good half day at this today, so made some progress. The first job, not the most exciting in the world, was to dimension the timber. I started with a hand plane and winding sticks:

OyxkyyP.png

2O0mG4e.png

hcYTGZY.png

I really like those photos, as you don't normally see so clearly what you are doing when planing out wind. Anyway, this is a hybrid exercise, and I then moved to the planer:

WUh8YX2.png

I glued up the legs:

nKaNde1.png

I was then interrupted by a neighbour's escaped dog which got in amongst our chickens and scattered them to the 4 corners of the parish. Two hours later.....

Obviously with hand-tool woodworking, setting out is done from tenon shoulders. So, I started work on the stretchers by knifing the shoulders on the first one, and transferring those marks to all the others in sequence:

5P6d74k.png

I marked out everything then created a knife wall:

pouUjA5.png

By close of play I had all the shoulders cut, and tomorrow I'll remove the cheeks:

dB7WNcM.png
 
I'm not sure of the proper terminology, Roger, but I've heard it called that in Youtube clips. It's where you cut with a knife, then chisel out a little of the waste up to the cut line, and the little cliff you've formed by doing that then acts as a guide for your saw. Doing that should mean never having to adjust your shoulders.
 
Keep the 'photos coming Mike, far more interesting than the faffing about I've been occupying my time with.

As an aside I hope you think carefully before turning on that electric heater, it might be full of dust and shavings and you could end up warmer than you would like. ;)
 
It's on all the time, Bob. I blow it out now and again with an air-line, and the fan in it tends to keep the insides fairly clear of dust. I never leave the heaters on when I leave the workshop, though.
 
Mike G":18wy150p said:
It's on all the time, Bob. I blow it out now and again with an air-line, and the fan in it tends to keep the insides fairly clear of dust. I never leave the heaters on when I leave the workshop, though.

I thought you'd have it sorted Mike. One of my old mates back a long time ago had one go up in flames do to sawdust and shavings, luckily he was there to put it out but I know he used to leave it on when he went in for lunch.
 
I spent some time this morning sawing the tenon cheeks. All my saws are filed rip, so tenon saws are just as at home sawing along the grain as across it, and this one has a fairly large set of teeth. Nonetheless, 8 big tenons (16 cheeks) was quite tiring:

lquEQgC.png

Its kerf is wider than that of this panel saw, which I needed to finish off the cuts:

8POAWSd.png

FfYMR6f.png

lw5c3A0.png

E8VjF6z.png

I also planed up all of the legs, and trimmed an end square to use as a reference for marking out:

Y5r5FKO.png

ee3fGMM.png

On to the mortices. First job was to mark out the reference lines (top of the top rail, and the underside of the bottom rail), and then orient the legs and mark them:

GuYWrSX.png

Deep mortices are a bit of a test of skills, and for this size I definitely prefer to drill away much of the waste:

LeJDD1V.png

I forgot to take a photo of an actual mortice, but I am sure you've seen one before. Anyway, here's some piccies of the dry fit:

Wr8rGJ0.png

YDEksCi.png

zQdMN8d.png

ilsMKbG.png

Trial fits like this are certainly easier when you've allowed for wedges. You've got a bit of wiggle room side-to-side. I don't think I'll get much done tomorrow, but for hand-tool work I'm pleased enough with that progress today.
 
Looks brilliant!

I'm somewhat reassured that you're taking a day off tomorrow, but look forward to seeing it all finished before the mince pies run out! :)
 
That’s some nice solid Maranti there. As ever Mike, I am in awe of the speed at which you achieve things. I started my bench over a month ago and though I’ve started to cut up the 2” Ash for doubling up to make the legs, that’s as far as I’ve got!
Mind you I have started doing it all by hand. Not sure if I have the patience to finish it that way though yet.
Ian
 
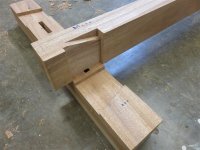
I resumed this morning by chopping out the last 4 mortices in the legs. It's hard to take a decent photo of a mortice, but here's a try:

j7hDSGQ.png

I dry-fitted the other legs and rails:

0jzJ5vA.png

9kHjHEI.png

To give you (and me) an idea of the final construction, I mocked it up quickly:

TvsKtDn.png

aK6QIe8.png

4kSewQR.png

I spent the rest of the day cleaning up those other bits (the stretchers and the cross brace thingies):

COAkiHE.png

XHxeniN.png

The last job of the day was to glue up the double stretcher (for the front of the bench behind the apron):

Q5HkXpt.png
 
That’s going to be a really solid bench.
I was looking at your plan before you started Mike, it looks as though the main front rail is housed into the back of the leg, glue and trenails?
I’m interested as I have a similar problem. I understand you want to set the rail back to enable cramping to the top, that will give you 4”? I have given myself 2” to cramp to so that the set back front rail can be morticed into the legs. What do you think, will a housing resist wracking over time?
Ian
Edit just thought are you making a cross halving there? That would be a lot better at resisting wracking.
 
I'm doing half-housed dovetails for those junctions. They'll be glued and ......not sure yet.....could be trenails, could be coach screws. It could even be both. The main racking resistance, though, will come from the apron which will be housed and wedged onto the front of the legs. The whole thing will be coach-screwed to the wall, so racking isn't a big threat anyway.
 
As usual Mike, I am always interested in the high quality of your work. The sub-structure to my own bench has similar hefty legs, rails and joints, and is absolutely rock solid.
 
Thanks John, Ian, et al.

After cleaning up the doubled up stretcher from its overnight gluing, I marked it with the position of the innermost shoulders. This is the only measuring involved horizontally, because everything is now set out by transfering those marks, and by offering up and marking:

KZj8FeQ.png

I cut the first of many halving joints, on one of the stretchers:

tAFbkxp.png

gUttvlc.png

5pihtgR.png

That's to the paring stage. Note the two router planes in the background, neither of which worked with this joint, unfortunately. The bog oak one is too small, and the other, although big enough, didn't have the reference surfaces in the right places. I reverted to something I did for years before I had a router plane:

WSdFK6X.png

svCFmU2.png

That simple marker shows the high spots, and combined with my No. 10 I soon had a flat face:

m8mseZ6.png

I marked it for a dovetail, and cut it out:

6Er6yOt.png

The next step shows a complete cock-up, but fortunately, no harm was done. I put the stretcher in the wrong location, and marked the dovetail:

hjgNOnI.png

NWumqQ8.png

Luckily the dimensioning of my timber was accurate so when I put the stretcher in its correct location it fitted really well, and by complete luck the joints were the same.

Moving on to the doubled-up stretcher... This was to have a secret halved dovetail joint. Secret only because there is no alternative. The first job was to house out in the same way as above. I then marked for the dovetail:

V7LBraT.png

A few minutes work with a chisel or two, and I soon had half the joint done:

POAw0f1.png

v0CPzx1.png

Offered in place, it fitted nicely. However, it wasn't possible to knife the entire length of the dovetail onto the leg, so half knife, half pencil:

tSTivnq.png

After doing all the stretchers, and offering them into place to mark the joints, I dis-assembled the whole bench to cut out the other halves of all the joints on the legs:

7NBMOGr.png

Ttzy7oj.png

pTv9SmF.png

xH87eTp.png

Fingers crossed, I'll be gluing this lot together tomorrow. And just an note on the meranti. It is really easy to work with, and can produce some pretty crisp surfaces and edges. There are no blemishes at all in any of the timber I've got, so doing decent joints is pretty straightforward.
 
Lovely stuff! I had wondered how you would see to mark that DT but that was fine, don’t think you’ll need anything other than glue Mike those are a good fit and lots of gluing area, they’ll never come adrift.
Ian
That’s a good trick with the depth screw! I shall definitely remember that one.
 
Thanks Ian. I'm looking forward to photos of yours.
 
I'm beginning to think that this bench isn't just designed to be practical to use but to be fun to make, as well.
Great stuff.
 
Spot on, Andy. This will be the only bench I'll ever make, so enjoying the process is a large part of the point.
 
Mike G":305zmww5 said:
Thanks Ian. I'm looking forward to photos of yours.
Oh Hell, no pressure there then haha.
Just arrived back in the us yesterday, I don’t know how you manage to escape to your workshop for what must be quite long periods. Mine always seems to have other plans.
Just realised, I wouldn’t want to detract from your wip, so that gives me a lot more time. Phew wriggled out of that one well!
 
I carried on making the joints in the legs to take the stretchers:

IAPj2hj.png

a86ZFhC.png

Incidentally, here is my workshop sketch working out the secret dovetail halving joint:

FnOpwn9.png

After finishing all the joinery, I had a last minute change of heart and decided to draw-bore peg the main M&Ts so that I could carry on working on the frames immediately after gluing. I drilled the peg holes (1/2"):

oxrooYy.png

After re-assembling the frames I marked up the centre of the holes through the mortices:

UhRS04i.png

On the tenon I then marked a new centre point 2 or 3mm closer to the shoulder (the marked point from the above photo is arrowed):

MlEFx7U.png

I marked up for the slits for the tenon wedges, and drilled a stopping hole at the end:

5DezDjf.png

I then cut the slits for the wedges:

efZnTFA.png

.......and then made the wedges:

08j0UhH.png

tPZWF6k.png

........and the pegs:

Lv1PDx7.png

1Yr9QNA.png

They were finished off with a good waxing:

hGF1tbS.png

The final job before gluing was to chamfer all the necessary edges:

SBTGQDU.png

People were informed I was gluing, and they all know not to disturb me in the process:

Oeg9nVx.png

The pegs pulled all the joints nice and tight:

eIPMlnd.png

Here is one of the tenons before the wedges were added:

EW4Fg1L.png

......and after:

xIOzusZ.png

Here are both frames sturdy and strong, with no clamping necessary:

txn5vAS.png

People arrived at the point, and work came to an abrupt halt.
 
Super WIP, Mike...and those joints ! Tight as a D'sA. :eusa-clap:
 
:lol: :lol: Thanks Roger. Yes, but with dead straight and true stock it's hard to stuff up a joint.
 
I started the day by cleaning up all the wedged tenons, and the pegs, and just a gentle tiffle with the smoother over all of the legs. It's important to remember that this is just a bench, and not a piece of furniture. Given that, these joints are just fine:

HdDBaYL.png

I cut all the legs to their final length, which is not a 5 minute exercise. Then, it was time for a dry assembly for a final check, and mark-up for chamfers etc.:

MryxTg2.png

Then it was time to glue it all together:

cN2oEMT.png

The two bottom stretchers had a batten glued and screwed to their inside faces. These were reclaimed from a bed I picked up on Facebook Marketplace last year:

KnTbxXM.png

Something else I got free was a group of 8 pub tables. They are made of solid heavy wood (someone on here suggested it might be rubber wood), and I had always planned to use them to add weight to the bench. 700 square by 42ish mm thick, they are heavy, heavy, heavy

:

toTiSng.png

CHtFk38.png

iRsEV1k.png

VQFTmdf.png

I trimmed a couple to act as the base of the cupboard:

VgzgY95.png

There is also going to be one on each end, and a couple forming the back of the cupboard. Unfortunately, they are just a little too thick to just slot into the leg frame and screw flat onto the rails, so I have to remove a little from the back first. One nasty long cut entailed clamping a batten as a guide for a tenon saw:

oDmEga9.png

r7BvvZf.png

I think all the woodwork on the base will be finished tomorrow, and there will then be a hiatus until I've bought the beech for the top and apron.
 
Very tidy work. Out of interest why didn’t you run the slope from corner to corner?IMG_8360.jpeg

Looks to mean that you can’t cut the mating interface straight off the saw - needing chiselling out instead?

Threads like this always make me feel I should just bite the bullet and get on with making a new bench
 
Well spotted Tom. That shows an in-workshop change of mind. I was originally going to house out for the cross members which sit on that piece at right angles. The reality is that that would have contributed no strength whatever, so I changed my mind when I saw that junction in a dry fit. And yes, you're right, it did mean chiselling the little remnant outside of a straight saw cut to achieve that cranked slope.
 
Thanks for the explanation, think I follow - glad I’m not the only one that has the occasional change of plan as I go along.
 
—Tom—":zhj20glt said:
Thanks for the explanation, think I follow....

I was expecting to house out rouhgly in this area:

daPeKYE.png

I didn't want to leave a funny little corner, or a void where it cut through the dovetail.

 
Thanks Ben.

Steamed European, Ian, but I'm not sure which country it's going to be from.

I'm tired of always sweeping rubbish up from under my existing bench, so turned the new one upside down to fit a kickboard at the front:

TOMTZX0.png

a55Znas.png

That's only screwed in place so that it can be removed if I need to alter the bench height. I put my name on it on ther underside of a frame member to give the person who eventually takes this bench apart a moment's thought:

SxtxYHh.png

On to the rainwater pipe. Cutting it to length:

n9FVc9T.png

Then cutting out for it in the end panels:

8rzKbaF.png

Xlk2DRX.png

TL0PUN8.png

I tipped the bench up to screw the bottom panels and the back panels in place. My goodness, it was a struggle lowering it into place. It's quite heavy now:

6Q0H42V.png

And viola. This is as far as I can get until I've bought the beech, which might be a few days:

Sp2rZpJ.png

MlG8nVS.png

wA5NzpU.png

From the back:

sMMlA1M.png

.....and with the cross members just standing in place. Again, I can't fix them or the rainwater pipe in place until I've got the top:

CtXNG86.png

AA8SYPf.png
 
I've really enjoyed reading this write-up, thanks for all the details Mike.

Once again I'm extremely impressed, both by the rate of work and also by the quality of the joinery involved. I keep going back and looking at this image:

j7hDSGQ.png

That looks a lot cleaner than any mortice I've ever cut!
 
Back
Top