
-
Hi all and welcome to TheWoodHaven2 brought into the 21st Century, kicking and screaming! We all have Alasdair to thank for the vast bulk of the heavy lifting to get us here, no more so than me because he's taken away a huge burden of responsibility from my shoulders and brought us to this new shiny home, with all your previous content (hopefully) still intact! Please peruse and feed back. There is still plenty to do, like changing the colour scheme, adding the banner graphic, tweaking the odd setting here and there so I have added a new thread in the 'Technical Issues, Bugs and Feature Requests' forum for you to add any issues you find, any missing settings or just anything you'd like to see added/removed from the feature set that Xenforo offers. We will get to everything over the coming weeks so please be patient, but add anything at all to the thread I mention above and we promise to get to them over the next few days/weeks/months. In the meantime, please enjoy!
You are using an out of date browser. It may not display this or other websites correctly.
You should upgrade or use an alternative browser.
You should upgrade or use an alternative browser.
Time for a new bench (dog holes)
- Thread starter Mike G
- Start date

Mike G
Petrified Pine
Dr.Al":225v96cc said:..... I keep going back and looking at this image:
That looks a lot cleaner than any mortice I've ever cut!

Thanks Al. Deep but narrow mortices do take a bit of care to do nicely, because you can't really see what you are doing much of the time. Nonetheless, this wood is extremely easy to chisel neatly, and I've long-established habits with mortices which I'm pretty confident with. As with sharpening, I wouldn't claim that my way is the best way, just that I have made my technique work OK for me.
Cabinetman
Sequoia
- Joined
- Oct 11, 2020
- Messages
- 5,836
- Reaction score
- 1,473
- Location
- Lincolnshire Wolds + Massachusetts
- Name
- Ian
Mike G":ujdur526 said:As per everyone else's bench, Bob.
As enigmatic as ever lol.
There’s something that could represent the drainpipe on your plan but ifs shown at the front not the back.
Anyway I’m sure you’ll enlighten us in due course Mike.
Mike G
Petrified Pine
Everyone has a downpipe in their bench, don't they? It is at the front. Most of the photos of my bench are from the back because I didn't want to have to try to turn this leviathan around to move it into its final position.

You tease!Mike G":1e6rzerq said:Everyone has a downpipe in their bench, don't they? It is at the front. Most of the photos of my bench are from the back because I didn't want to have to try to turn this leviathan around to move it into its final position.
Is it to drain away any negative thoughts? Nah, can't imagine you'd need that.
Maybe it's to store something long, thin and delicate in. Some sort of magic wand, perhaps?


Lons
Old Oak
Mike G":19chuwwd said:Everyone has a downpipe in their bench, don't they? It is at the front. Most of the photos of my bench are from the back because I didn't want to have to try to turn this leviathan around to move it into its final position.
Nope mine doesn't and I haven't seen it's like before. Can only think it's for electric flex or vaccuum hookup or maybe somewhere for the mice to nest (rats in Roger's case
 )
)I've got Covid at the minute so maybe brain fog, at least that's my excuse if by some remote chance it isn't another of your little riddles Mike. :lol:
Mike G
Petrified Pine
Lons":1px1x4jm said:...........if by some remote chance it isn't another of your little riddles Mike. :lol:
Who sir? Me sir???? Noooooo...... :eusa-whistle:
Lons
Old Oak
Mike G":2gjibog5 said:Lons":2gjibog5 said:...........if by some remote chance it isn't another of your little riddles Mike. :lol:
Who sir? Me sir???? Noooooo...... :eusa-whistle:
Yeah I can just picture you in front of the headmaster at school :lol:
I use lengths of drainpipe to store lengths of mouldings, threaded bars, copper pipes etc but 1 certainly wouldn't be enough. :eusa-think:

Weekend worrier
Seedling
Really enjoying following this thread, neatness and precision I can only dream of at my current level of ability! Nice work.

- Joined
- Jul 21, 2014
- Messages
- 10,414
- Reaction score
- 165
I suspect the pipe is for water cooling of the bench given Mike's phenomenally high work rate! :lol:
Bob
Bob

AJB Temple
Sequoia
- Joined
- Apr 15, 2019
- Messages
- 7,850
- Reaction score
- 1,313
Your old bench is in fact quite a bit better than my main bench. I've never had a really nice one. Whilst I would like a nice, smart, sturdy bench, it's just so difficult to justify time spent on that when there are so many other projects my wife has on her list :? :?
Lons
Old Oak
AJB Temple":qmclfqli said:Your old bench is in fact quite a bit better than my main bench. I've never had a really nice one. Whilst I would like a nice, smart, sturdy bench, it's just so difficult to justify time spent on that when there are so many other projects my wife has on her list :? :?
Time for a new wife.
:lol:Cabinetman
Sequoia
- Joined
- Oct 11, 2020
- Messages
- 5,836
- Reaction score
- 1,473
- Location
- Lincolnshire Wolds + Massachusetts
- Name
- Ian
Yes but Adrian, you can’t possibly do that next project without the necessary implements, and after all it only takes a couple of days to make a wonderful sturdy new bench. Doesn’t it Mike!
If it wasn’t for the fact that Mike keeps the work flowing at that pace year after year I might have thought he made it look as though he produced a wip over a few days after spending weeks on it the same as the rest of us. Sorry folks we’re just laggards in comparison.
If it wasn’t for the fact that Mike keeps the work flowing at that pace year after year I might have thought he made it look as though he produced a wip over a few days after spending weeks on it the same as the rest of us. Sorry folks we’re just laggards in comparison.
Mike G
Petrified Pine
Cabinetman":2y07bdb6 said:...... I might have thought he made it look as though he produced a wip over a few days after spending weeks on it the same as the rest of us. .....
:lol: :lol: Live and in real time, as always. I doubt I work faster than anyone else. I just dedicate more time to it than most .
Mike G
Petrified Pine
I didn't mean to go down this path today, but I got a little side-tracked. I thought I would clear the bench and shelf in preparation for building the new bench-top in the next couple of days, and then doing a swap from one bench to the other:

It was a bit of a pain taking the shelf down because of poorly-accessible fixings:

I just carried on unscrewing things. This is one of my planing stops:

I managed to get the top off:

Which gave me a good view of my handiwork from nearly 40 years ago when I packed the top up off the frame with some real quality woodwork:

I popped the vice off:


.........and just kept on undoing things:
The breadboard end looked like it was just through-tenoned:

......but the reason it broke up as I took it apart was that the tenons were wedged:

After clearing my electric tools away from the inside of the bench, this is what was left:

That stuff falls through the dog holes, and it's a problem I aim to reduce in the new bench. Now, I said the workmanship was first rate, didn't I:


Yes, that ply is shuttering ply, and yes, it has concrete on it and is held in place by plasterboard nails.
I pushed the new bench into place, and it rather dwarfs the old one:


Then it was just a case of taking everything off the frame:

And then taking the frame apart until there was nothing left of the original:

It was a bit of a pain taking the shelf down because of poorly-accessible fixings:
I just carried on unscrewing things. This is one of my planing stops:
I managed to get the top off:
Which gave me a good view of my handiwork from nearly 40 years ago when I packed the top up off the frame with some real quality woodwork:
I popped the vice off:
.........and just kept on undoing things:
The breadboard end looked like it was just through-tenoned:
......but the reason it broke up as I took it apart was that the tenons were wedged:
After clearing my electric tools away from the inside of the bench, this is what was left:
That stuff falls through the dog holes, and it's a problem I aim to reduce in the new bench. Now, I said the workmanship was first rate, didn't I:
Yes, that ply is shuttering ply, and yes, it has concrete on it and is held in place by plasterboard nails.
I pushed the new bench into place, and it rather dwarfs the old one:
Then it was just a case of taking everything off the frame:
And then taking the frame apart until there was nothing left of the original:
I spy satisfaction from two directions.
The old bench was well built emough for all the use it had. You can be pleased that you put no more effort into it than was necessary.
But the new one will be evidence of your skills and experience.
Incidentally, I have the same Record bench stop, which I bought 30+ years ago.
It was so simple then - there were no reviews to read, nobody to confer with. I just walked into one of several local toolshops and handed over the cash!
The old bench was well built emough for all the use it had. You can be pleased that you put no more effort into it than was necessary.
But the new one will be evidence of your skills and experience.
Incidentally, I have the same Record bench stop, which I bought 30+ years ago.
It was so simple then - there were no reviews to read, nobody to confer with. I just walked into one of several local toolshops and handed over the cash!
Cabinetman
Sequoia
- Joined
- Oct 11, 2020
- Messages
- 5,836
- Reaction score
- 1,473
- Location
- Lincolnshire Wolds + Massachusetts
- Name
- Ian
Well it’s certainly going to be built better than your old one, but just look at the work that was produced on it.
I think I have sussed out the drainpipe btw.
I think I have sussed out the drainpipe btw.
Woolf
Seedling
“That stuff falls through the dog holes, and it's a problem I aim to reduce in the new bench”
The mystery of the pipe explained
The mystery of the pipe explained
Mike G
Petrified Pine
No, no. The problem of stuff falling through holes will be solved by not having many holes, and having most of them outside the area of the cupboard. The pipe is no mystery. It's there for the same reason everyone has a pipe in their bench.

Trevanion
Old Oak
Mike G":1cixzlns said:Now, I said the workmanship was first rate, didn't I? Yes, that ply is shuttering ply, and yes, it has concrete on it and is held in place by plasterboard nails.
It served a purpose and it was good enough, what more could you ask? Being guilty of it myself, far too many people get caught up in the details that don't matter in the grand scheme of things.
I wonder why there's now a hose poking through the pipe in the bench, which is a universal detail of all benches of course but it's a bit like the saw nib, in that nobody really has a definitive answer why it's there.
Lons
Old Oak
Mike G":3op4mdey said:The pipe is no mystery. It's there for the same reason everyone has a pipe in their bench.
Oh no they don't. :? I thought pantomime season was over.
I'm starting to look at my bench thinking where the hell is the pipe. :lol: I have some drainpipe I could fit just can't fathom why on earth I'd want to.
I'm probably missing a couple of long thin must have workbench contraptions that could be stored in a drainpipe
Cabinetman
Sequoia
- Joined
- Oct 11, 2020
- Messages
- 5,836
- Reaction score
- 1,473
- Location
- Lincolnshire Wolds + Massachusetts
- Name
- Ian
In the other photo the vacuum is placed to the right of the bench, suspect the hose goes through the pipe to connect other vacuum bits to, — gets the suction to the left hand side of the bench. Just why that’s important I don’t have a clue.
Ian
Ian
Mike G
Petrified Pine
(full Aussie mode) You guys are having a lend of me...
:lol: :lol:
OK, I've probably dragged that one out as long as I feasibly can. It's just a place to put the vacuum hose. I have a Henry in the cupboard at the end of the bench, and in the old bench there was a gap under the top I just stuffed the hose into, meaning it sometimes got caught up in the stuff in the cupboard under the bench. This new bench has a pipe into which to the hose gets pushed, just so that it's neatly out of the way. Ian was very close.
:lol: :lol:
OK, I've probably dragged that one out as long as I feasibly can. It's just a place to put the vacuum hose. I have a Henry in the cupboard at the end of the bench, and in the old bench there was a gap under the top I just stuffed the hose into, meaning it sometimes got caught up in the stuff in the cupboard under the bench. This new bench has a pipe into which to the hose gets pushed, just so that it's neatly out of the way. Ian was very close.
Mike G
Petrified Pine
Previously, I had fixed the cross-members in place which will support the top:

Yesterday, I visited Lathams (Purfleet), and bought some beech:

The guy reckoned this was the biggest section of beech on sale anywhere in the southeast of England:


Even in the last two photos you can see that it wasn't flat. Clearly I was going to have to do a bit of work.
For some reason the majority of the timber was sawn, but the 38mm stuff for the apron was planed. I cut it to length:

.........planed up the edges, and glued it (it needs to be 300 wide and Lathams didn't have anything that wide in 1 piece):


For the first time in 40 years or more I am benchless. Not having a vice meant wasting quite a bit of time clamping up supports and stops for planing the edges.
Today, I planed. I planed, and planed, and planed. I sharpened 5 bench planes today, including the number 6 twice.
After cutting the main two boards to length, because I don't want to plane wood I don't need, I offered them in place:

I then started by scrub planning across the grain and at 45 degrees to it with my first choice for that sort of work, which I received a year or two back from Andy T of this parish:

This is why it can remove a reasonable amount of material in short order:

There was a big bow to take out of the board, and it was cupped. I have a long straight piece of aluminium channel which I rub backwards and forwards on boards when I am flattening them. It highlights the highspots with its oxide:

It probably took me 4 hours to plane a reference face onto those two boards. This meant I could then use the planer thicknesser:


This is the opposite side to the one I flattened, but it shows how out-of-true the boards were:

They're gorgeous now, though, but down from around 70mm to 61 thick:

My wife walked in around then and said something like "what beautiful wood. You won't want to be chiselling and chopping on that". I hope it doesn't stay pretty for long. I had a big clear up, then started on the edges:



On to the apron, which I glued last night. I cleaned up one face, and finished with a number 4 taking gossamer shavings:

The junction between the apron and the benchtop will be with a small rebate. After planing all day, I thought this would be a quick and easy job. I started with what I think is a skew moving fillister:


It was quick to set up, and easy to use...........for 2 strokes. Then it clogged. Over and over again:

Possibly it's because I am using it as a rebate plane and the fence is near the sole. But it wasn't that side that kept clogging. Anyway, I tried and tried, but eventually swapped to my combination plane:

As you can see, I made a number of parallel grooves:

I cleaned those up with a number 78 rebate plane:

And then finished off with my number 10:


It's not a lot to show for a whole day's work: 3 flat bits of wood and a rebate. And a couple of bags of this stuff:

Yesterday, I visited Lathams (Purfleet), and bought some beech:
The guy reckoned this was the biggest section of beech on sale anywhere in the southeast of England:
Even in the last two photos you can see that it wasn't flat. Clearly I was going to have to do a bit of work.
For some reason the majority of the timber was sawn, but the 38mm stuff for the apron was planed. I cut it to length:
.........planed up the edges, and glued it (it needs to be 300 wide and Lathams didn't have anything that wide in 1 piece):
For the first time in 40 years or more I am benchless. Not having a vice meant wasting quite a bit of time clamping up supports and stops for planing the edges.
Today, I planed. I planed, and planed, and planed. I sharpened 5 bench planes today, including the number 6 twice.
After cutting the main two boards to length, because I don't want to plane wood I don't need, I offered them in place:
I then started by scrub planning across the grain and at 45 degrees to it with my first choice for that sort of work, which I received a year or two back from Andy T of this parish:
This is why it can remove a reasonable amount of material in short order:
There was a big bow to take out of the board, and it was cupped. I have a long straight piece of aluminium channel which I rub backwards and forwards on boards when I am flattening them. It highlights the highspots with its oxide:
It probably took me 4 hours to plane a reference face onto those two boards. This meant I could then use the planer thicknesser:
This is the opposite side to the one I flattened, but it shows how out-of-true the boards were:
They're gorgeous now, though, but down from around 70mm to 61 thick:
My wife walked in around then and said something like "what beautiful wood. You won't want to be chiselling and chopping on that". I hope it doesn't stay pretty for long. I had a big clear up, then started on the edges:
On to the apron, which I glued last night. I cleaned up one face, and finished with a number 4 taking gossamer shavings:
The junction between the apron and the benchtop will be with a small rebate. After planing all day, I thought this would be a quick and easy job. I started with what I think is a skew moving fillister:
It was quick to set up, and easy to use...........for 2 strokes. Then it clogged. Over and over again:
Possibly it's because I am using it as a rebate plane and the fence is near the sole. But it wasn't that side that kept clogging. Anyway, I tried and tried, but eventually swapped to my combination plane:
As you can see, I made a number of parallel grooves:
I cleaned those up with a number 78 rebate plane:
And then finished off with my number 10:
It's not a lot to show for a whole day's work: 3 flat bits of wood and a rebate. And a couple of bags of this stuff:

I can smell that beech from here.
Is that an electric filament heater catching those shavings? A bit of a hazard?
Is that an electric filament heater catching those shavings? A bit of a hazard?
StevieB
Nordic Pine
Excellent - I presume 'arms like Popeye' are also a side effect of this work!
Mike G
Petrified Pine
Andyp":sjimev4t said:.....Is that an electric filament heater catching those shavings? A bit of a hazard?
It is, but it was off. Normally it's under the bench top overhang so stays clear of shavings etc, but as there is no bench-top yet........
Mike G
Petrified Pine
StevieB":1plbiqk4 said:Excellent - I presume 'arms like Popeye' are also a side effect of this work!
In Mark Knopfler's words....."maybe get a blister on (your) my little finger....."
MattS
Nordic Pine
That beech looks lovely. Good tip with the aluminium oxide to highlight high spots, I like that.
Epic! Extra nice to see that old jack plane doing the sort of work it was made for.
And on a minor point of order, a moving fillister plane registers of the near edge of the work; what you have there is a sash fillister, mostly but not exclusively used to plane glazing rebates.
And on a minor point of order, a moving fillister plane registers of the near edge of the work; what you have there is a sash fillister, mostly but not exclusively used to plane glazing rebates.
Trevanion
Old Oak
Mike G":10zlunmj said:The guy reckoned this was the biggest section of beech on sale anywhere in the southeast of England
Typical Lathams, all hat and no cattle. I've been machining down some 500mm x 75mm Beech boards for the past couple of days, not the European commercial stuff though, and quite heavily spalted. The widest clean piece I've managed to produce is 400mm wide, with the rest being around 150mm to 300mm wide cutting around serious defects, to be glued up for window boards in a chapel.
Cabinetman
Sequoia
- Joined
- Oct 11, 2020
- Messages
- 5,836
- Reaction score
- 1,473
- Location
- Lincolnshire Wolds + Massachusetts
- Name
- Ian
Great work Mike, true about the hat and cattle, mind you I’m not in the SE but large sections are plentiful up here (north Lincs).
Lovely bits of Beech, I didn’t glue the apron into a rebate on mine and regularly wish that I had, so that’s a good move.
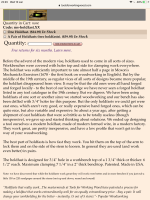
Just a thought I am coming back to the UK at the end of Feb, I could bring a couple of Gramercy holdfasts with me if you are interested, last time I looked they were only available from Germany in Europe, can recommend them.
Ian
Lovely bits of Beech, I didn’t glue the apron into a rebate on mine and regularly wish that I had, so that’s a good move.
Just a thought I am coming back to the UK at the end of Feb, I could bring a couple of Gramercy holdfasts with me if you are interested, last time I looked they were only available from Germany in Europe, can recommend them.
Ian
Cabinetman
Sequoia
- Joined
- Oct 11, 2020
- Messages
- 5,836
- Reaction score
- 1,473
- Location
- Lincolnshire Wolds + Massachusetts
- Name
- Ian
Just looked them up $40+ 6% tax here in PA
johnward
Sapling
Thanks for the progress pics Mike. Some of the most interesting I've seen.
Mike G
Petrified Pine
AndyT":1uueuvsp said:....And on a minor point of order, a moving fillister plane registers of the near edge of the work; what you have there is a sash fillister, mostly but not exclusively used to plane glazing rebates.
Thanks Andy. Hence the pre-set depth stop, I guess.
Mike G
Petrified Pine
Trevanion":3czmz5p5 said:Mike G":3czmz5p5 said:The guy reckoned this was the biggest section of beech on sale anywhere in the southeast of England
Typical Lathams, all hat and no cattle. I've been machining down some 500mm x 75mm Beech boards.....
Superb! I must have rung 5 or 6 timber merchants and sawyers around me, and none could even offer any boards at all 63 thick, other than Lathams.
Mike G
Petrified Pine
Cabinetman":cx48387g said:.....Just a thought I am coming back to the UK at the end of Feb, I could bring a couple of Gramercy holdfasts with me if you are interested......
That's very kind of you Ian, thank you, but I received a pair from Doug last year.
Cabinetman
Sequoia
- Joined
- Oct 11, 2020
- Messages
- 5,836
- Reaction score
- 1,473
- Location
- Lincolnshire Wolds + Massachusetts
- Name
- Ian
Ok right, good to go!
Mike G
Petrified Pine
I have to work sometime, you know, so only got a few hours at this in the afternoon. I started by clamping the apron to the first board of the top, in the rebate:

I was quite a way out of square:

......so I planed the rebate to adjust things. Once everything was right, I screwed them together temporarily (screws as clamps), and sat it in place to do some marking:


This is for a wedged stopped halving joint between the leg and the apron. I knifed and then sawed in the usual way, and then chopped out a rough mortice at the far end of the housing:



This allows you to saw to full depth the whole length of the shoulders:

Because its about 10" from the front edge of the board to the stopped back of the housing, and I didn't have a chisel long enough to reach, a dug out an in-cannel shallow gouge:

Along with my screw depth-marker thing, it did a great job:

I was able to knock the high points off with a long 2" chisel:



Before anyone says I should have used a router...............1/ I'm practising, and having fun, and 2/ it's switch is failing, and it cuts out unexpectedly. I couldn't be bothered with it.
I offered the board into place:

Here is the tapering dovetailed gap for a wedge:

I marked and cut a.....something....not sure what you'd call this joint....:

After screwing everything back together and clamping it carefully into position, I then marked the shoulders of the halving joint on the legs:

I cut the shoulders (after knifing the line), then started the long cut with a tenon saw to keep things accurate:

Before swapping to a handsaw to finish off:


It needed a little tiffling:

.......but came out well after a while:


Next time I get in the workshop I'll do the wedges, and start on the breadboard ends.
I was quite a way out of square:
......so I planed the rebate to adjust things. Once everything was right, I screwed them together temporarily (screws as clamps), and sat it in place to do some marking:
This is for a wedged stopped halving joint between the leg and the apron. I knifed and then sawed in the usual way, and then chopped out a rough mortice at the far end of the housing:
This allows you to saw to full depth the whole length of the shoulders:
Because its about 10" from the front edge of the board to the stopped back of the housing, and I didn't have a chisel long enough to reach, a dug out an in-cannel shallow gouge:
Along with my screw depth-marker thing, it did a great job:
I was able to knock the high points off with a long 2" chisel:
Before anyone says I should have used a router...............1/ I'm practising, and having fun, and 2/ it's switch is failing, and it cuts out unexpectedly. I couldn't be bothered with it.
I offered the board into place:
Here is the tapering dovetailed gap for a wedge:
I marked and cut a.....something....not sure what you'd call this joint....:
After screwing everything back together and clamping it carefully into position, I then marked the shoulders of the halving joint on the legs:
I cut the shoulders (after knifing the line), then started the long cut with a tenon saw to keep things accurate:
Before swapping to a handsaw to finish off:
It needed a little tiffling:
.......but came out well after a while:
Next time I get in the workshop I'll do the wedges, and start on the breadboard ends.